
How To Configure Network Bridge on AlmaLinux 9
Configuring a network bridge on AlmaLinux 9 enables the connection of multiple network interfaces into a single logical interface, facilitating seamless communication between network segments. This is particularly useful in virtualization environments, such as KVM, to allow virtual machines to share the host’s physical network connection.
In this guide, you will learn to Configure Network Bridge on AlmaLinux 9. A network bridge configuration includes connecting two or more network interfaces on a system to create a single logical network interface, known as a bridge. This bridge allows network traffic to pass transparently between the connected interfaces, effectively joining them into a single network segment.
Network bridges are commonly used in scenarios where it is necessary to extend a local area network (LAN) across multiple physical or virtual interfaces, such as in virtualization environments, container networking, or network segmentation.
In this tutorial on the Greencloud website, you will learn to Configure Network Bridge on AlmaLinux 9.
Method 1: Manually Configure Network Bridge on AlmaLinux 9
To Configure Network Bridge on AlmaLinux 9, you must access your server as a non-root user with sudo privileges. For this purpose, you can check the
Now, proceed to the following steps to Configure Network Bridge on AlmaLinux 9.
Step 1 – Install bridge-utils on AlmaLinux 9
First, you need to run the system update with the following command:
dnf update -yThen, you must install the bridge-utils package for managing your network bridges. To do this, run the commands below:
dnf install epel-release -y
dnf install bridge-utils -y
Step 2 – Find Ethernet Interface on AlmaLinux 9
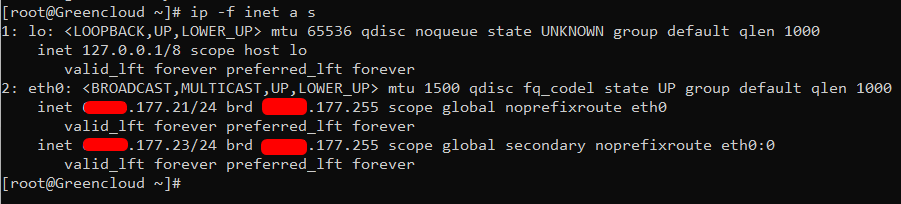
At this point, you must find your physical interface by using the following command:
ip -f inet a sIn this example, eth0 is my physical interface.
Example Output
Step 3 – Configure Ethernet Interface on AlmaLinux 9
At this point, you must edit the network configuration file. To open the file, you can use your favorite text editor, like Vi editor or Nano editor:
nano /etc/sysconfig/network-scripts/ifcfg-eth0Now you need to modify the configuration file for your Ethernet interface, for example, eth0, to include the following lines:
TYPE=Ethernet
BOOTPROTO=none
NAME=eth0
DEVICE=eth0
ONBOOT=yes
BRIDGE=br0
Once you are done, save and close the file.
Step 4 – Create a Bridge Interface on AlmaLinux 9
At this point, you need to create a new configuration file for the bridge interface (br0) in the same directory. To do this, you can run the command below:
nano /etc/sysconfig/network-scripts/ifcfg-br0Add the following lines to the configuration file for the bridge interface (br0):
TYPE=Bridge
BOOTPROTO=none
NAME=br0
DEVICE=br0
ONBOOT=yes
IPADDR=<bridge_ip_address>
NETMASK=<subnet_mask>
GATEWAY=<gateway_ip_address>Note: Remember to set the appropriate values for your network configuration.
When you are done, save and close the file.
Next, restart the network service to apply the changes:
systemctl restart NetworkManager
Step 5 – AlmaLinux 9 brctl Command
At this point, you can verify that the bridge interface is correctly configured and operational by using the brctl command:
brctl show
Also, use the command below to show your current bridges:
bridge linkMethod 2: Configure a network bridge using NetworkManager’s command-line tool, nmcli
Below is a step-by-step guide
Step 1: Identify Network Interfaces
List the available network interfaces to identify the one you want to bridge (e.g., eth0):
nmcli device statusip link
Step 2: Create the Bridge Interface
Create a new bridge interface named br0 using nmcli:
nmcli con add ifname br0 type bridge con-name br0nmcli con show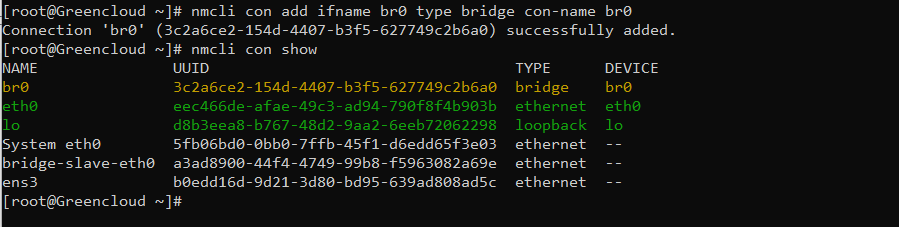
Step 3: Add the Physical Interface to the Bridge
Enslave the physical interface (e.g., eth0) to the bridge as a port:
nmcli con add type bridge-slave ifname eth0 master br0Step 4: Configure IP Settings for the Bridge
Assign an IP address to the bridge interface. You can configure it with a static IP or DHCP, depending on your network requirements.
For Static IP: Modify the bridge connection to set a static IP address, gateway, and DNS. For example:
nmcli con mod br0 ipv4.addresses 192.168.50.228/24
nmcli con mod br0 ipv4.gateway 192.168.50.1
nmcli con mod br0 ipv4.dns "8.8.8.8,8.8.4.4"
nmcli con mod br0 ipv4.method manualFor DHCP: If the bridge should obtain an IP address automatically via DHCP:
nmcli con mod br0 ipv4.method autoStep 5: Disable the Original Interface Connection
To avoid conflicts, deactivate the original connection profile for the physical interface (e.g., eth0):
nmcli con down "Wired connection 1"Step 6: Activate the Bridge
Bring up the bridge connection to apply the configuration:
nmcli con up br0nmcli con show --activeStep 7: Verify the Bridge Configuration
Check the bridge status and its ports:
bridge link show3: eth0: <BROADCAST,MULTICAST,UP,LOWER_UP> mtu 1500 master br0 state forwarding priority 32 cost 100ip addr show br0Step 8: Restart Networking (Optional)
To ensure the configuration persists after a reboot, restart the networking service:
systemctl restart NetworkManagerrebootAdditional Notes
- Bridge Name Customization: You can use a different bridge name (e.g., brr01) instead of br0, but ensure all configuration references (e.g., in BRIDGE= settings) use the chosen name consistently.
- Wi-Fi Limitation: Network bridges cannot be configured over Wi-Fi interfaces in Ad-Hoc or Infrastructure modes due to IEEE 802.11 standards, which use 3-address frames. Use Ethernet interfaces for bridging.
- VM Integration: To use the bridge with KVM virtual machines, specify br0 as the network source when creating VMs. For example, with virt-install:
virt-install --name alma_vm --memory 1024 --disk path=/tmp/alma_vm.img,size=10 --network bridge=br0 --cdrom /path/to/AlmaLinux-9.isoThis connects the VM to the same network as the host via the bridge.
- Firewall Considerations: Update firewall rules to allow traffic through the bridge if necessary. For example, using firewalld:
firewall-cmd --permanent --add-port=br0 firewall-cmd --reloadTroubleshooting:
- If the bridge does not activate, check the NetworkManager logs:
journalctl -u NetworkManager - Ensure the physical interface is not managed by another connection profile.
- Verify the interface is up with ip link show.
- If the bridge does not activate, check the NetworkManager logs:
Conclusion
By following these steps, you can Configure Network Bridge on AlmaLinux 9, allowing you to bridge multiple network interfaces and manage network traffic. Make sure to adjust the configuration settings according to your specific network requirements. Hope you enjoy it.
