How to Use iPerf to Test Network Speed and Bandwidth on Linux
In this tutorial, you will learn how to use iPerf3 to measure throughput and simulate network loads on your networking infrastructure. iPerf3 is a useful, simple command-line tool for testing network throughput and performance. We will provide step-by-step instructions as well as a few common examples and use cases of ways to effectively use iPerf in your environment.
The tutorial was tested with our “Ubuntu 24.04” templates and is meant to work on our self-managed virtual private servers.
1. Install iPerf on Linux
# apt install iperf3
If you want to use your Linux host as the iperf3 server, you need to open the TCP/UDP ports 5201 in firewalld (or iptables):
# firewall-cmd --permanent --add-port=5201/udp
# firewall-cmd --permanent --add-port=5201/tcp
# firewall-cmd --reload
2. How to use iperf3
When renting a server or a VPS and being committed to 1 Gbps bandwidth, you need to determine whether the bandwidth is as committed. You can use the iPerf tool to test the connection
Connection model:
- 1 machine called client -1 Gbps bandwidth
- 1 machine called server – 1 Gbps bandwidth
Test with TCP Protocol
– On the server-mode machine, run the following command:
Syntax to start iPerf server-side:
# iperf3 -s -p <port>
- p: Specifies the listen port. If no -p option is given, the default listen port is 5001.
Now the server is open and listening to TCP port 5201

– On VPS client-mode, run the following command to connect to the server:
Syntax to start iPerf client-side:
# iperf3 -c <dst - ip> [ options ]
Note: replace server with the server’s IP address or domain
# iperf3 -c <dst - ip> -p < port>
- p: specify a port destination on the iPerf server.
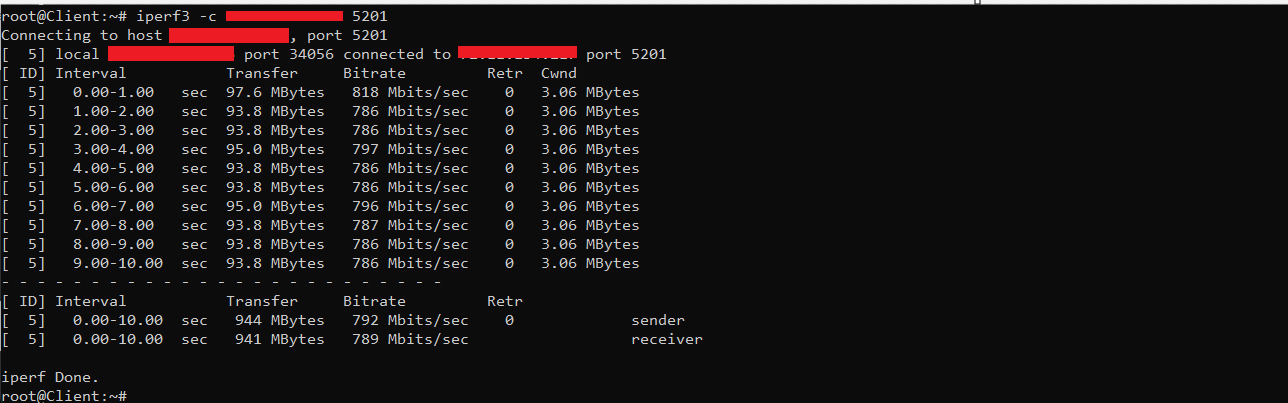
Above is the result of connecting from the VPS Client to the VPS server and the result returned is about 786 Mbits/sec.
- At this time, the server side will also see similar results:
- On the VPS acting as the iPerf server, to stop receiving connections, press the key combination Ctrl + C
- As the result returned by iperf3, the bandwidth of the server and the VPS client both reach <1 Gbps. This proves that the VPS service provider has met the bandwidth commitment for the Customer to use.
Test with UDP Protocol
Similar to the TCP protocol, we also start the UDP server on VPS to act as server-mode
# iperf3 -s -p < port>
The client-mode side executes the command:
# iperf3 -c < dst - ip > -p < port> -u -b 100M
- dst-ip: IP of VPS server-mode
- u: create a UDP Protocol connection
- b: by default iPerf sets the default UDP connection limit to 1.05Mb/s. Therefore we need to turn on the -c flag with the max BW we want to test – in the example above it is 100M or you can replace it with parameter 0 for unlimited
Default

After enabling the bandwidth limit you want to test to 100M

Some other common iPerf options
# iperf -c <dst - IP> -u -b 1000m -i 0.5 -t 100 -m
Command parameter explanation:
- c: host address of iPerf server
- u: use UDP protocol
- b: maximum bandwidth value is 1000 Mbits/sec
- i: time interval between 2 result reports in seconds (0.5s)
- t: time to push traffic in seconds (100s)
- m: print MTU header
Conclusion
So Greencloud has guided you through how to perform a test on the network performance of a virtual server/physical server. Wish you success.
Good Luck!

