How to change your DNS setting on Window/Linux/Mac
1.Introduce
If you’ve never changed your DNS address, you’re probably still using the one given to you by your ISP. It’s really easy to change the DNS server and by doing so, you can enhance the privacy and security (and speed, to some extent) of your device.A DNS is a string of numbers that you’ll need to enter in your device so it can connect to the internet. For example, Google DNS address is 8.8.8.8 and 8.8.4.4. It’s very popular and is easy to remember.Changing your DNS settings is a simple process. However, before you change it, save the current DNS settings so if something doesn’t work, you can easily switch back to the old numbers.There are several public DNS servers that you can use such as Google Public DNS,CloudFlare,OpenDNS, OpenNIC, Comodo Secure DNS.
2. How to change DNS
On Window:
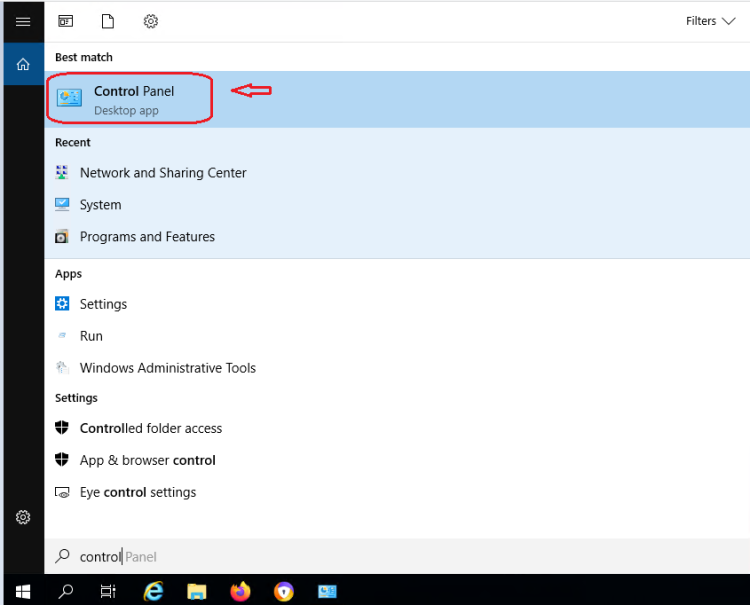
Step 1: Go to the Control Panel
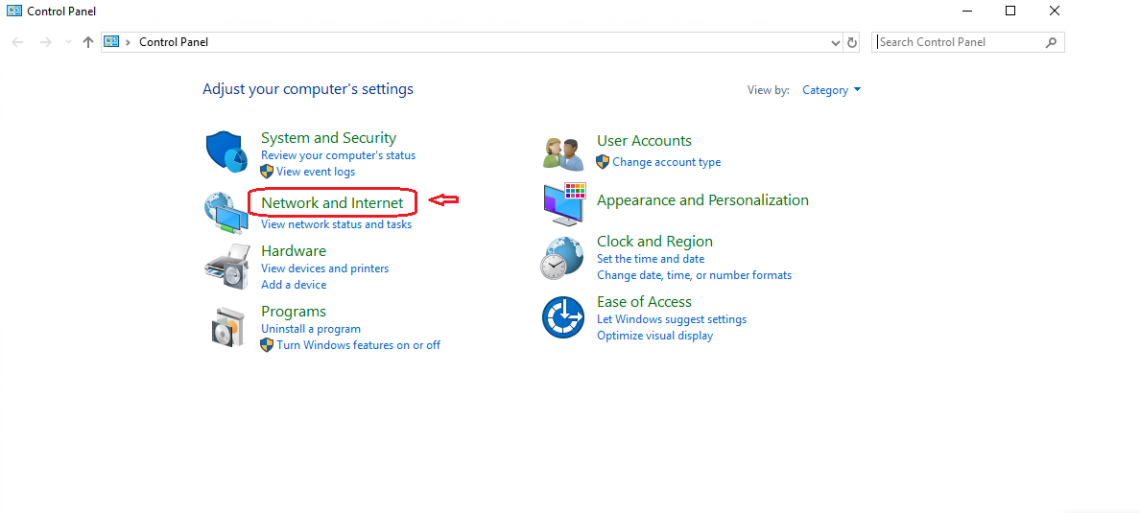
Step 2 : Click on Network and Internet
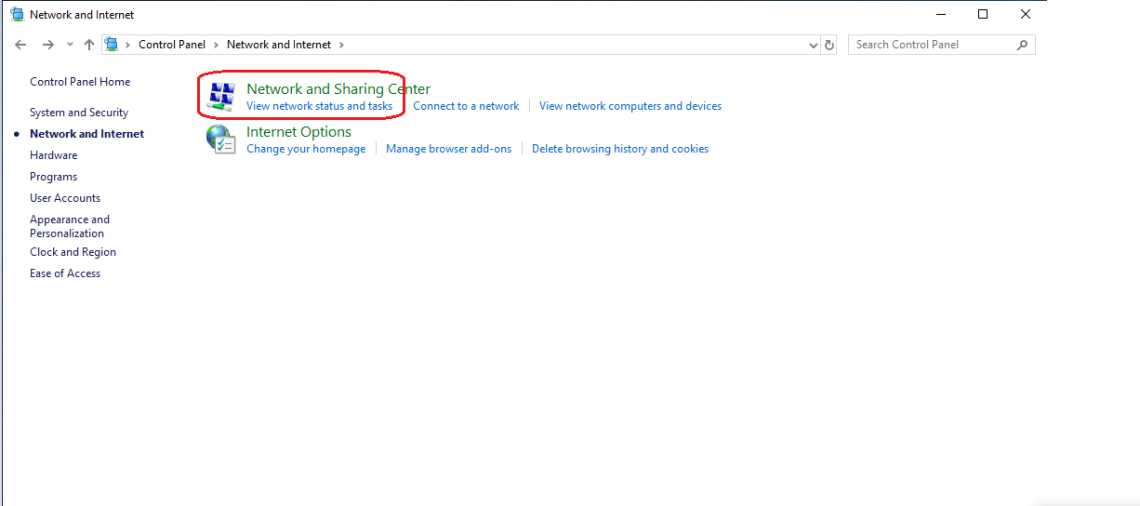
Step 3: Click on Network and Sharing Center
Step 4 Go to Change Adapter Settings
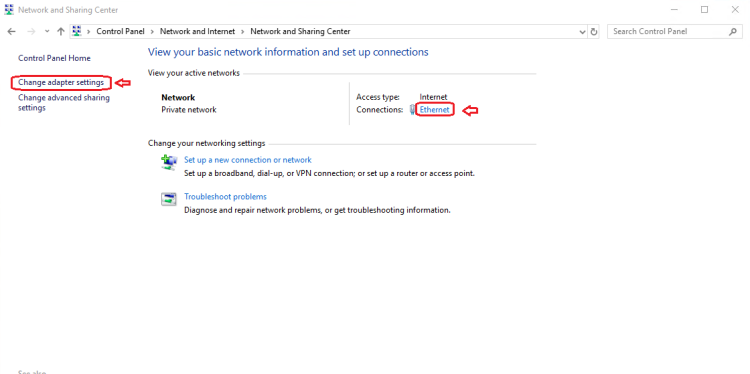
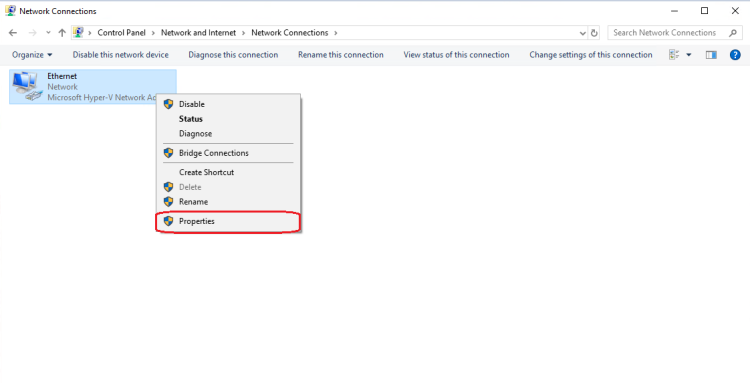
Step 5 You will see some network icons here. Select the network you’re currently connected to and right click on it. Select Properties.
Step 6:Click on IPv4 and select Properties
If “Obtain DNS server address automatically” is selected, click the radio button next to “Use the following DNS server addresses:” >enter the DNS addresses you want to use
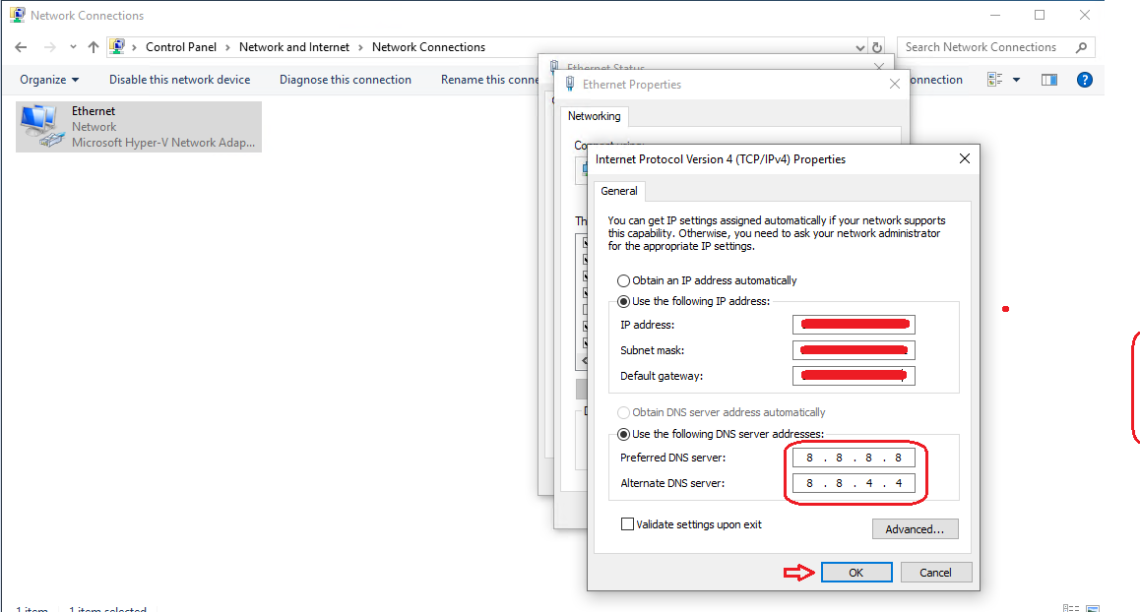
Note: You can also enter only a preferred DNS server, replace the preferred DNS server from one provider with a secondary DNS server from another, or enter more than two
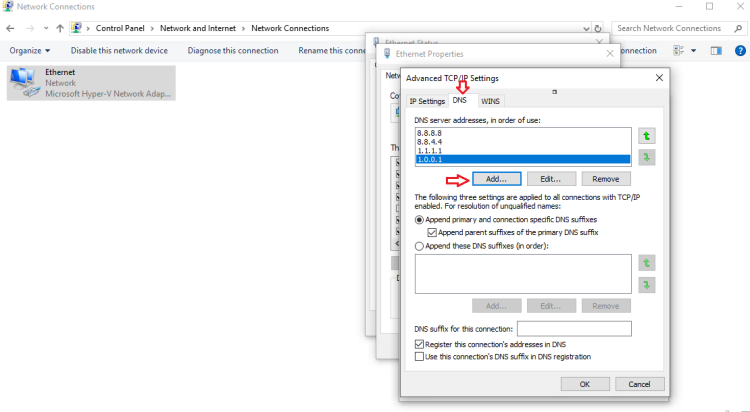
Step 7: DNS servers using fields in the DNS tab (select Advanced to enter multiple DNS servers) >click on Ok and Close.
On Linux
The DNS configurations are stored in a file named resolv.conf. Here is a step-by-step guide to change it
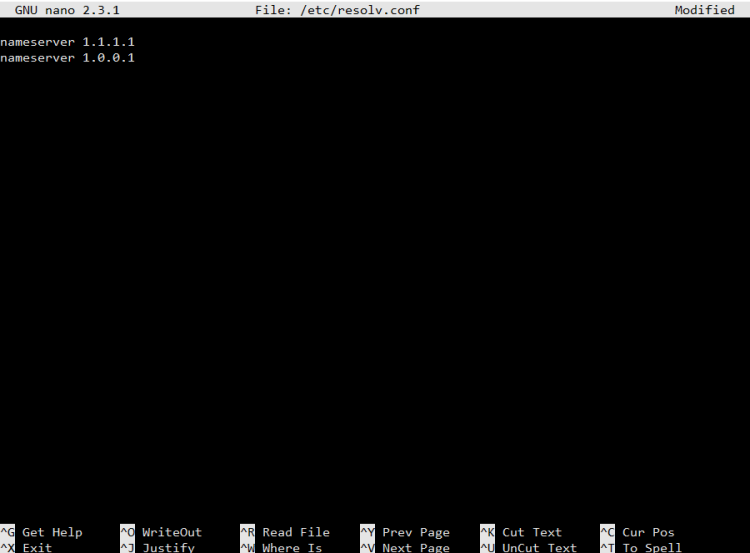
Step 1: Open /etc/resolv.conf
$ nano /etc/resolv.conf
Step 2: Add the lines for Domain nameservers you want to use. For example, if you want to use DNS CloudFlare(1.1.1.1 and 1.0.0.1) as your DNS, add it to the file
Step 3: Save resolv.conf. If you are using nano to edit the file, press Ctrl + X and then Y when it asks you to save the file
On MAC OS
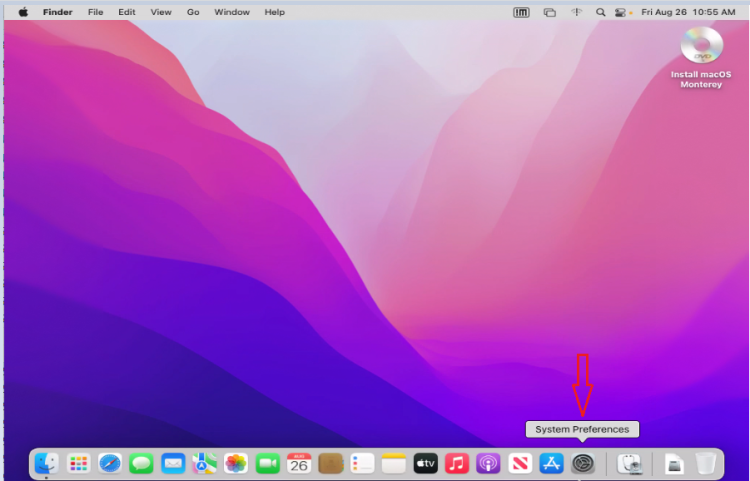
Step 1: Go to the Apple menu and select “System Preferences”
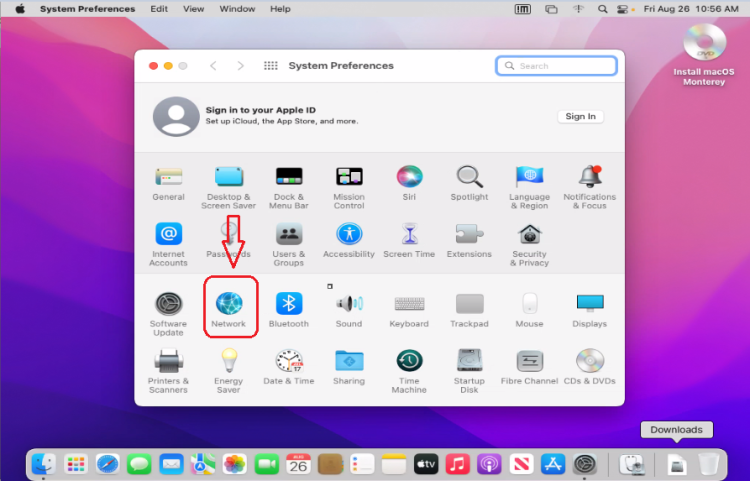
Srep 2: Choose the “Network” control panel
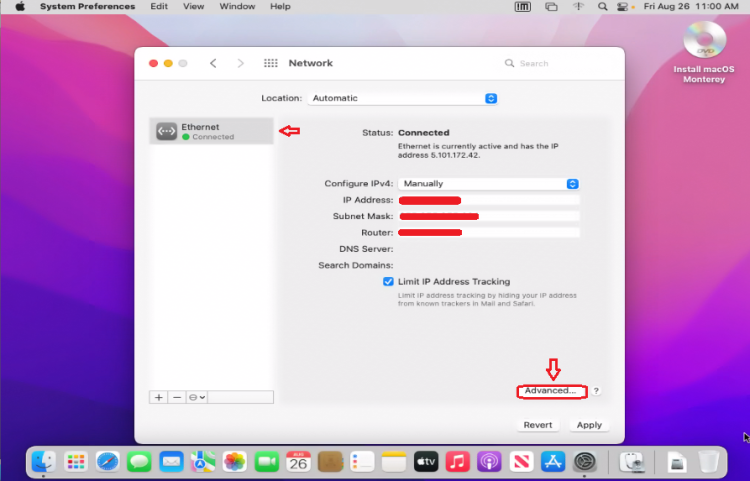
Step 3: Select your network interface from the left side ( “Ethernet” for example)
Step 4: Click the “Advanced” button in the lower right corner of the Network window
Step 5: Choose the “DNS” tab at the top of the screen to edit, add, or remove DNS
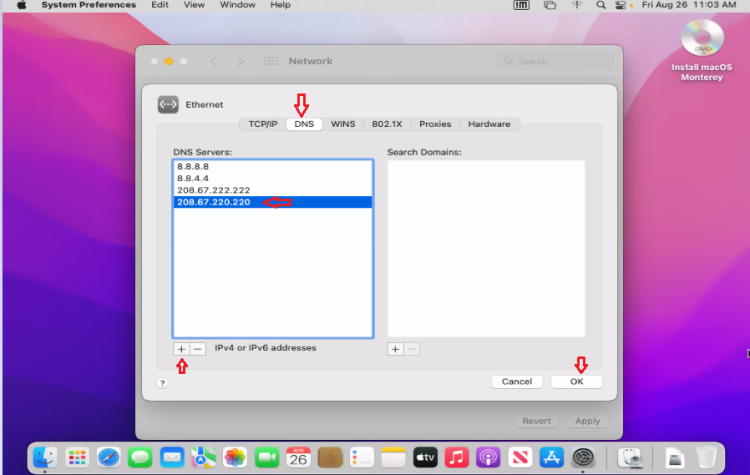
- Add a new DNS server: click on the [+] plus button.
- Edit an existing DNS server: click twice on the DNS IP address you wish to change.
- Remove a DNS server: select a DNS server IP address and then click either the [-] minus button or hit the delete key.
> when finished making changes to the DNS settings, click on the “OK” button.
Step 6: Now click on “Apply” for the DNS changes to take effect, close out of System Preferences as usual.
The topmost DNS servers will be accessed first, so you’ll want to put the best performing servers near the top of the list for the best results.
In the screenshot examples above, Google DNS servers (8.8.8.8 and 8.8.4.4) are placed above the OpenDNS servers, both of which are faster than ISP provided DNS servers
3. How to check which DNS is in use ?
On Window
-Check all added DNS
The easiest way to determine what DNS server you’re using is via Windows Command Prompt. Click on Start and search on Command prompt >enter
Type “ipconfig /all” followed by Enter. You’ll get a lot of information:
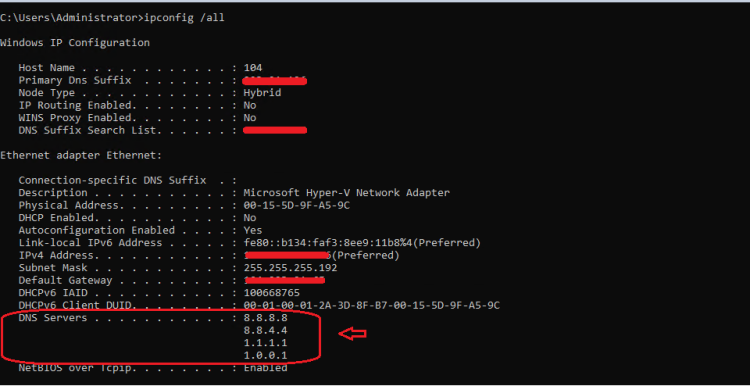
In the midst of all that information, you can see “DNS Servers” listed. Typically, there are multiple servers that provide backup access if one fails to respond.
-Check DNS is being used
Open “Command Prompt and type ” nslookup” then enter You’ll get a lot of information:

-> DNS being used is 8.8.8.8
On Linux :
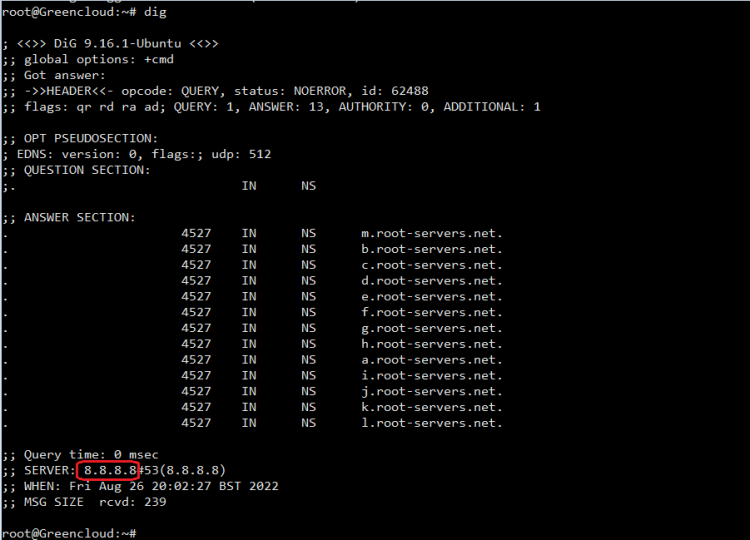
You can install and use the “dig” to check:
+ Ubuntu/Debian:
$ apt install dnsutils
+ Centos:
$ yum install bind-utils
>Then run dig command:
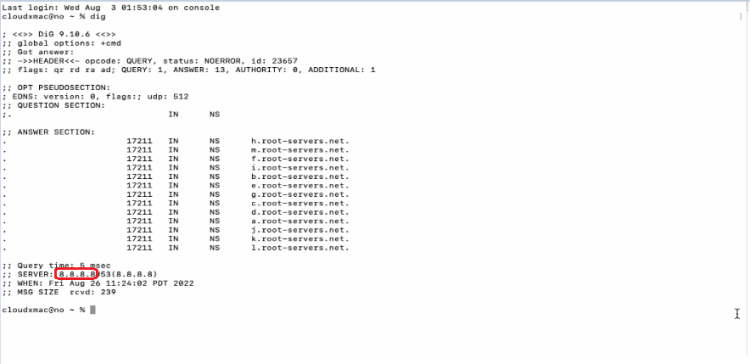
On MAC OS:
Same as on linux, you can open Terminal and run dig command to check:
4. Commonly used DNS
| DNS Provider | Preferred DNS | Alternate DNS |
| Cloudflare | 1.1.1.1 | 1.0.0.1 |
| Google Public | 8.8.8.8 | 8.8.4.4 |
| OpenDNS | 208.67.222.222 | 208.67.220.220 |
| Verisign | 64.6.64.6 | 64.6.65.6 |
| DNS.WATCH | 84.200.69.80 | 84.200.70.40 |
| OpenNIC | 50.116.23.211 | 192.99.240.129 |
| Dyn | 216.146.35.35 | 216.146.36.36 |
| DNS Advantage | 156.154.70.1 | 156.154.71.1 |
| SafeDNS | 195.46.39.39 | 195.46.39.40 |
| Comodo Secure | 8.26.56.26 | 8.20.247.20 |
| Norton ConnectSafe | 199.85.126.10 | 199.85.127.10 |
| GreenteamDNS | 81.218.119.11 | 109.88.198.133 |
| SmartViper | 208.76.50.50 | 208.76.51.51 |
| AlternateDNS | 198.101.242.72 | 23.253.163.53 |
| Yandex.DNS | 77.88.8.8 | 77.88.8.1 |
-You can see the details of Public DNS in any location in the world here to change to suit your needs: Public DNS Server List

