How to install Icinga2 and Icinga Web 2 on Ubuntu 22.04
Mastering your infrastructure means understanding why, when, and how significant changes occur in devices or critical services. Adequate monitoring of core resources within your organization alleviates fear, speculation, and panic, replacing them with systematic, organized, and informed responses to any unusual or catastrophic events. Achieving this requires equipping the stewards and custodians of infrastructure with the right tools. One such tool that enhances the daily support and maintenance of servers and services is Icinga.
According to their comprehensive website, Icinga is a monitoring system that checks the availability of your network resources, notifies users of outages, and generates performance data for reporting. Designed with scalability and extensibility in mind, Icinga can monitor large, complex environments across multiple locations through Distributed Monitoring. To leverage this monitoring product, we will set up Icinga 2 and Icinga Web 2 on Ubuntu 22.04.
Icinga 2 serves as the monitoring server, and Icinga Web 2 provides a clear, convenient, and comfortable browser-based view of system activities. Configuration can be easily managed using Icinga Director, configuration management tools, or plain text within the Icinga DSL. Let’s begin by setting up Icinga 2.
Install and Configure Icinga 2 on Ubuntu 22.04
This stage will take up the onus of step-by-step installation of Icinga 2. Empecemos.
Step 1: Update and install essential applications
We shall start from a clean and well-updated server with the latest software.
apt update && apt upgradeInstall essential applications we shall need throughout the installation process.
apt install -y vim apt-transport-https wget gnupgStep 2: Add Icinga Package Repository
We will need to add the Icinga repository to our server package management configuration as shown below.
wget -O - https://packages.icinga.com/icinga.key | apt-key add -
. /etc/os-release; if [ ! -z ${UBUNTU_CODENAME+x} ]; then DIST="${UBUNTU_CODENAME}"; else DIST="$(lsb_release -c| awk '{print $2}')"; fi;
echo "deb https://packages.icinga.com/ubuntu icinga-${DIST} main" | tee /etc/apt/sources.list.d/${DIST}-icinga.list
echo "deb-src https://packages.icinga.com/ubuntu icinga-${DIST} main" | tee -a /etc/apt/sources.list.d/${DIST}-icinga.list
Then update the server to get packages from the newly added repository.
apt updateStep 3: Install Icinga2 packages
Now that we have the official Icinga repository, we can install Icinga 2 by using the apt package manager to get the icinga2 package as below.
apt install icinga2 -yStep 4: Setting up Check Plugins
Without plugins, Icinga 2 does not know how to check external services. The Monitoring Plugins Project provides an extensive set of plugins that can be used with Icinga 2 to check whether services are working properly. The recommended way of installing these standard plugins is to use Ubuntu’s package manager as shown below.
apt install monitoring-plugins -yAfter that is done, start and enable icinga2
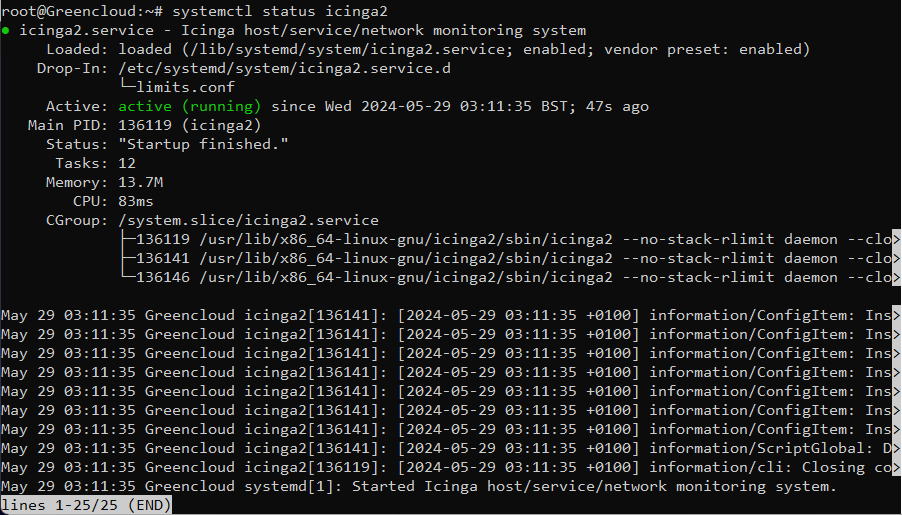
systemctl enable --now icinga2And check its status
$ systemctl status icinga2
Step 5: Install Database and configure IDO MySQL
The Database Icinga Data Output (DB IDO) feature for Icinga 2 takes care of exporting all configuration and status information into a database. Let us install MariaDB and the Database Icinga Data Output.
apt install mariadb-server mariadb-clientAfter that, get DB IDO installed as below.
apt install icinga2-ido-mysql -yYou will see prompts during installation, choose “<Yes>” in the first.
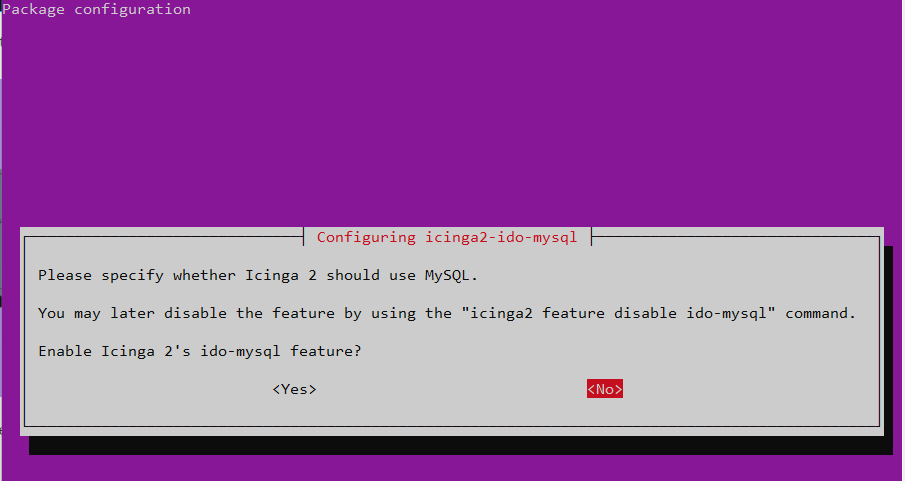
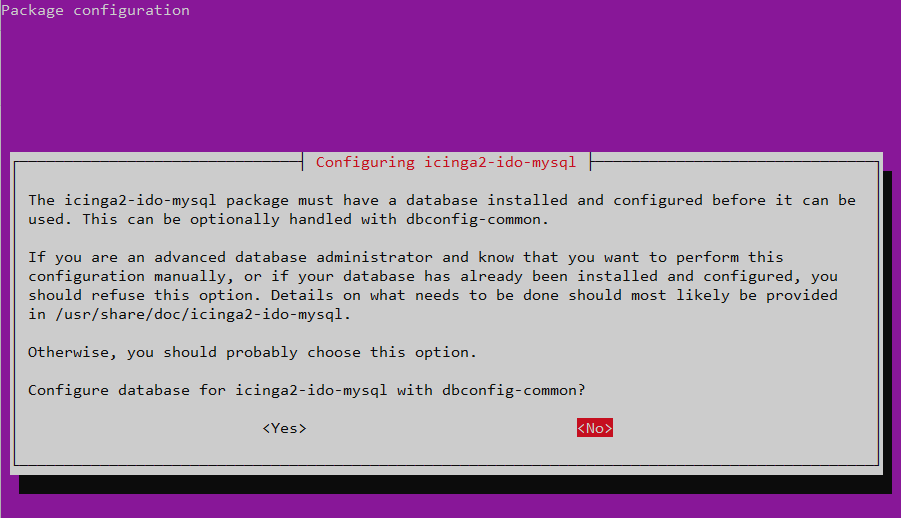
In the second prompt, choose “<No>” since we already have installed and configured the Database.
Next, create a database and user for Icinga2. You are free to name your database and user differently and ensure you use a safe password.
$ mysql -u root -p
CREATE DATABASE icinga;
GRANT SELECT, INSERT, UPDATE, DELETE, DROP, CREATE VIEW, INDEX, EXECUTE ON icinga.* TO 'icinga'@'localhost' IDENTIFIED BY 'Green@1234';
FLUSH PRIVILEGES;
quit
After creating the database you can import the Icinga 2 IDO schema using the following command. Enter the root password into the prompt when asked and give it some time to complete.
$ mysql -u root -p icinga < /usr/share/icinga2-ido-mysql/schema/mysql.sql
Enter password: <Enter-your-root-password>
Step 6: Enable the IDO MySQL module
The package provides a new configuration file installed in /etc/icinga2/features-available/ido-mysql.conf. Update the database credentials in this file.
$ nano /etc/icinga2/features-available/ido-mysql.conf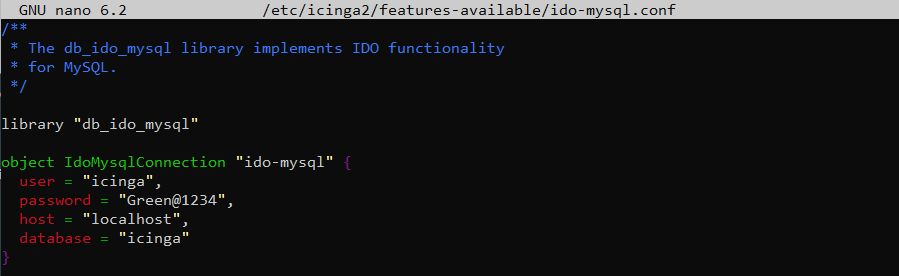
Next, enable the ido-mysql feature configuration file using the icinga2 feature as follows:
$ icinga2 feature enable ido-mysql
Enabling feature ido-mysql. Make sure to restart Icinga 2 for these changes to take effect
Restart Icinga 2 as adviced.
systemctl restart icinga2Step 7: Setting Up Icinga 2 REST API
Icinga Web 2 and other web interfaces require the REST API to send actions (reschedule check, etc.) and query object details. Being important, we need to activate the API.
Enable the API feature using the icinga2 cli command like this:
icinga2 api setupSample output when the command above is run is shown below
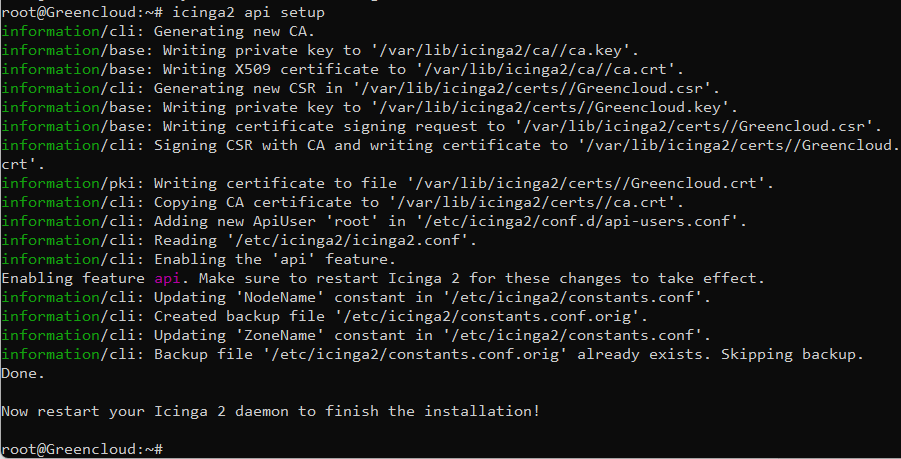
The above command will not only enable the API feature but will set up certificates and a new API user root with an auto-generated password in the /etc/icinga2/conf.d/api-users.conf config file.
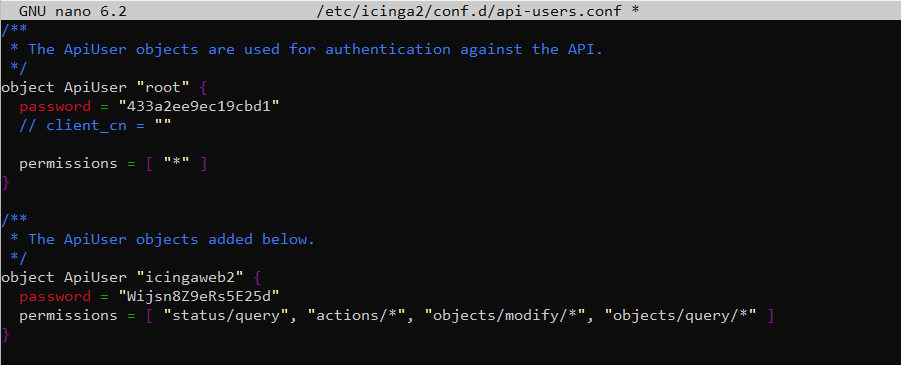
Edit the /etc/icinga2/conf.d/api-users.conf file, add a new ApiUser object below the auto-generated one, and specify the permissions attribute with minimal permissions required by Icinga Web 2.
$ nano /etc/icinga2/conf.d/api-users.conf
/**
* The ApiUser objects added below.
*/
object ApiUser "icingaweb2" {
password = "Wijsn8Z9eRs5E25d"
permissions = [ "status/query", "actions/*", "objects/modify/*", "objects/query/*" ]
}
Note that this API will be listening on port 5665 by default.
A screenshot of the whole configuration file is shared below for clarity
Restart Icinga 2 to activate the new configuration made.
systemctl restart icinga2Install and Configure Icinga Web 2 on Ubuntu 22.04
Icinga 2 can be used with Icinga Web 2 and a variety of modules to make the monitoring experience notches higher. This part illustrates how to set up Icinga Web 2.
Step 1: Add Package Repository
The preferred way of installing Icinga Web 2 is to use the official package repository. Note that if you are installing Icinga Web 2 on the same server as Icinga 2, there is no need to add the repositories once again. On the other hand, if you intend to install Icinga Web 2 on a separate Ubuntu server, then you will have to do Step 1 and Step 2 in Setting up Icinga 2 stage 1 above.
Step 2: Install Icinga Web 2
We shall use the apt package manager to retrieve and install the icingaweb2 package. Below is the command we will run to accomplish this. You will note additional packages icingacli and libapache2-mod-php. libapache2-mod-php is cool for Ubuntu since it makes Icinga Web 2 work out-of-the-box without touching PHP FPM. Additionally, your web server should be up and running after the installation of Icinga Web 2. This is only in Ubuntu|Debian installation.
apt install icingaweb2 libapache2-mod-php icingacli -yStep 3: Prepare Web Setup
To prepare for web setup, we will have to manually create a database and a database user. If you are on a separate server, you will have to install MariaDB|MySQL for this part. Kindly use How To Install MariaDB on Ubuntu 22.04 (Focal Fossa) to set it up quickly. If you are on the same server, skip the link and proceed to add the database user.
$ mysql -u root -p
CREATE DATABASE icingaweb2;
GRANT ALL ON icingaweb2.* TO icingaweb2@localhost IDENTIFIED BY 'Green@1234';
FLUSH PRIVILEGES;
quit
After you are done we shall continue to set up Icinga Web 2 quickly and easily with the Icinga Web 2 setup wizard which is available the first time you visit Icinga Web 2 in your browser. When using the web setup you are required to authenticate using a token. To generate a token we shall use the icingacli tool available for us as shown below.
$ icingacli setup token create
The newly generated setup token is: d6ac1b878e8cfef3
You can later display the token using the icingacli:
icingacli setup token showIf you have a firewall, allow port 80 or 443 (if you are using https)
ufw allow httpStep 4: Starting Web Setup
Finally, visit Icinga Web 2 in your browser to access the setup wizard and complete the installation: http://[domain-name-or-ip-address]/icingaweb2/setup.
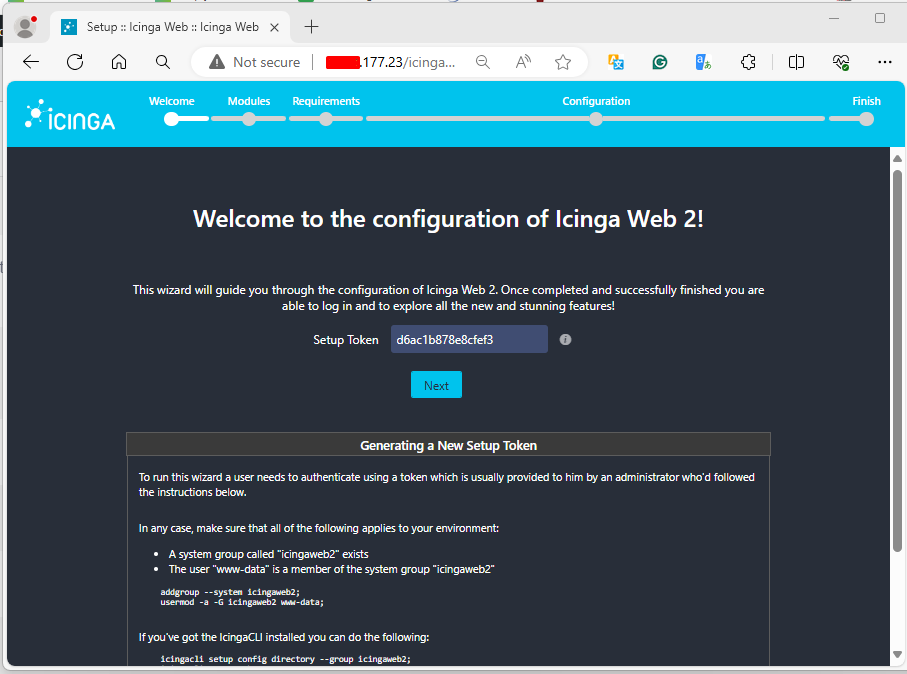
That will launch the web interface where we will complete the Icinga Web 2 setup. In the first page illustrated below, you will be asked to enter the token we created in the step just before this. Copy your token and paste it in then click “Next”
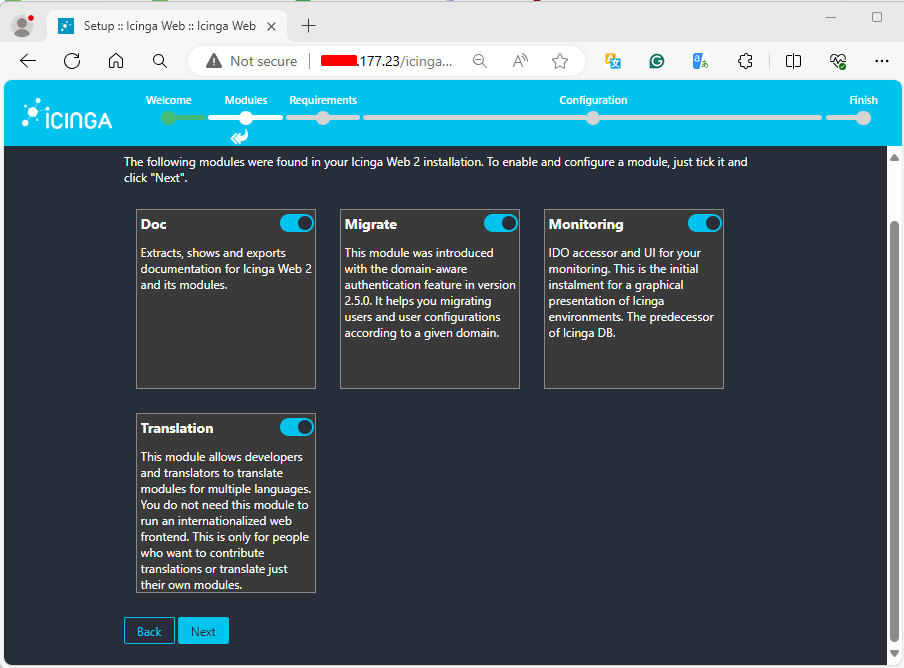
Modules
Page two prompts you to activate the other modules that the Icinga team put together. If you will find them helpful, simply activate them then click “Next” for the next step.
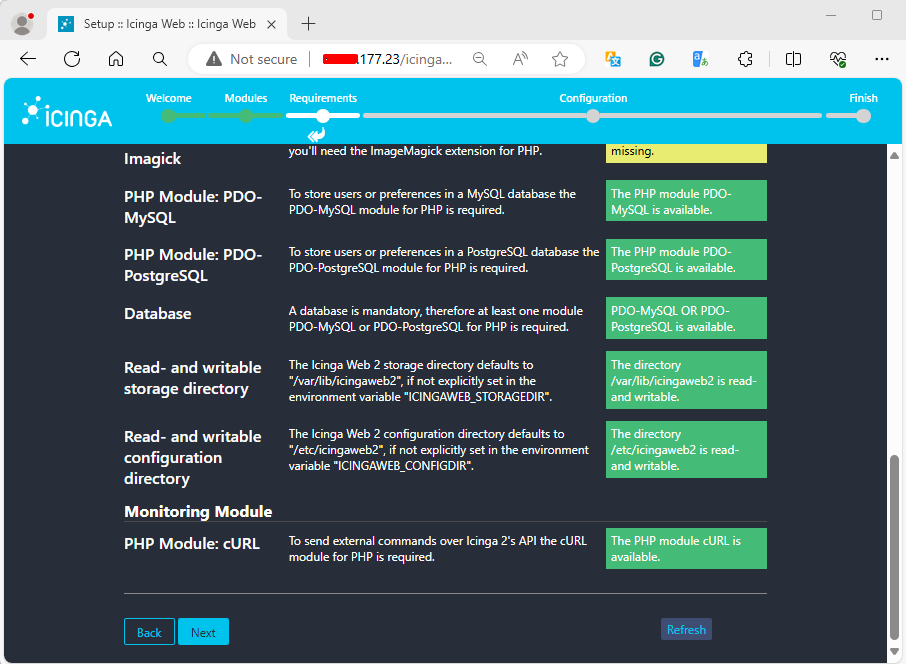
PHP Modules
The page that follows shows you the PHP modules that are available and the ones that are missing. Click “Next”.
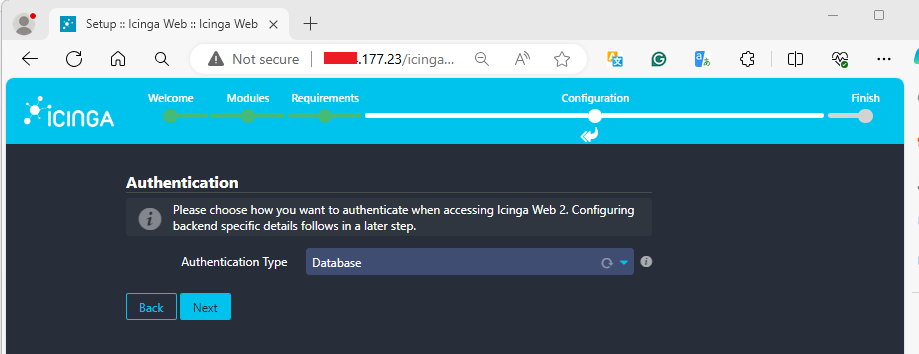
Configure Authentication Type
What comes next is choosing the Authentication type you will use. If you have an LDAP implementation or would like to use a Database, choose the one that will suit your needs here from the drop-down list. Hit “Next” once done.
Depending on what you selected in the previous step, you will be presented with a form to fill in the details Icinga Web 2 needs to authenticate users. This guide will be using a Database. Enter the DB details we keyed in Step 3 Stage 2. After you are done, you can click “Validate Configuration” to cross-check whether the details you entered are correct. Click on “Next” when done.
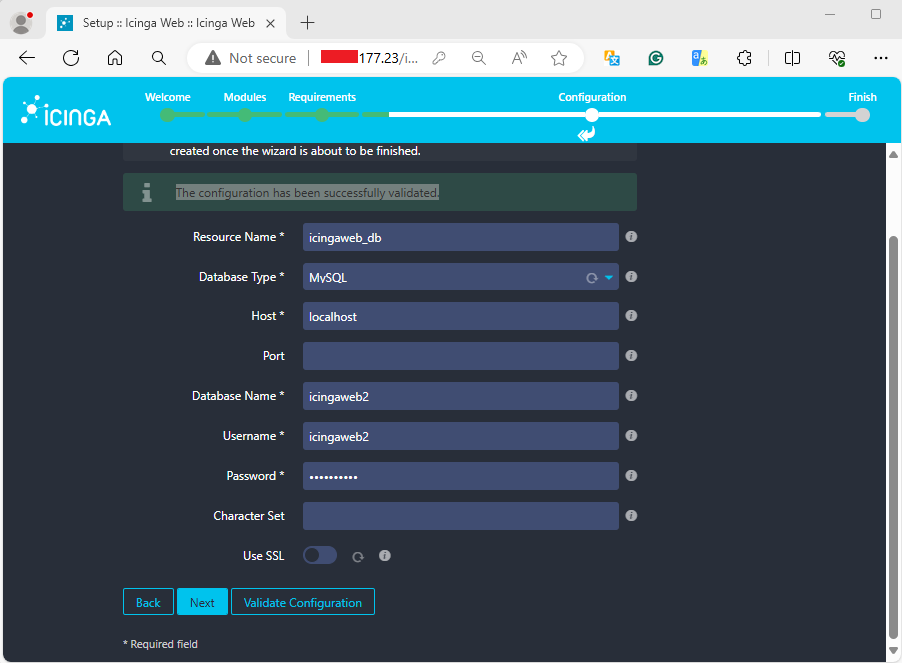
Message displayed: The configuration has been successfully validated.
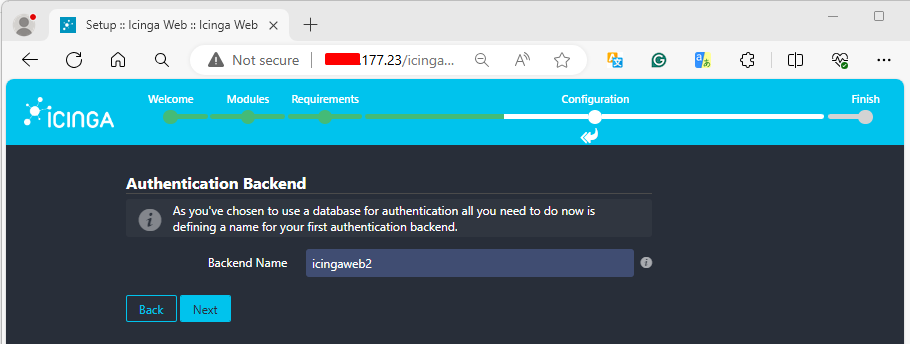
Authentication Backend
The next page will ask you to give a name to your backend.
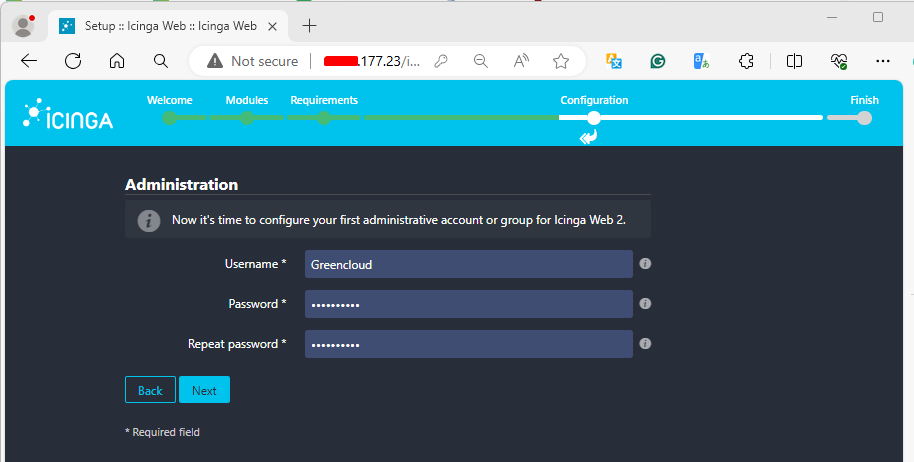
Add an administrative user
Next, we shall add an Administrative user that we will use to log into Icinga web 2 once the setup is done, It is through this account that we shall be able to create others as well.
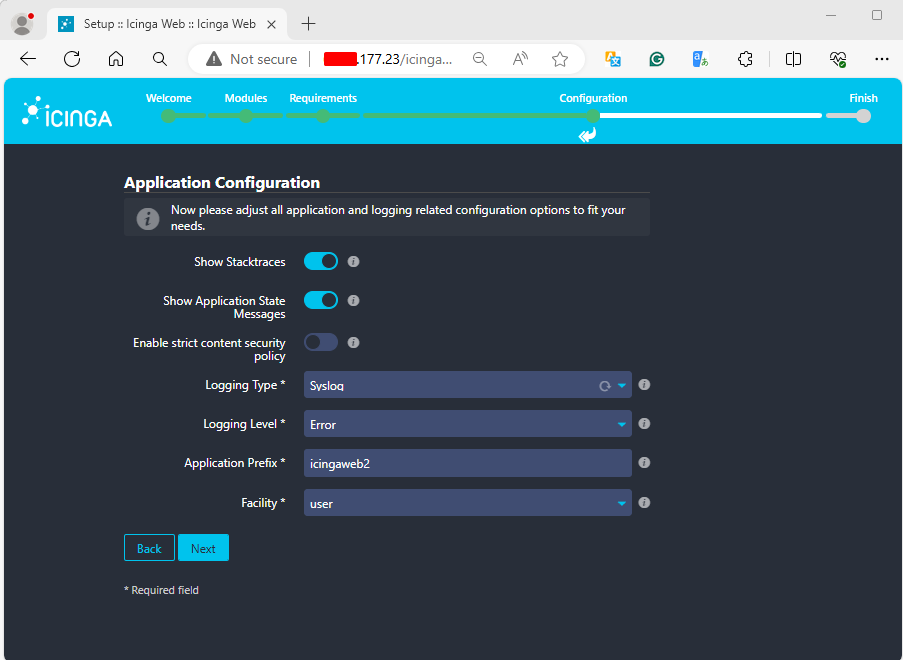
Application Configuration
Here, adjust all application and logging-related configuration options to fit your needs then hit “Next“
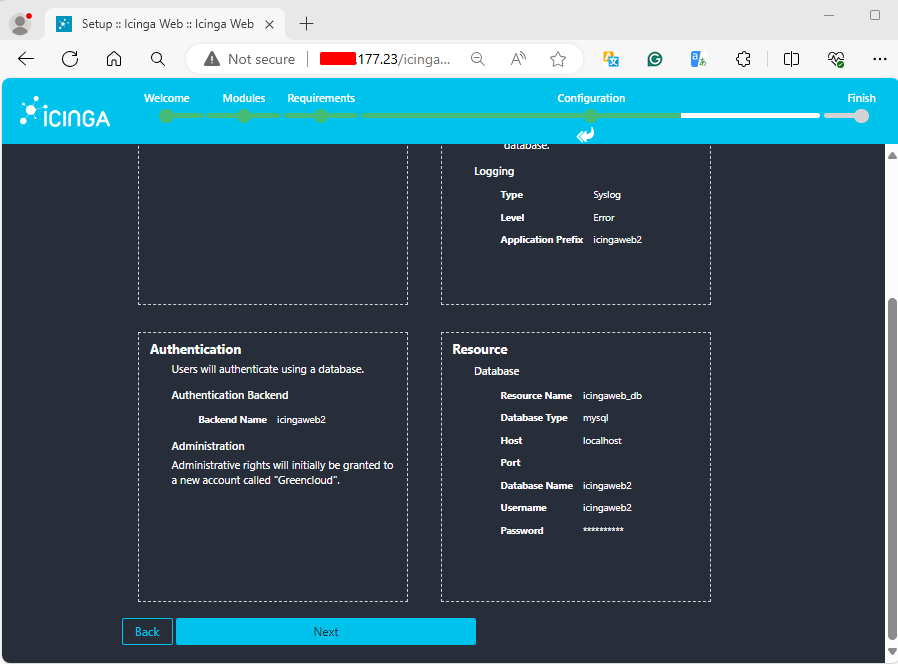
Review of configurations done
At this stage, we have configured Icinga Web 2 successfully. We only need to confirm our settings before setting it up. If all is nice and good, hit “Next“.
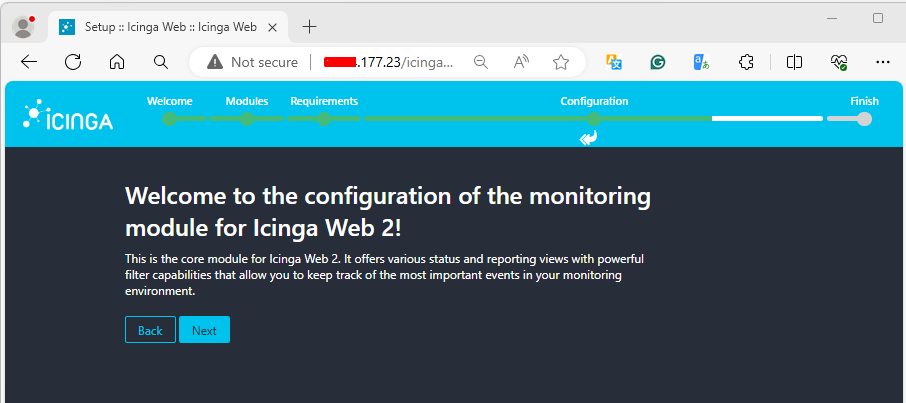
Configuring monitoring module
The monitoring module offers various status and reporting views with powerful filter capabilities that allow you to keep track of the most important events in your monitoring environment. Click “Next” to start configuring the monitoring module.
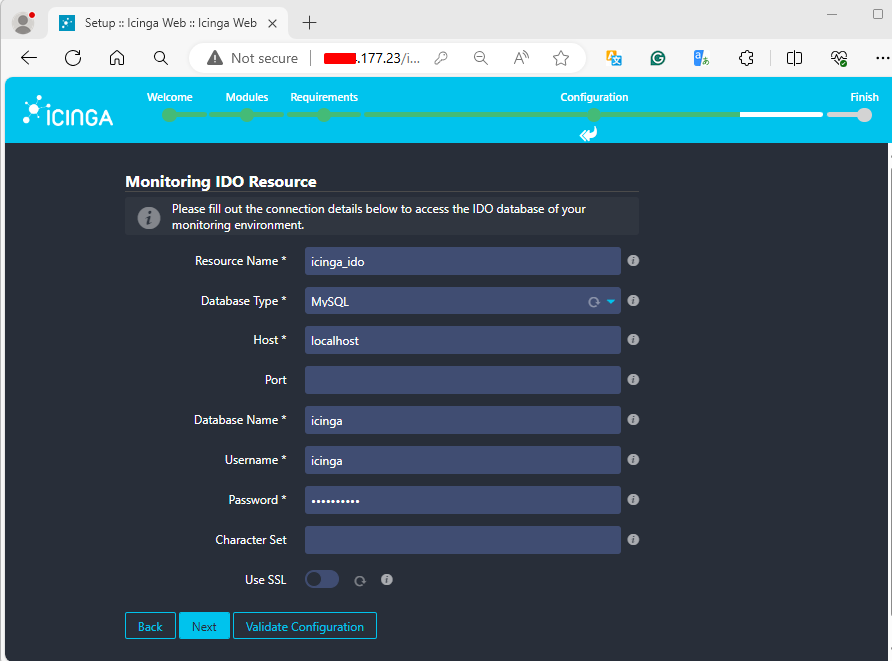
Monitoring IDO Resource
Fill out the connection details below to access the IDO database we configured in Step 5, Stage 1. Validate the settings and then click “Next“.
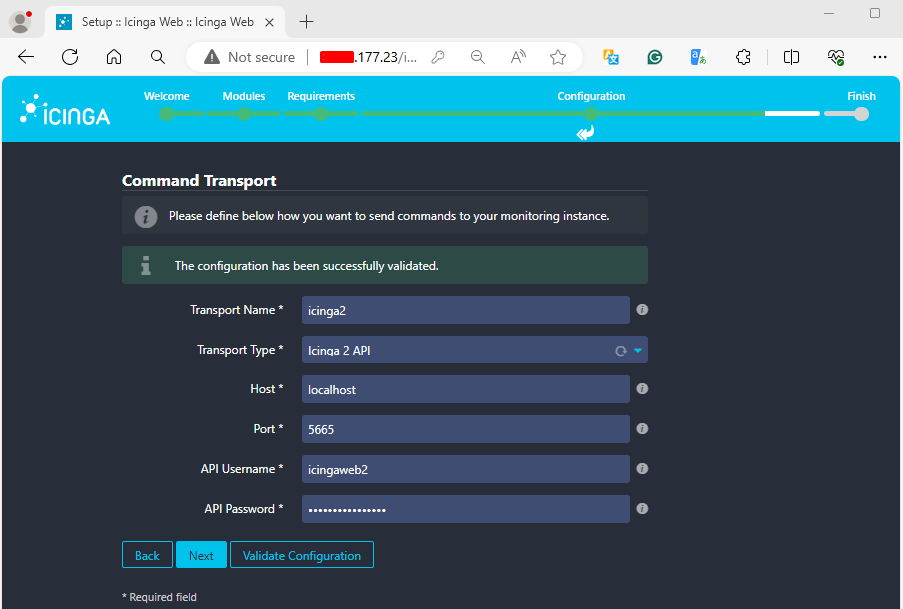
After proper validation, you should see a success message like so. Click “Next” to move forward.

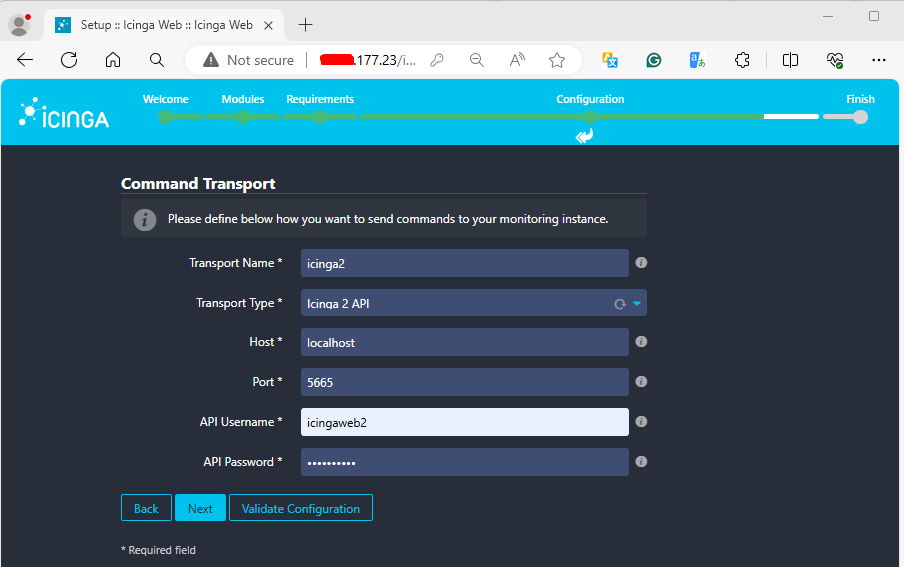
Command Transport
This is where the API we setup in Stage 1, Step 7 comes to good use. Enter the details you set in your environment in the form. For a reminder, the configs for this guide were as shown below:
object ApiUser "icingaweb2" {
  password = "Wijsn8Z9eRs5E25d"
  permissions = [ "status/query", "actions/*", "objects/modify/*", "objects/query/*" ]
}
Once done keying in the credentials, click on “Validate” to check if everything was set correctly.
Monitoring Security
To protect your monitoring environment against prying eyes please fill out the settings below.
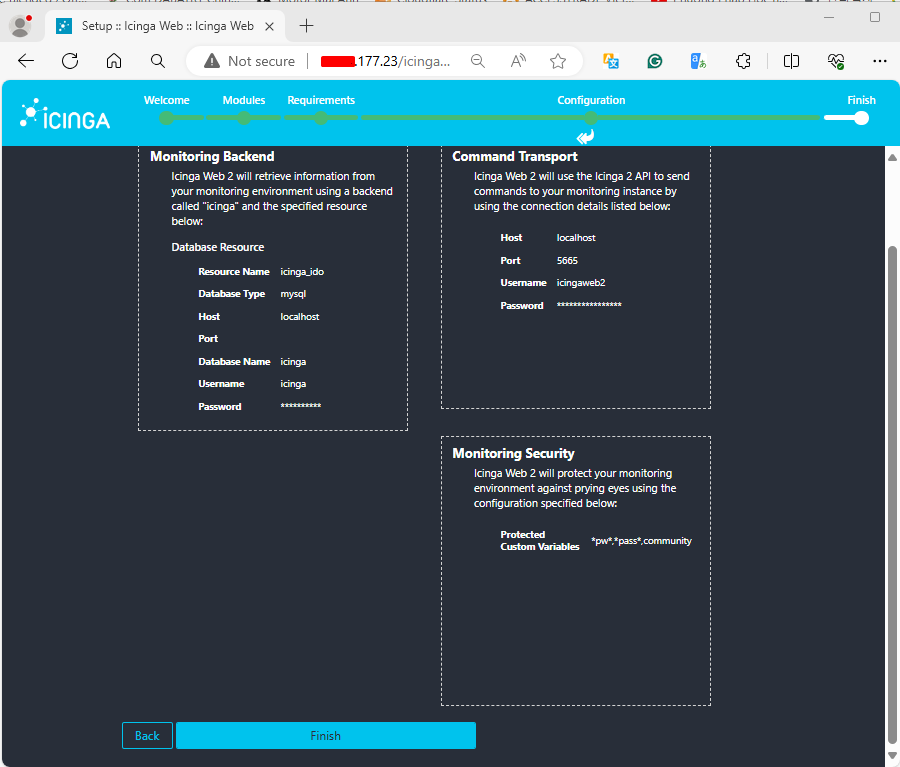
Final Monitoring module Review
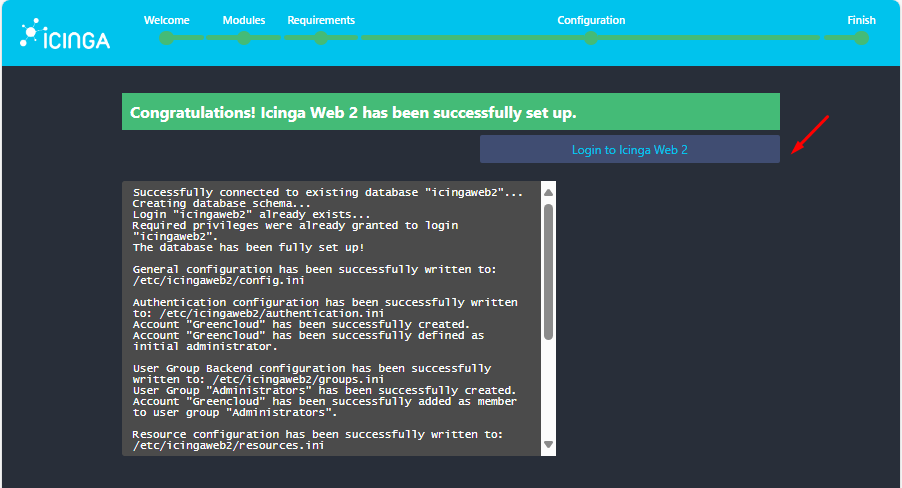
You can review the changes supposed to be made before finishing the setup in this step. You are advised to feel free to navigate back to make any corrections. Otherwise, if everything looks pretty, click on “Finish” below and you should get the message that “Icinga Web 2 has been successfully set up“.
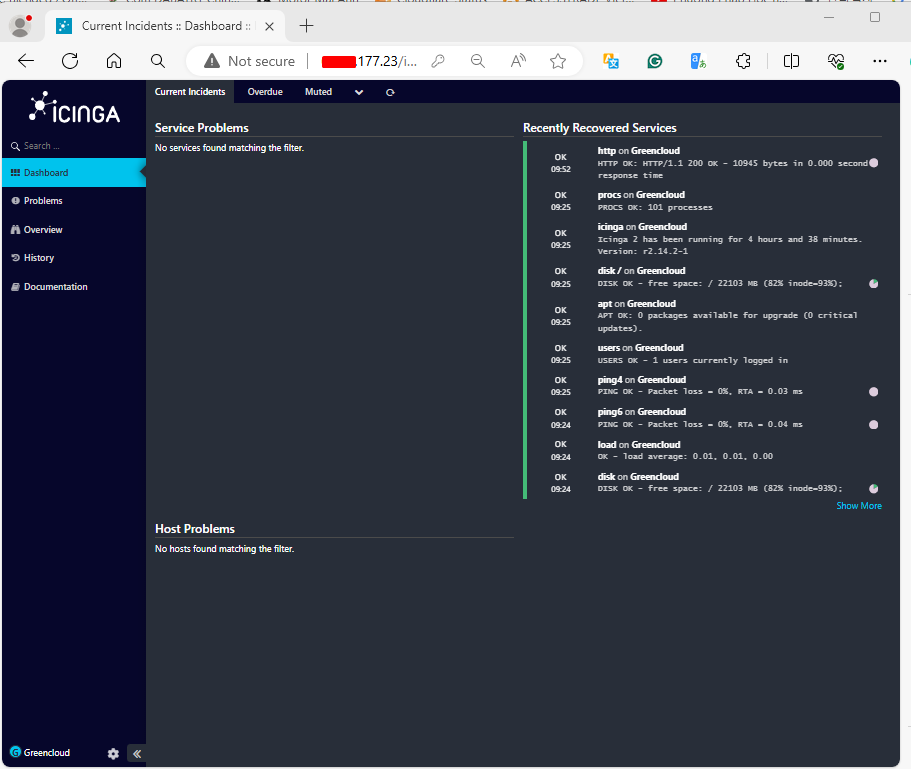
Click on “Login to Icinga Web 2” to begin your monitoring journey with Icinga. The next screenshots show the remaining parts of the road.
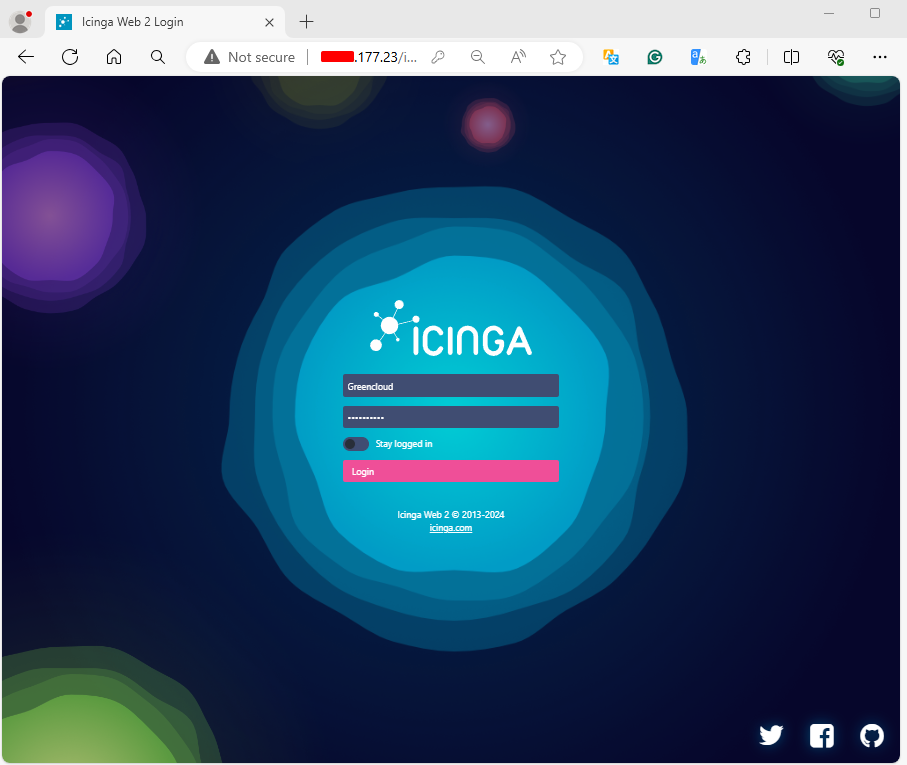
That will land you into the arms of the “Login page”. Enter the administrative user we created earlier and we should be led in via the main door.
Conclusion
We have reached the end of the Icinga installation guide. It’s been a long journey, but we have finally arrived. Thank you for visiting, supporting, and staying with us until the end.
