How to Use iPerf to Test Network Speed and Bandwidth on Windows
Iperf is a great networking tool for performing end-to-end throughput tests. These tests can be layer two or layer three. But as simple as the use of Iperf is, it is only popular among experienced network engineers. In this post, we will look at how to install and use Iperf on Windows for throughput test.
The Iperf tool is a freeware that can be run as an executable file either in server or client mode. It is purely a command line and that explains the reason why only a few people use it. Iperf is available for Windows, Arch Linux, Ubuntu, Android, iOS, and more. Since this post is about how to install and use Iperf on Windows, I limit my explanation to installing and using Iperf on a Windows Server 2022, the process is fairly the same for other versions of Windows.
Use cases for using iPerf
iPerf has come in handy numerous times for me as a Network Engineer. Off the top of my head some of the things I’ve used iPerf for that were particularly handy have been:
- Running iPerf between VMs or systems in different data centers to test latency and throughput
- Verifying I was getting the bandwidth we were paying for from our ISP
- Testing the speed between wireless clients and access points
- Benchmarking NAS and SAN performance
- Generate TCP and UDP traffic to load test applications and infrastructure
- Checking the impact of network or firewall changes
- Troubleshooting slow networks
- Checking for packet loss ( UDP tests will show packet loss percentage if there is any)
- Showing clients actual measured throughput during a site visit
1. Download and Install iPerf
Step 1: Download iPerf for Windows from this link or other trusted sources.
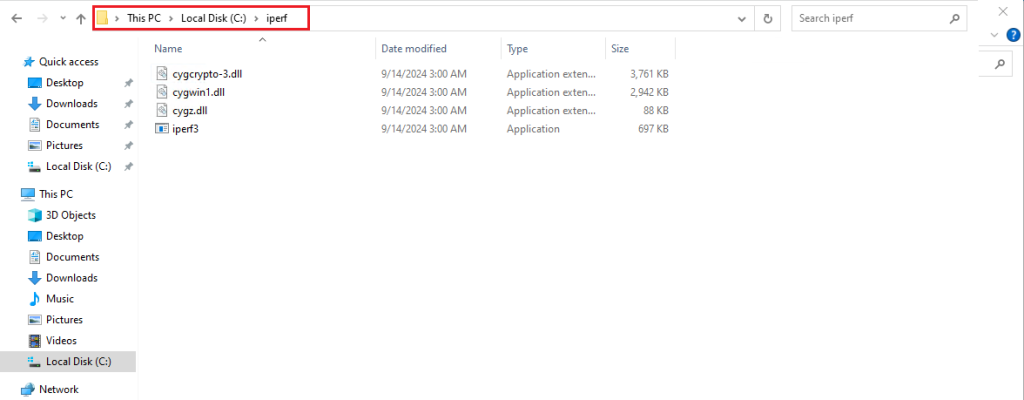
Step 2: Extract the downloaded ZIP file to a folder (e.g., C:\iperf).
Step 3: Copy the iperf3 executable and any required DLLs to the computers you want to use for testing. One computer will act as the server and the other the client.
2. Run iPerf in Server Mode
Step 1: Open a command prompt or terminal and navigate to the folder containing iperf3.exe.

Step 2: Type the command iperf3 -s to start the iPerf server.
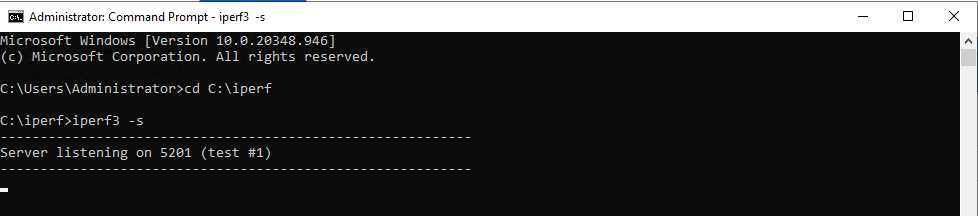
The server will display “server listening on 5201” when ready.
Note: You need to open ports 5201/TCP and 5201/UDP in the firewall to connect through
3. On the iPerf Client:
Step 1: Open a command prompt or terminal and navigate to the iperf3 executable.
Step 2: Type iperf3 -c SERVER-IP-OR-NAME to start the iPerf client, replacing SERVER-IP-OR-NAME with the IP address or hostname of the iPerf server.
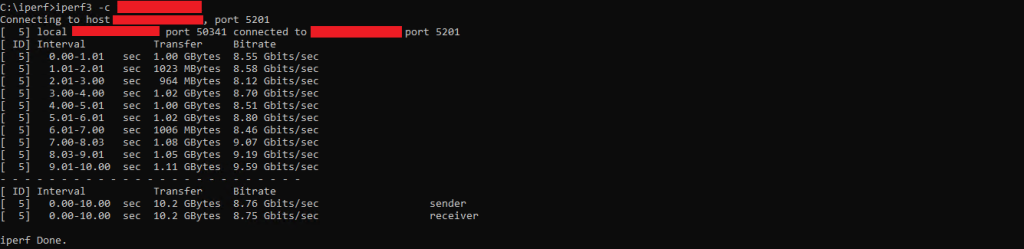
The test will run for 10 seconds by default and display results when finished. If you’re on a windows machine you can open Task Manager and see the bandwidth utilization on the performance tab.
Interpreting iPerf Test Results
The iPerf output will display report intervals and throughput information. Key stats:
- Interval – The periodic reporting interval.
- Transfer – The bytes transferred during this interval.
- Bandwidth – The throughput measured over this interval.
- Transfer Total – Total bytes transferred and the average bandwidth over the whole test.
- Bandwidth Average – Average throughput throughout the test.
Useful iPerf Options
iPerf comes with multiple command switches you can use for adjusting settings and performing various tests. Here are some common iPerf options to tweak your throughput tests:
- -i – Sets the interval time between periodic bandwidth reports in seconds. Useful for longer tests.
- -t – Sets the total time in seconds to transmit. The default is 10 seconds.
- -p – Changes the listening port on the server.
- -u – Use UDP instead of TCP.
- -b – Limit bandwidth to a specified amount. Useful for not saturating a network.
- -R – Reverse direction – server sends data, client receives.
- -bidir – Bidirectional – data transmitted from both server and client in the same test.
Now, let’s step through a few common examples of using iPerf to test network bandwidth.
4. Practical iPerf Examples
Here are a few examples that provide a mix of TCP and UDP tests, with options to adjust duration, direction, bandwidth, ports, and parallel streams.
Example 1. Basic iperf3 TCP test
Run a simple 10-second TCP test between the iperf3 server and client
On the server, run the command:
iperf3 -s
On the client, run the command:
iperf3 -c SERVER_IP
Example 2. 60-second TCP test
Extend the test duration to 60 seconds.
Command:
Server: iperf3 -s
Client: iperf3 -c SERVER_IP -t 60
Example 3. UDP test
Switch to UDP instead of TCP.
Command:
Server: iperf3 -s
Client: iperf3 -c SERVER_IP -u
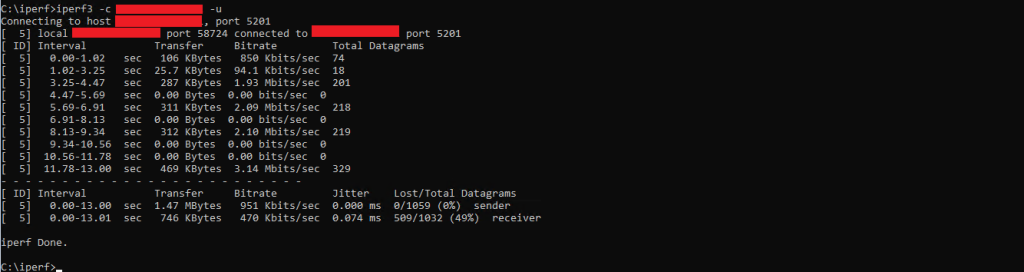
Once the server receives a udp packet from the client it will switch to listening on udp.
Example 4. Reverse direction
Reverse the direction so the server sends and the client receives data.
Command:
Server: iperf3 -s
Client: iperf3 -c SERVER_IP -R
Example 5. Limit bandwidth
Limit bandwidth to 50 megabits per second.
Command:
Server: iperf3 -s
Client: iperf3 -c SERVER_IP -b 50M
By default iPerf target bandwidth for UDP connections is 1Mbps, and the default target bandwidth for TCP connections is unlimited. It’s a good idea to set a custom bandwidth limit when testing so you don’t saturate the links and bring down the network (unless that’s your intention).
Example 6. Change port
Use port 5002 instead of default 5201.
Command:
Server: iperf3 -s -p 5002
Client: iperf3 -c SERVER_IP -p 5002
Notice that the port needs to be changed on both the server and the client for the connection to work.
Conclusion
So Greencloud has guided you through how to perform a test on the network performance of a virtual server/physical server. Wish you success.
Good Luck!

