How to Install and configure CSF (Config Server Firewall) on CentOS 7
I. What is CSF (Config Server Firewall)?
Config Server Firewall, also known as CSF for short, is a suite of firewall applications for Linux servers. CSF can also detect unauthorized logins or intrusions for services such as SSH, SMTP, IMAP, Pop3, commands, suand many more. CSF can detect when someone is logging into the server via SSH and alert you when this user tries to use commands suon the server to use higher commands like using root.
CSF also checks and prevents invalid logins on mail services such as (Exim, IMAP, Dovecot, uw-imap, Kerio), OpenSSH server, and Ftp server (Pure-ftpd, vsftpd, Proftpd). CSF is a very good security solution for hosting servers and can be integrated into the user interfaces (UI) of WHM/cPanel, DirectAdmin, and Webmin.
However, in this tutorial, we only install CSF on the CentOS 7 server and operate it entirely by command.
II. Install and configure CSF (Config Server Firewall) on CentOS 7
To install and configure CSF (Config Server Firewall) on CentOS 7 we need to go through the following 5 steps.
Step 1: SSH into your DirectAdmin system
To install and configure CSF (Config Server Firewall) on CentOS 7, the first thing we need to do is SSH into your VPS or server with root privileges first. If you do not know how to
After successfully SSHing, we continue with step 2 to perform the CSF (Config Server Firewall) installation commands.
Step 2: Install CSF (Config Server Firewall) on CentOS 7
Installing CSF (Config Server Firewall) on CentOS 7 is very simple, we just need to execute the order of commands as follows.
yum install wget perl-libwww-perl.noarch perl-Time-HiRes -y
cd /usr/src/
wget https://download.configserver.com/csf.tgz
tar -xzf csf.tgz
cd csf
sh install.sh
Explanation of the above commands:
- Command 1: Since CSF is based on Perl, we need to install the Perl library on the server first.
- Command 2: Move into the
src. - Command 3: Download the CSF installer.
- Command 4: Extract the CSF installer.
- Command 5: Move into the
csfnewly extracted folder. - Command 6: Execute csf settings file named
install.sh.
Below is the image after the installation is complete.
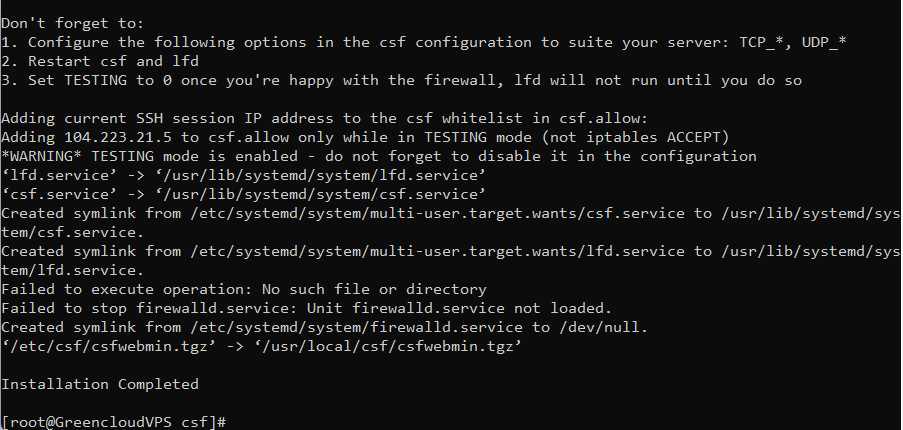
After the installation, we continue with step 3 to check if the CSF is working.
Step 3: Check if CSF is working
Now you should check if CSF is really working on this server by executing the following two commands.
cd /usr/local/csf/bin/
perl csftest.pl
Explanation of the above 2 commands:
- Command 1: Move to the
/usr/local/csf/bin/. - Command 2: Execute the
csftest.pl.
If you get a message like below it means CSF is working without any problems at all.
RESULT: csf should function on this server
My test image is as follows.

So we have finished installing CSF on CentOS 7. Next, you need to configure CSF so that CSF can work properly.
Step 4: Configure CSF on CentOS 7
Before going into the process of configuring CSF on CentOS, the first thing you must know is that the operating system CentOS 7has a default firewall application called firewalld. You have to stop firewalldand remove it from boot according to the operating system with the following two commands.
systemctl stop firewalld
systemctl disable firewalld
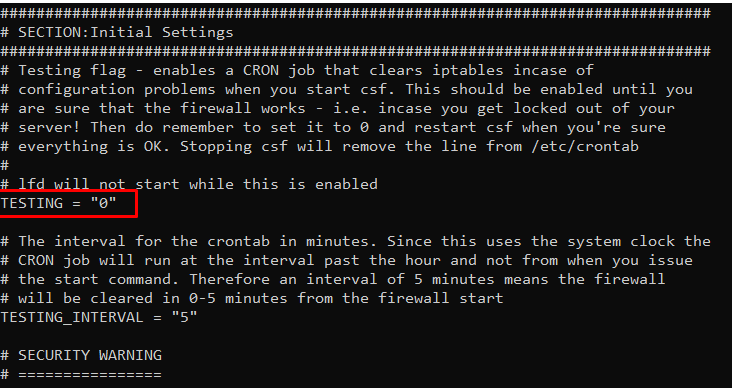
Then go to the CSF config directory at the path /etc/csf/and edit the file csf.confusing the vi editor with the command.
cd /etc/csf/
vi csf.conf
You need to edit the TESTING configuration from 1 to 0, then move to line 139 and check the entry to TCP_INsee if your current SSH port is available. By default, when installing CSF, the SSH port is automatically opened, even if you have changed the port.
Now start the CSF and LFD with the following commands:
systemctl start csf
systemctl start lfd
And then enable the csf and lfd services that are started when CentOS starts:
systemctl enable csf
systemctl enable lfd
Now you can view all ruleCSF (rules) with the following command:
csf -l
So we have completed the installation and configuration of CSF (Config Server Firewall) on CentOS 7.
III. Summary
Through this article, you have learned how to install and configure CSF (Config Server Firewall) on CentOS 7. With the additional installation of CSF, it has greatly increased the security level of your server, even with the default configuration.
Hope this article will be of help to you. Hope you can do it successfully.
