How to Install Adminer Database Administration Tool on Ubuntu 22.04
Introduction
Adminer (formerly phpMinAdmin) is a fully-featured database administration tool that supports both RDBMS (Relational Database Management System) such as MySQL/MariaDB, PostgreSQL, SQLite, MS SQL, and Oracle and the NoSQL such as MongoDB and others (via plugin) . It’s a lightweight, user-friendly, and high-performance database management tool that can be used easily to manage your databases.
Adminer is created as an alternative to phpMyAdmin, it’s written in PHP and consists of a single tiny PHP file and distributed under the Apache License (or GPL v2).
In this tutorial, we will show you step-by-step instructions on how to install “Adminer” the database administration tool on Ubuntu 22.04 server.
Prerequisites
Before you get started with the following guide, you must have some requirements below:
- An Ubuntu 22.04 Server.
- A non-root user with root/administrator privileges.
- A Database Server is installed on your machine. The Adminer tools support multiple RDBMS (Relational Database Management System) such as MySQL/MariaDB, PostgreSQL, SQLite3, and OracleDB.
Adminer Installation on Ubuntu Server
On the newer Ubuntu systems (including Ubuntu 22.04), the Adminer database tool is available by default on the Ubuntu Universe repository. This makes administrator easier to install Adminer without any third-party repository or any additional steps for basic installation.
Before you start installing Adminer, run the following apt command to update and refresh your Ubuntu repository package index.
apt update && apt upgrade -y
Now you can check the “adminer” package using the following command. At the time of this writing, the Ubuntu repository provides the latest version of Admuiner v4.8, which is available in the “universe/web” Ubuntu repository. Also, you can see there are some package dependencies for Adminer, which includes PHP drivers for multiple RDBMS such as MySQL/MariaDB, PostgreSQL, and SQLite3.
apt info adminer

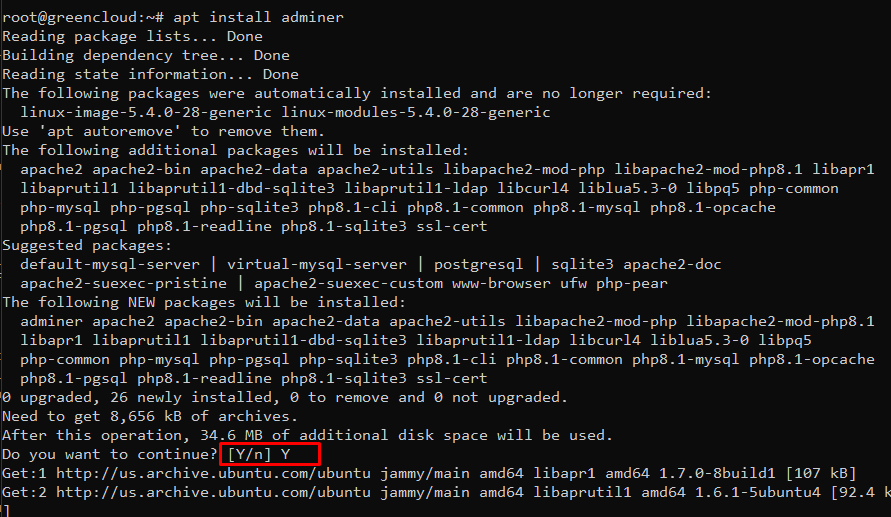
Now you can install the “Adminer” database administration tool using the apt command below. Input Y to confirm the installation and press ENTER to continue, and the “Adminer” installation will begin.
apt install adminer
After the “Adminer” installation is finished, you will need to activate the default Apache2 configuration for the Adminer “/etc/apache2/conf-available/adminer.conf“.
Run the following command to activate the Adminer configuration for the Apache2 web server.
ln -s /etc/apache2/conf-available/adminer.conf /etc/apache2/conf-enabled/
Next, check and verify the Apache2 configuration using the following command. Then, restart the Apache2 service to apply new changes.
apachectl configtest
systemctl restart apache2

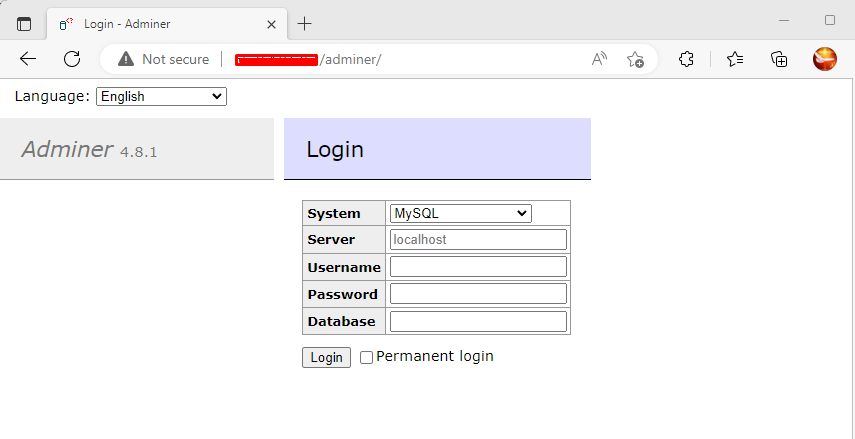
Now you can access it via your web browser with the default URL path “/adminer” (i.e: http://IP/adminer). And you should get the login page of the “Adminer” database administration tool.
Adminer is a multi-database administration tool, which is so much different than database administration tools such as phpMyAdmin which only supports MySQL/MariaDB or pgAdmin for the PostgreSQL.
You can use “Adminer” to connect to multiple RDBMS such as MySQL/MariaDB, PostgreSQL, SQLite, and OracleDB. To connect to your database using “Adminer”, you can just input the details database user, password, and the database on the “Adminer” login page.
Securing Adminer Installation
After you have installed the Adminer, now you will secure the installation using different methods.
Below you will secure the “Adminer” installation using two methods:
- Changing the default URL path: The default Adminer installation is available at the path URL “/adminer”, which is guessable for attackers. Changing the default URL path will make your Adminer more secure, because only you know the URL path access for your Adminer installation.
- Adding Basic Authentication: This will add an authentication before you get the Adminer login page. The basic authentication can be created using the Apache2 module basic_auth.
Changing Default URL Path
The default Adminer installation includes the Apache2 config file “/etc/apache2/conf-available/adminer.conf” that can be used to set up your Adminer database administration tool on your server.
Edit the file “/etc/apache2/conf-available/adminer.conf” using the following command.
nano /etc/apache2/conf-available/adminer.conf
At the top of the line, you can see the “Alias …” option which defines the default URL path of Adminer. In the demo, we will change the default URL path from “/adminer” to the custom path “/mydbadmin” using the following configuration.
Alias /mydbadmin /etc/adminer
Save and close the file when you are done.
Next, run the following command to check and verify the Apache2 configuration. If you get the output message such as “Syntax OK“, its means your Apache2 configuration is correct.
apachectl configtest
Now restart the Apache2 service to apply new changes using the command below.
systemctl restart apache2
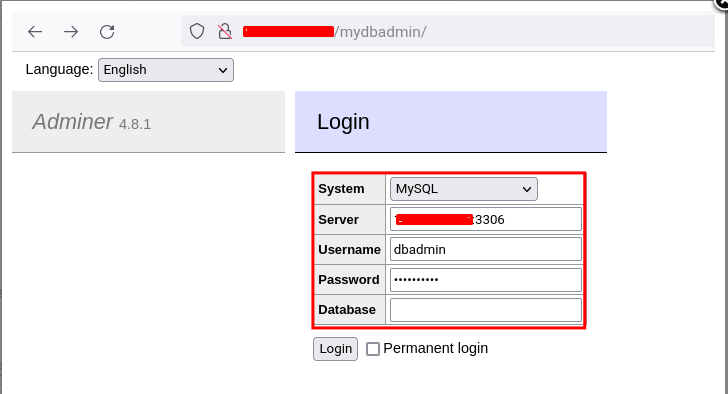
Lastly, you can visit your Adminer installation on the new URL path “/mydbadmin” (ie: http://IPVPS/mydbadmin). And you should get the login page of the Adminer database administration tool.
Adding Apache Basic Authentication
After changing the default path URL installation, it’s time to add the basic authentication to the Adminer using the Apache2 module “basic_auth“.
Run the following command to create a new user file “/etc/adminer/.htpasswd” for the Apache basic authentication. In this example, you will define the new user for the Apache basic authentication as “dbadmin“.
Now input the password for the user “dbadmin” and repeat the password. And the new user file for Apache basic authentication will be created.
htpasswd -B -c /etc/adminer/.htpasswd dbadmin
If you just want to add a new user, you can remove the option “-c”, which means creating a new database user file. So, the command for adding a new user should like the following.
htpasswd -B /etc/adminer/.htpasswd newuser
Next, edit the configuration “/etc/apache2/conf-available/adminer.conf” using the following command.
nano /etc/apache2/conf-available/adminer.conf
Add the following configuration to the file. Using the configuration, the only valid users on the user file “/etc/adminer/.htpasswd” will be allowed to log in and access the Adminer database administration tool on the URL path “/mydbadmin“.
<Location /mydbadmin>
  AuthType Basic
  AuthName "Restricted Resource"
  AuthBasicProvider file
  AuthUserFile /etc/adminer/.htpasswd
  Require valid-user
</Location>
Save and close the file when you are done.
Now run the following command to check and verify the Apache configuration file. Then, restart the Apache2 service to apply new changes.
apachectl configtest
systemctl restart apache2
Lastly, back to your web browser and visit your Adminer URL installation (i.e: http://IPVPS/mydbadmin). And now you should be prompted for the Apache basic authentication before you get the Adminer login page.
Input the user “dbadmin” and the password, then click “Login“. And you should get the Adminer login page.
Setting Up Database User (MySQL/MariaDB)
In this example, we will use the MariaDB database on a different server. So, you will need to set up database details such as username and password for non-localhost.
Before you create a new MariaDB user, you will need to set up the MariaDB to be running on the private IP address, which can be set up via the MariaDB configuration “/etc/mysql/mariadb.conf.d/50-server.cnf“.
Edit the MariaDB config file “/etc/mysql/mariadb.conf.d/50-server.cnf” using the below command.
sudo nano /etc/mysql/mariadb.conf.d/50-server.cnf
Change the default “listen” address to the MariaDB server private IP. In this example, the IP address of the MariaDB server will be changed to “0.0.0.0” so that all IPs have access.
bind-address = 0.0.0.0
Save and close the file when you are done.
Now run the following command to restart the MariaDB service and apply new changes.
systemctl restart mariadb
Next, log in to your MySQL/MariaDB server and run the mysql command below.
mysql -u root -p
Now run the following MariaDB queries to create a new user and password for your MariaDB server. In this example, the MariaDB user “dbadmin@IPVPS_Adminer” will be able to connect to the MariaDB server from the Adminer server, which has an IP address “IPVPS_Adminer“.
CREATE USER 'dbadmin'@'IPVPS_Adminer' IDENTIFIED BY 'dbpassword';
GRANT ALL PRIVILEGES ON *.* TO 'dbadmin'@'IPVPS_Adminer' WITH GRANT OPTION;
FLUSH PRIVILEGES;
Next, run the following queries to check and verify the privileges of the user “dbadmin@IPVPS_Adminer“. Then, type “quit” to exit from the MariaDB shell. As you can see MariaDB user “dbadmin@IPVPS_Adminer” will be able to access all databases on the MariaDB server.
SHOW GRANTS FOR dbadmin@IPVPS_Adminer;
quit
After that, verify the list of UFW rules using the below command. And you should see the new rule for MySQL/MariaDB access on port “3360/tcp” is available on the UFW firewall.
ufw allow 3306
Logging to the MariaDB Server from Adminer
After setting up the database user on your system, it’s time to connect to the database server from the Adminer database administration tool.
On the Adminer login page, input details database host, username, and password. Then, click the “Login” button to log in.
After logging in, you can now manage your database from the Adminer dashboard. Also, you will notice the database version and the user that you are currently using to connect to the server.

Conclusion
Congratulation! You have now successfully installed the Adminer database administration tool on Ubuntu 22.04. You have also secured the Adminer installation by changing the default URL path and adding the basic authentication using the Apache module basic_auth. And lastly, you have also configured the database user (MySQL/MariaDB) that can be used to log in using the Adminer.

