
How To Install HAProxy on AlmaLinux 9
Large websites serve innumerable requests and must be able to concurrently respond to client requests and return the correct messages, images, video, application data, etc., in time.
Load balancing can be defined as the distribution of traffic across a group of backend servers referred to as a server pool or server farm. A load balancer sits between the application server and the client to be able to route all the requests as well as fulfill them accordingly.
There are different load balancing algorithms, each providing a unique benefit. The choice of the algorithm depended on your needs:
- Round Robin – the requests are distributed across the server pool
- Least Connections – requests are sent to the server with the fewest current connections to clients
- Least Time – requests are directed to a server with the fastest response and the fewest active connections
- Hash requests are distributed based on the provided key, such as an IP address or a URL
- IP Hash – the client’s IP address determines which server receives the requests
- Random with Two Choices – two servers are selected randomly, and requests are sent to one ot them using the Least Connections algorithm
HAProxy, an acronym for High Availability Proxy, is a free and open-source load balancer. It can balance incoming traffic from TCP and HTTP-based applications by distributing it across a server farm. This tool, written in the C language, holds a reputation for high performance and efficiency.
- Simplified circuit breaking
- SSL/TLS termination.
- Layer 4 TCP and layer 7 HTTP load balancing.
- Proxy protocol support
- Scriptable multi-layer health checking
- Supports Lua and SPOE
- Supports gRPC
- Multithreading
- Multi-factor stickiness
- Supports API
With the above features, HAProxy finds use in several areas where high availability is required. Several high-profile websites use HAProxy, including Reddit, GoDaddy, GitHub, Tumblr, Twitter, Tuenti, Bitbucket, OpsWorks(AWS), Speedtest.net e.t.c
Today, we will learn how to install and configure HAProxy on AlmaLinux 9.
1) Setup Requirements
For this guide to be a success, you need to meet the following requirements:
- At least 3 servers(one running HAProxy and two with the application)
- Memory -2GB and above
- Storage -20 GB and above
In my environment, the 3 servers have been configured as shown:
| TASK | HOSTNAME | IP ADDRESS |
| HAProxy | master.greencloud.com | 64.44.177.a |
| Backend01 | node1.greencloud.com | 64.44.177.b |
| Backend02 | node2.greencloud.com | 64.44.177.c |
Set the hostnames as shown:
##HAProxy
hostnamectl set-hostname master.greencloud.com

##Backend Node 01
hostnamectl set-hostname node1.greencloud.com

##Backend Node 02
hostnamectl set-hostname node2.greencloud.com
Add the hostnames to the /etc/hosts file on each server
$ nano /etc/hosts
64.44.177.a  master.greencloud.com
64.44.177.b   node1.greencloud.com
64.44.177.c  node2.greencloud.com
2) Install the HAProxy package
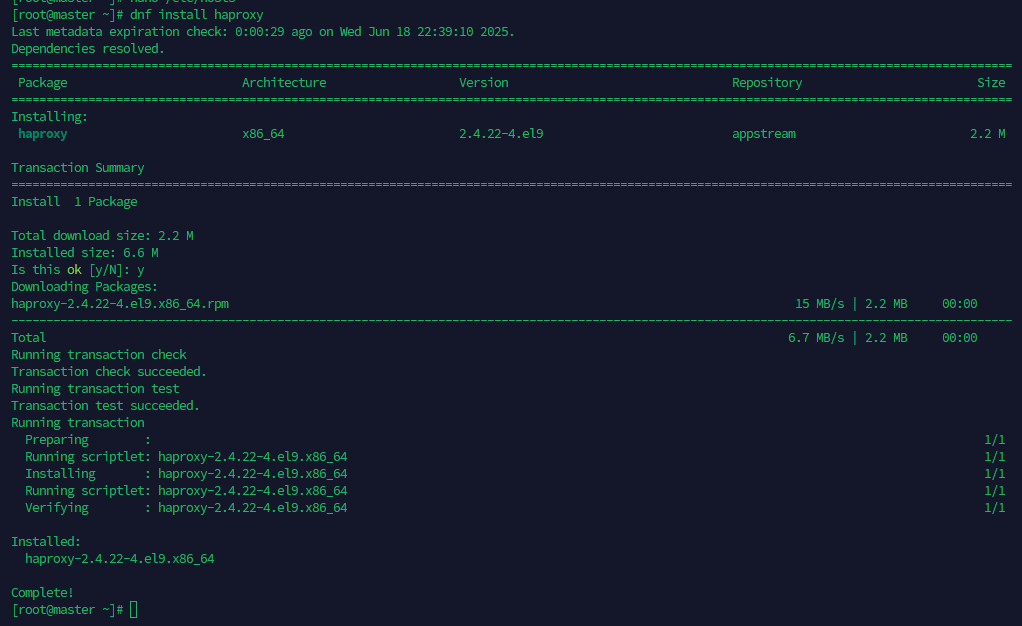
Once the environment has been set up, install HAProxy on the master node. Since HAProxy is provided in the default AlmaLinux 9 repositories, you can install it by executing the command:
dnf install haproxy Dependency Tree:
3) Configure HAProxy frontend and backend
Once the installation is complete, there are a few configurations you need to make to the /etc/haproxy/haproxy.cfg file. These configurations are:
- Global section– holds parameters for all servers running.
- default settings – has details that apply to all proxy subsections
- Frontend settings – defines the listening sockets for the client connection
- Backend settings – defines the server IP address and the load balancer algorithm
Take a backup of the config file:
cp /etc/haproxy/haproxy.cfg{,.old}Open the configuration file for editing:
nano /etc/haproxy/haproxy.cfgReplace contents with:
#################################################
# GLOBAL
#################################################
global
log /dev/log local0
daemon
maxconn 50000


#################################################
# DEFAULTS
#################################################
defaults
log global
mode http
option httplog
option dontlognull
option http-server-close
option forwardfor

timeout connect 5s
timeout client 50s
timeout server 50s


#################################################
# FRONTEND (ONLY ONE FRONTEND ON PORT 80)
#################################################
frontend load_balancer
bind *:80
mode http

# HAProxy Stats Dashboard
stats enable
stats uri /haproxy?stats
stats refresh 10s
stats auth admin:Admin123

default_backend webservers


#################################################
# BACKEND SERVERS
#################################################
backend webservers
mode http
balance roundrobin

option httpchk
http-check send meth HEAD uri / ver HTTP/1.1 hdr Host localhost

server Backend01 64.44.177.b:80 check inter 3s fall 3 rise 2
server Backend02 64.44.177.c:80 check inter 3s fall 3 rise 2
When you are done, save and close the file.
Save the configuration file and allow the ports through the firewall:
firewall-cmd --add-port=8088/tcp --permanent
firewall-cmd --add-port=80/tcp --permanent
firewall-cmd --reload
Set SELinux in permissive mode:
setenforce 0
sed -i 's/SELINUX=enforcing/SELINUX=permissive/g' /etc/selinux/config
Verify if the configuration is okay:
$ haproxy -c -f /etc/haproxy/haproxy.cfg
Configuration file is valid
My configuration looks as shown without comments:
$ grep -v "^ *#" /etc/haproxy/haproxy.cfg | grep -v "^$"Configure HAProxy logging
To configure HAProxy logging, you need to edit the file below:
nano /etc/rsyslog.confIn the file, uncomment the lines:
# Provides UDP syslog reception
# for parameters see http://www.rsyslog.com/doc/imudp.html
module(load="imudp") # needs to be done just once
input(type="imudp" port="514")
Also, disable private authentication messages by adding the line:
# Don't log private authentication messages!
*.info;mail.none;authpriv.none;cron.none;local2.none                 /var/log/messages
local2.* /var/log/haproxy.log
Verify if the config file is okay:
$ rsyslogd -N1
Restart Rsyslog;
systemctl restart rsyslogNow, restart and enable the HAProxy service.
systemctl restart haproxy
systemctl enable haproxy
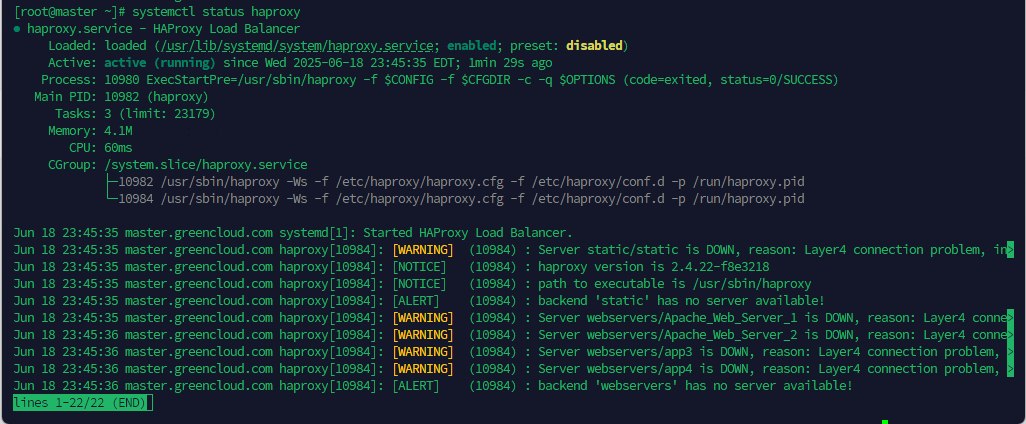
Verify if the service is running:
$ systemctl status haproxy
Configure HAProxy Backend Servers
The backend servers will be configured to run the application. We need to install the Apache web server on the backend servers. (On both backend servers )
dnf install httpd -yOnce installed, start and enable the service:
systemctl start httpd
systemctl enable httpd
Enable port 80 through the firewall:
firewall-cmd --add-port=80/tcp --permanent
firewall-cmd --reload
Now, create a sample HTML file on each of the servers.
Node1:
$ nano /var/www/html/index.html
<h1>GreenCloud! Welcome to Web Server 1</h1>
Restart the service.
systemctl restart httpdNode2:
$ nano /var/www/html/index.html
<h1>GreenCloud! Welcome to Web Server 2</h1>
Restart the service:
systemctl restart httpd4) Test HAProxy Load Balancer
Now we will test if the setup is working as desired with the round-robin algorithm. We should receive connections from both backend servers.
First, access the page using the URL http://HAProxy-IP_Address or http://HAProxy-domain-name

Refresh the page and see if you can establish a connection from the second server.

5) Access the HAProxy Stats
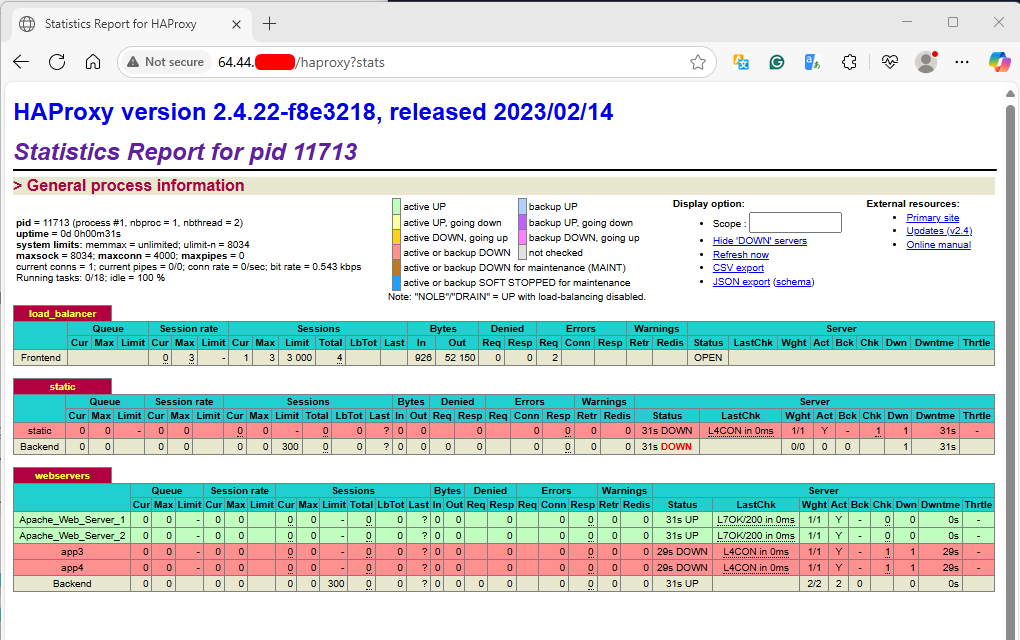
Also, you can access your HAProxy stats to check your general process information. To do this, you can follow the URL below:
http://your_server_ip/haproxy?statsIt will prompt you for the username and password you have defined in the HAProxy config file.
Conclusion
HAProxy is a powerful tool for improving the scalability, reliability, and performance of server environments. At this point, you have learned to set up HAProxy Load Balancing on AlmaLinux 9 and Configure Backend servers. Hope you enjoy it.
