How to decentralize File and Folder permissions for users in Windows server 2019, 2022
In many cases, you will need to change the permissions that a certain individual user has to a file or folder.
So what are the advantages of file and folder permissions?
First of all, you can control whether someone in another account (User) has the permission to Read, Write or Delete the file or folder you want.
At the same time, it is also a solid wall in front of User rights accounts (not Admin accounts) that cannot damage folders or system files.
In this article, we will show you how to decentralize File and Folder permissions for users in Windows server 2019, 2022
Decentralization on Windows server
To assign File or Folder permissions to users you need to have users on your Windows server if you haven’t created a user you can see our user creation guide.
Step 1: Right-click on the folder you want to change and select Properties

Step 2: In the Properties window, switch to the Security tab and click on the Edit item.

Step 3: Next click Add.

Step 4: Now enter your account name or click Advanced… if you don’t remember the account name to be authorized.

Then you click Find Now to find the account => Then you click OK.

Step 5: At the Security tab, select user you can choose the permissions for the user then click Apply.

Advanced settings
Step 1: Go back to Properties, Security => and select Advanced.

Step 2: Next, click Add.

Step 3: Continue, click Select a principal.

Step 4: Enter your account name or click Advanced… if you don’t remember the account name to be authorized.

Then you click Find Now to find the account => Then you click OK.

Step 5: Next pay attention to the Type section. There will be 2 options: Allow (allow) or Deny (not allow).
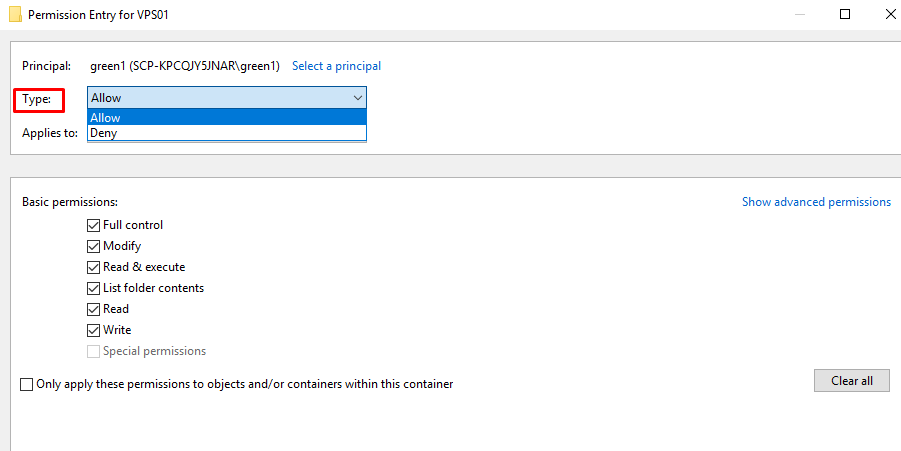
In the Applies to section, we have the following options:
- This folder, subfolders and files: Applies to this folder, its subfolders and the files it contains.
- This folder only: Only applies to this folder.
- This folder and subfolders: Applies only to this folder and its subfolders.
- This folder and files: Only applies to this folder and the files it contains.
- Subfolders and files only: Only applies to subfolders and files contained in this folder.
- Subfolders only: Only applies to subfolders contained in this folder.
- Files only: Only applies to files in this folder.
Go to the Basic Permissions section with the following options:
- Read: Allows you to view the names of files, folders and subfolders, copy and read files and folders.
- Write: Provides all Read permissions, allows to create more folders, add files, delete files.
- List folder contents: Allows you to view the names of files, folders and subfolders, when selected will automatically tick Read & execute and Read.
- Read & execute: Allows to install or run the file, when selected, it will automatically tick Read, List folder contents.
- Modify: Allows viewing of file names, folders and subfolders, allows full rights to edit or execute files, and folders when selected will automatically add all remaining permissions, except Full Control.
- Full Control: All rights in Modify, allowed to edit permissions or change the owner (Take Ownership), when selected will automatically tick all remaining rights. In general, when you select Full Control, you will have full rights
=> After the setup is complete, click OK to finish.
If you decentralize Deny, a message will appear as follows:
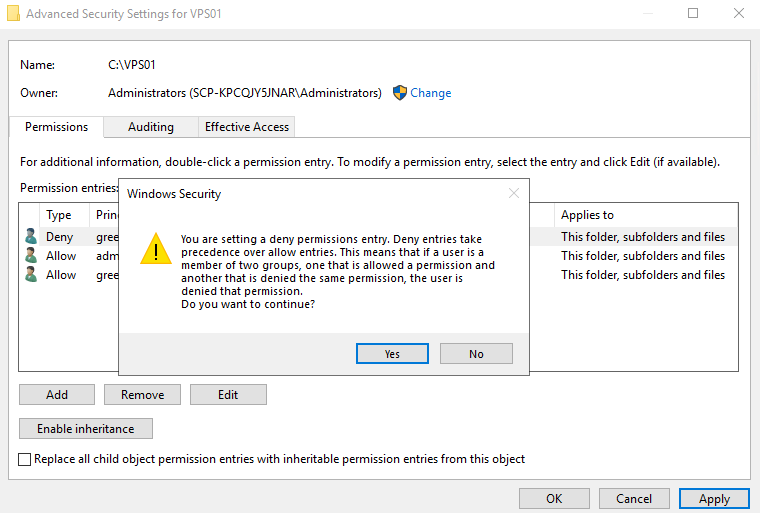
Just select OK to confirm. Continue to click Apply => OK => and OK. So you have adjusted the right to complete.
Instructions for advanced permissions
Customize permissions: In Step 5 in part #2 above, we will click Show advanced permissions.

We can customize the following permissions:
- Full Control: All permissions, when selected, will automatically tick all remaining permissions.
- Traverse Folder / Execute file: Allowed to run and execute the file.
- List Folder / Read data: View file and folder names.
- Read attributes: Read attributes of files or folders.
- Read extended attributes: Read advanced attributes of a file or folder.
- Create files / write data: Allowed to add files to the folder.
- Create folders / append data: Allow to create or add folders.
- Write attributes: Edit file or folder attributes.
- Write extended attributes: Edit advanced attributes of a file or folder.
- Delete subfolders and files: Allow to delete files and subfolders of this folder.
- Delete: Allow to delete this folder.
- Read permissions: Read the list of permissions for this folder.
- Change permissions: Allow to edit permissions.
- Take ownership: Allow to edit folder owner.
- Change ownership of files and folders (Take Ownership).
=> After the setup is complete, click OK
In the Owner section => you click Change .

You select the account to transfer the permission => then click OK.

Continue to click Apply => select OK.

So you have successfully transferred the file or folder permissions
When accessing with another user, you will not be able to open the file or folder when that User is not authorized

Conclusion
Hopefully, this article will be helpful for you. Good luck!

