How to install RabbitMQ on Ubuntu 22.04
In this article, we’ll show you a step-by-step guide on how to install and configure a RabbitMQ Server on Ubuntu 22.04 to help you get up and running with this great piece of software.
Prerequisites
To follow this guide, you need to meet the following set of requirements:
- An instance of Ubuntu 22.04.
- A user with sudo privileges
- Python 3 with pip package manager installed
Step 1: Install the newest version of Erlang
Install required dependencies
Run the following commands to install the required packages.
apt update
apt install curl software-properties-common apt-transport-https lsb-release
Add Erlang Repository
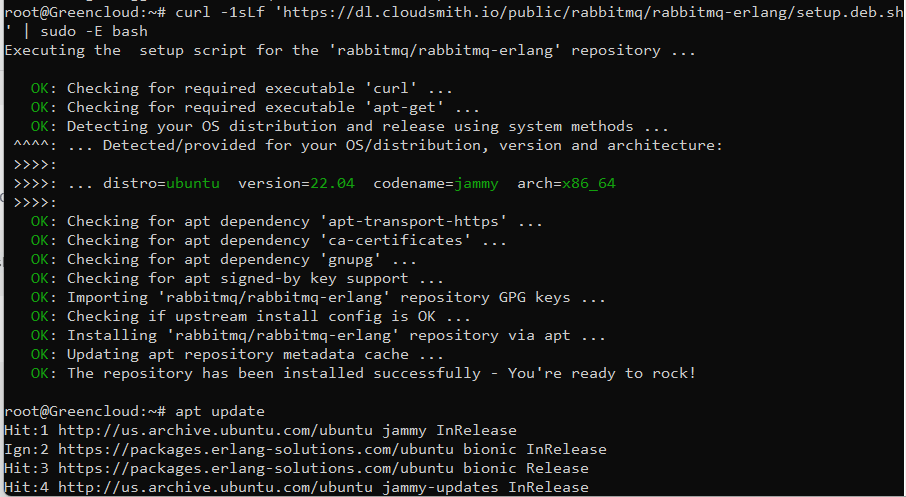
Once you have imported the key, add the repository to your Ubuntu 22.04 system by running the following commands:
curl -1sLf 'https://dl.cloudsmith.io/public/rabbitmq/rabbitmq-erlang/setup.deb.sh' | sudo -E bashExpected command execution output:
Install Erlang on Ubuntu 22.04
The last step is the actual installation of Erlang. Update your system package list and install Erlang:
apt update
apt install erlang
Check Erlang version:
$ erl -eval 'erlang:display(erlang:system_info(otp_release)), halt().' -noshell
Step 2: Add RabbitMQ Repository To Ubuntu 22.04
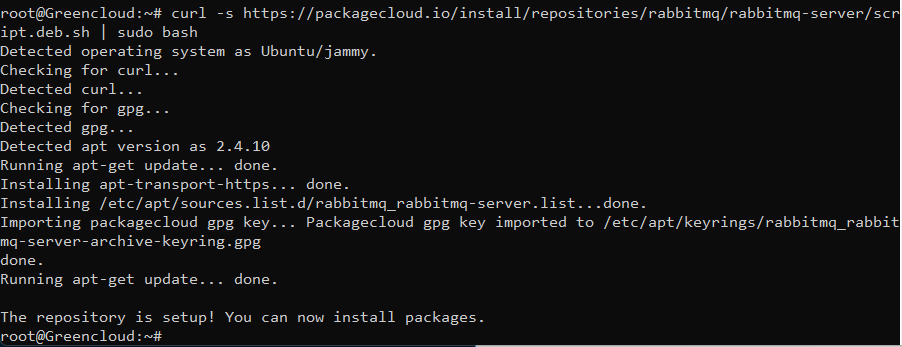
Team RabbitMQ maintains an apt repository on PackageCloud, a package hosting service. It provides packages for most recent RabbitMQ releases.
Let’s add the RabbitMQ Repository to our Ubuntu system.
curl -s https://packagecloud.io/install/repositories/rabbitmq/rabbitmq-server/script.deb.sh | sudo bash
Step 3: Install RabbitMQ Server Ubuntu 22.04 LTS
To install RabbitMQ Server Ubuntu 22.04, update the apt list, then install rabbitmq-server package:
apt update
apt install rabbitmq-server
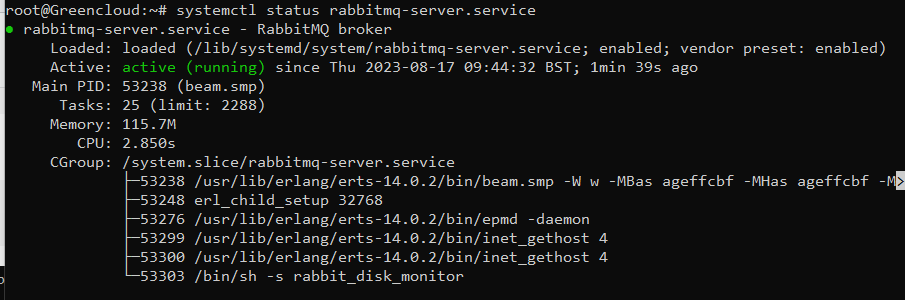
Check status:
systemctl status rabbitmq-server.service
Check RabbitMQ version:
rabbitmqctl status | grep RabbitMQ
Check if the service is configured to start on boot or not:
systemctl is-enabled rabbitmq-server.service
enabled
If it returns disabled, enable it by running:
systemctl enable rabbitmq-server
Step 4: Check your firewall
After installing RabbitMQ, ufw is enabled and configured by default. If you don’t want that, you can disable it by this command:
ufw disable
Step 5: Enable the RabbitMQ Management Dashboard
You can optionally enable the RabbitMQ Management Web dashboard for easy management.
rabbitmq-plugins enable rabbitmq_management
The Web service should be listening on the TCP port 15672.
Double if the port is listening:
ss -tunelp | grep 15672

By default, the guest user exists and can connect only from localhost. You can point your browser to http://localhost:15672 and login with this user locally with the password “guest”.

To be able to log in on the network, create an admin user like the below:
rabbitmqctl add_user admin Green1234
rabbitmqctl set_user_tags admin administrator
RabbitMQ User Management Commands
Delete User:
rabbitmqctl delete_user user
Change User Password:
rabbitmqctl change_password user Green@1234
Create a new virtual host:
rabbitmqctl add_vhost /my_vhost
List available Virtual hosts:
rabbitmqctl list_vhosts
Delete a virtual host:
rabbitmqctl delete_vhost /my_vhost
Grant user permissions for vhost:
rabbitmqctl set_permissions -p /my_vhost user ".*" ".*" ".*"
List vhost permissions:
rabbitmqctl list_permissions -p /my_vhost
To list user permissions:
rabbitmqctl list_user_permissions user
Delete user permissions:
rabbitmqctl clear_permissions -p /my_vhost user
You can buy a VPS starting from $6 by clicking the following image!

