
How to Install OpenLDAP Server on AlmaLinux 9
OpenLDAP is a powerful and versatile software implementation of the Lightweight Directory Access Protocol (LDAP). It allows for efficient management of user information and authentication within a network. In this comprehensive guide, we will walk you through the step-by-step process of installing OpenLDAP Server on your AlmaLinux 9 machine. By the end of this tutorial, you will have a fully functional OpenLDAP Server up and running, ready to be integrated into your applications.
Prerequisites
Before we dive into the installation process, let’s make sure we have all the necessary prerequisites in place:
- An AlmaLinux 9 machine: For this demonstration, we will assume the hostname and IP address of our server.
- A non-root user with administrator privileges: Ensure that you have a non-root user account with sudo privileges to carry out the installation and configuration steps.
Setting Up FQDN
Before installing the OpenLDAP server, it is essential to configure the Fully Qualified Domain Name (FQDN) and ensure it points to the correct IP address. Follow these steps to set up the FQDN on your AlmaLinux machine:
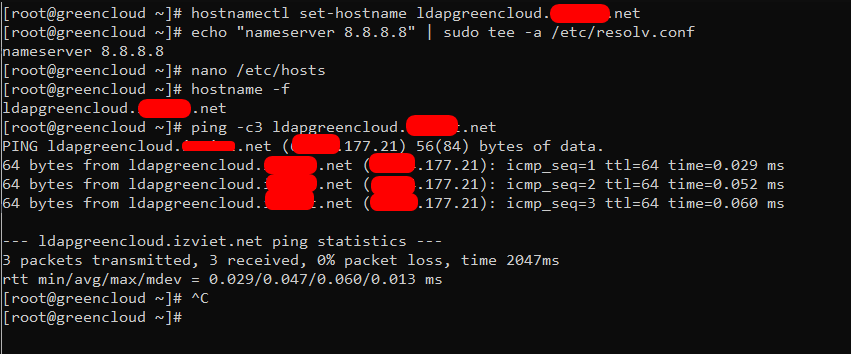
- Set up the FQDN of your AlmaLinux machine by running the following command:
hostnamectl set-hostname ldapgreencloud.example.net
echo "nameserver 8.8.8.8" | sudo tee -a /etc/resolv.conf
- Open the
/etc/hostsfile with the nano editor using the following command:
nano /etc/hosts
- Insert the following configuration into the file, making sure to replace the IP address, FQDN, and hostname with your own values:
Your_IP ldapgreencloud.example.net
- Save the file and exit the editor.
- To verify that the FQDN is correctly set up and pointing to the proper IP address, run the following commands:
hostname -f
ping -c3 ldapgreencloud.example.net
If successful, you should see the FQDN ldapgreencloud.example.net associated with the IP address.
Installing OpenLDAP Server
To install the OpenLDAP server on your AlmaLinux machine, follow these steps:
- Add the EPEL repository to your AlmaLinux server by running the following command:
dnf install epel-release -y

- Install the OpenLDAP server and client packages by running the following command:
dnf install openldap-servers openldap-clients
- When prompted, type
yTo confirm the installation, press ENTER. - When asked to add the GPG key of the EPEL repository, type
yand press ENTER. - Start and enable the OpenLDAP service by running the following commands:
systemctl start slapd
systemctl enable slapd
- Verify that the slapd service is running by executing the following command:
systemctl status slapd
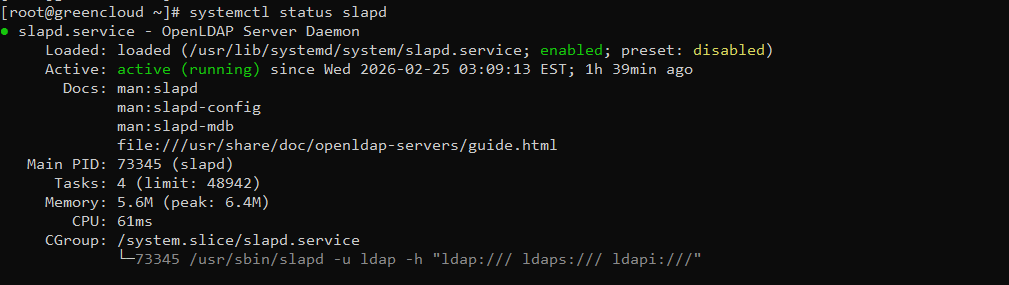
If running, you should see an output indicating that the service is active (running).
- Open both the LDAP and LDAPS services on firewalld to allow client connections. Run the following firewall-cmd commands, and then reload firewalld to apply the changes:
firewall-cmd --add-service={ldap,ldaps} --permanent
firewall-cmd --reload
- Verify the list of firewalld rules by running the following command:
firewall-cmd --list-all
If successful, you should see both LDAP and LDAPS services listed.
Congratulations! You have successfully installed the OpenLDAP server on your AlmaLinux machine. In the next section, we will guide you through the basic configuration steps for your OpenLDAP server.

Basic OpenLDAP Server Configuration
After installing the OpenLDAP server, it is crucial to configure it properly. In this section, we will cover the initial configuration steps, including setting up the domain name and base domain, creating an administrator user, and importing basic schemas.
Setting Up Domain and Base Domain
To set up the domain name and base domain on your OpenLDAP server, follow these steps:
1: Generate LDAP Administrator Password
Create a hashed password for the LDAP administrator:
slappasswd
{SSHA} hash.2: Configure the LDAP Database
Create a configuration file:
nano setroot.ldif
dn: olcDatabase={2}mdb,cn=config
changetype: modify
replace: olcSuffix
olcSuffix: dc=example,dc=net

dn: olcDatabase={2}mdb,cn=config
changetype: modify
replace: olcRootDN
olcRootDN: cn=Manager,dc=example,dc=net

dn: olcDatabase={2}mdb,cn=config
changetype: modify
replace: olcRootPW
olcRootPW: {SSHA}PASTE_YOUR_HASH_HERE
ldapmodify -Y EXTERNAL -H ldapi:/// -f setroot.ldif
3: Create the Base Domain Structure
Create a file named:
nano basedomain.ldif
dn: dc=izviet,dc=net
objectClass: top
objectClass: dcObject
objectClass: organization
o: Izviet Network
dc: izviet

dn: ou=People,dc=izviet,dc=net
objectClass: organizationalUnit
ou: People

dn: ou=Groups,dc=izviet,dc=net
objectClass: organizationalUnit
ou: Groups
ldapadd -x -D "cn=Manager,dc=izviet,dc=net" -W -f basedomain.ldif
4: Verify LDAP Configuration
Test administrator authentication:
ldapwhoami -x -D "cn=Manager,dc=izviet,dc=net" -W
dn:cn=Manager,dc=izviet,dc=net
ldapsearch -x -b dc=izviet,dc=net
Conclusion
Congratulations! You have successfully installed and configured the OpenLDAP server on your AlmaLinux 9 machine. You are now ready to leverage its powerful features for efficient user management and authentication within your network. For further security and scalability, consider setting up SSL/TLS for your OpenLDAP server and exploring web-based frontends such as php OpenLDAP. GreenCloud offers reliable and secure cloud hosting solutions, including Linux SSD VPS, to empower your business with efficient and scalable infrastructure. Happy LDAP-ing!
