Linux ifconfig Command With Examples
Introduction
The ifconfig command is a part of net-tools, a legacy Linux tool for configuring a network interface. Modern distributions use the IP command, which works in a similar manner.
Even though ifconfig has limited capabilities compared to IP, the command is still commonly used to configure a network interface in Linux.
This tutorial will teach you how to use the Linux ifconfig command through practical examples.
- A VPS/server running Linux.
- Full root access
Linux ifconfig Command Syntax
The basic ifconfig syntax looks like this:
ifconfig [interface_name_optional] [arguments_optional]
The ifconfig command prints an output when executed without arguments or with the interface name only. If used with arguments, there is no output.
Linux ifconfig Command Options
The ifconfig command works with arguments to achieve different results. Below is a list of common ifconfig command options:
| Option | Description |
|---|---|
| -a | Prints the configuration for all interfaces, not just the active ones. |
| -s | Displays only a shortlist of all interfaces. |
| -v | Prints a more detailed configuration for all interfaces. |
| interface_name | Represents the interface’s name and is accompanied by a unit number. Prints the configuration for a specific interface. |
| down | Deactivates the interface. |
| up | Activates the interface. |
| [IP_address_number] | Assigns an IP address to a specified interface. |
| netmask [address] | Changes the network mask for a specific interface. |
| broadcast [address] | Sets the broadcast address for a specific interface. |
| mtu [number] | Sets the Maximum Transfer Unit (MTU) of an interface. |
| promisc | Enables promiscuous mode in which the interface receives all packets. |
| [-]promisc | Disables promiscuous mode. |
| arp | Enables the ARP protocol on a specific interface. |
| [-]arp | Disables the ARP protocol on a specific interface. |
| allmulti | Enables the all-multicast mode in which the interface receives all multicast packets. |
| [-]allmulti | Disables the all-multicast mode. |
Linux ifconfig Command Examples
The ifconfig command manages network interface parameters. Hence, the command has extensive practical usage. The sections below list common examples.
1. View Active Network Interface Settings
Run ifconfig with no arguments to print essential information about all active network interfaces:
ifconfig
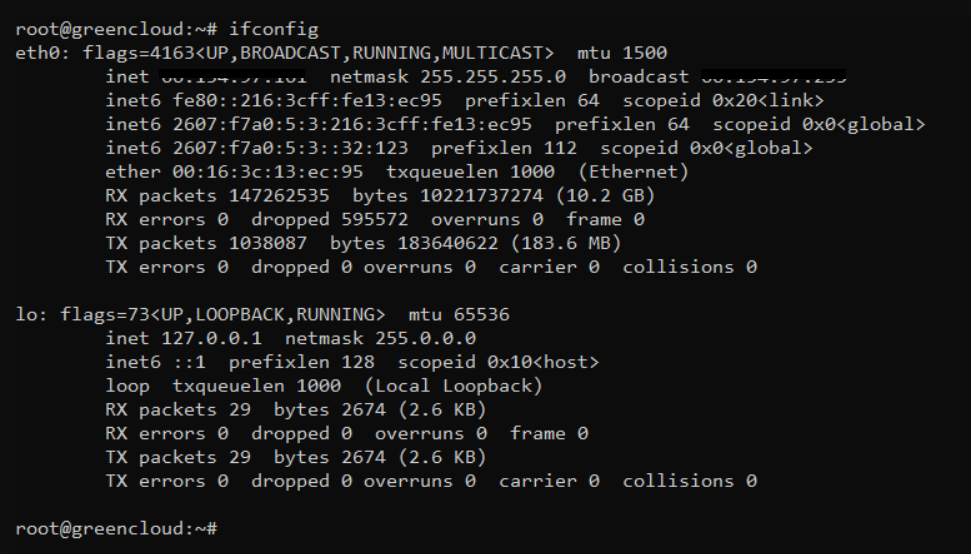
The output shows crucial data about the network interfaces, like:
-
- The names of the active network interfaces. This system includes eth0 and lo (the loopback interface). Active network interfaces differ from system to system.
- The hardware MAC address.
- The IP address (inet), netmask, and broadcast address.
- The MTU (Maximum Transmission Unit) value.
The same command prints a different output when run on a different Linux distribution. For instance, on CentOS ifconfig shows settings for the interface as well.
2. Display a Shortlist of Active Interfaces
The ifconfig command without any arguments prints a rather detailed output about all active interfaces.
Use the -s flag with ifconfig to display a concise summary of every active interface:
ifconfig -s

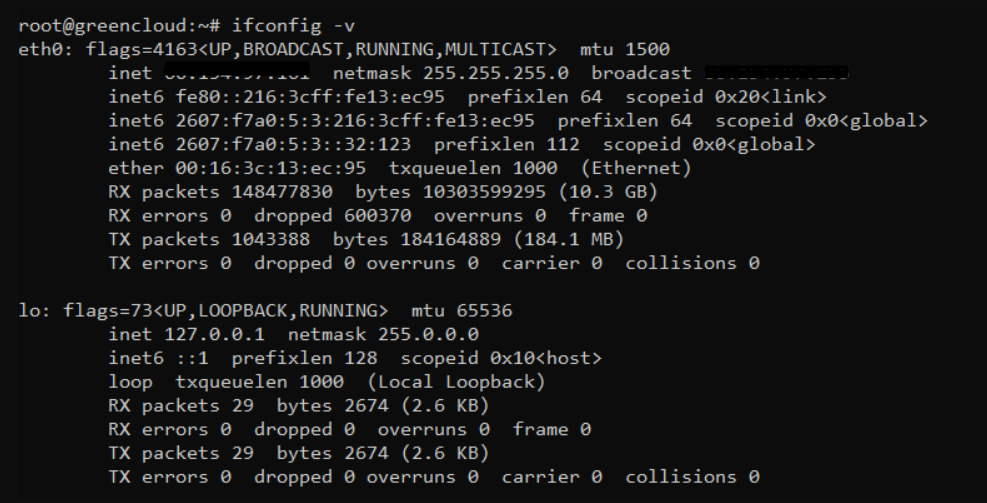
3. Print the Verbose Output
As opposed to the -s flag, the verbose option (-v) prints a more detailed output. Depending on the system, the outcome is either the same as ifconfig without arguments or slightly more in-depth.
ifconfig -v

In this case, the output is the same as when running ifconfig without arguments.
4. Show Every Network Interface Configuration
Without options, ifconfig displays active interfaces only. To get info about both active and inactive network interfaces, run ifconfig with the -a option:
ifconfig -a
The system has no inactive networks, so the output is the same as without the -a argument.
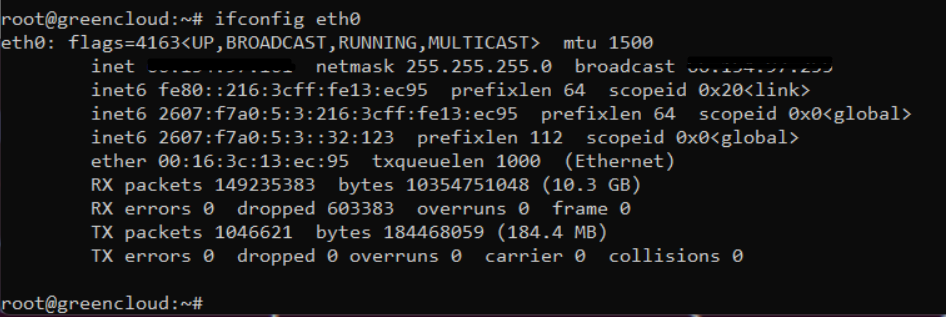
5. Get Information About a Specific Network Interface
To get information about a single specific network interface, use :
ifconfig [interface_name]
For instance, to display eth0’s settings, execute:
ifconfig eth0
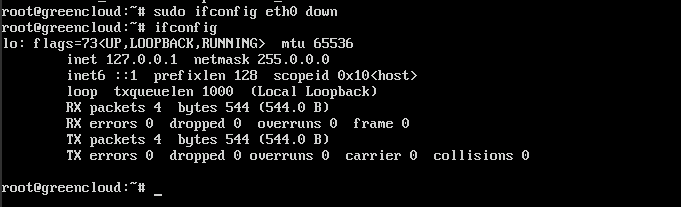
6. Disable a Network Interface
An active network interface transmits and receives data. To deactivate a specific network interface, run the ifconfig command with the down flag and use sudo:
ifconfig [interface_name] down
For example, to disable eth0 run:
ifconfig eth0 down
The command doesn’t print any output. Run ifconfig without any arguments to verify that lo is not active anymore:
7. Enable a Network Interface
To reactivate a network interface, use the up flag with sudo. For example, to enable the eth0 interface run:
ifconfig eth0 up
Verify that the eth0 interface is active again:
ifconfig
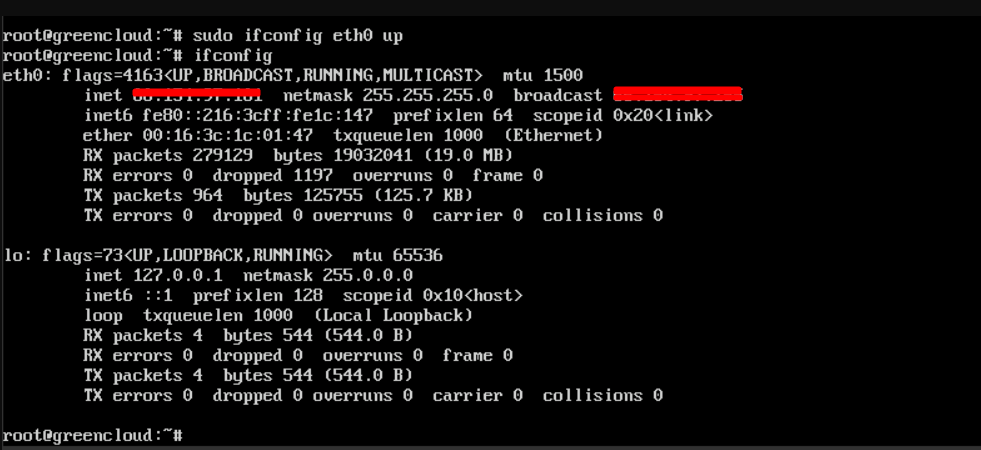
The output shows that both interfaces are now active and running.
8. View IP Addresses
List all IP addresses related to the interfaces on the system by piping ifconfig with grep.
ifconfig | grep inet

The output prints all lines that contain IP addresses.
9. Assign an IP Address to an Interface
To define an IP address for a specific interface, run the ifconfig command with the interface name and the IP address.
ifconfig [interface_name] [IP_address]
For instance, to assign 10.0.2.20 to eth0, run:
ifconfig eth0 10.0.2.20
The command doesn’t have any output. Run ifconfig with no arguments to confirm the IP address change:

10. View Network Interface Masks
Each interface has its assigned netmask. A netmask (or a subnet mask) refers to ranges of IP addresses divided into classes ( A, B, and C being the most common). Each class belongs to a default subnet mask. For instance:
- Class A IPs belong to the 255.0.0.0 netmask.
- Class B networks belong to the 255.255.0.0 netmask.
- Class C networks use the 255.255.255.0 netmask.
Note that the IP class doesn’t fit into its default netmask in some cases.
To list netmasks used by active network interfaces, pipe the results with grep:
ifconfig | grep netmask

The output prints a list of IPs and netmasks they belong to. The netmask, in this case, is 255.0.0.0
11. Assign a Netmask to an Interface
To assign a netmask address to an interface, specify the interface and use the netmask option with sudo.
ifconfig [interface_name] netmask [netmask_IP]
For instance, assign the netmask 255.255.255.0 to eth0:
ifconfig eth0 netmask 255.255.255.0
Verify the results with:
ifconfig

The output shows that the netmask is changed to 255.255.255.0
12. View the Broadcast Address of Interfaces
The broadcast setting is the address that sends messages to all hosts in a network. It is assigned automatically by the system.
Use grep to list the broadcast addresses of the interfaces:
ifconfig | grep broadcast

The command lists the lines in which the broadcast address is present.
13. Assign a New Broadcast IP to a Network Interface
To assign a new broadcast IP, specify the network interface and use the broadcast argument with sudo.
ifconfig [interface_name] broadcast [broadcast_IP]
For example, assign 10.0.2.250 as the new broadcast IP to eth0 with:
ifconfig eth0 broadcast 10.0.2.250
Since there is no output, verify the change by running ifconfig:

14. Configure Multiple Network Parameters with One Command
The IP address, netmask, and broadcast of an interface can all be modified with one command. The syntax is:
ifconfig [interface_name] [IP] netmask [netmask_addresss] broadcast [broadcast_address]
For example, for eth0 we’ll set:
- The IP to 10.0.2.15
- The netmask to 255.0.0.0
- The broadcast to 10.0.2.255
ifconfig eth0 10.0.2.15 netmask 255.0.0.0 broadcast 10.0.2.255
Verify the results:
ifconfig

The output shows that all three parameters are changed.
15. Set MTU for an Interface
The MTU stands for the maximum transmission unit and allows users to limit the size of packets transmitted on an interface. Use the mtu argument with the ifconfig command, specify it’s value, and use sudo:
ifconfig [interface_name] mtu [mtu_value]
For example, set the MTU for enp0s3 to 2000 with:
ifconfig enp0s3 mtu 2000

16. Set an Alias IP
The ifconfig command allows users to associate additional IP addresses with an interface using an IP alias.
Create an alias IP with the following command:
ifconfig [interface_name]:[alias_number] [alias_IP]
Note that the alias IP must belong to the same netmask.
For example, the IP address for enp0s3 is 10.0.2.15. This is a type A IP and belongs to the 255.0.0.0 netmask. To create an alias IP under the 255.0.0.0 netmask, do not change the first two numbers. For instance, run the following command to create an alias enp0s3:0:
ifconfig enp0s3:0 10.0.2.30
Verify the outcome:
ifconfig

The alias enp0s3:0 and the assigned IP are listed.
To remove an alias IP, run:
ifconfig enp0s3:0 down
17. Enable Promiscuous Mode
Promiscuous mode allows a network device to accept all packets. The mode is often used to analyze network activity.
To enable promiscuous mode for a network interface, use the promisc argument:
ifconfig [interface_name] promisc
For example,

18. Disable Promiscuous Mode
Disable promiscuous mode with the -promisc flag:
ifconfig enp0s3 -promisc
Verify the results with ifconfig.
The PROMISC flag is not present in the output, meaning that the interface is in normal mode.
19. View Transmission Errors
Print any transmission errors in the interface by filtering the output with grep:
ifconfig | grep errors

This command outputs lines with errors, which in this case is zero.
Conclusion
After reading this article, you know how to use ifconfig to configure network settings. While using the IP is still the popular choice, ifconfig does offer plenty of opportunities.
Next, learn different ways to configure CentOS network settings.

