How to Use Tar to Backup and Restore Your Data on Linux
The tar command, also known as a “tape archive”, is used to compress files and folders in Linux operating systems. It creates a tar archive by converting a group of files or directories into a single compressed file. It allows you to decompress the tar archive, prints a list of all files included in the archive, and add the file to the archive. Generally, the system administrator uses the tar command to create and restore a backup on the server.
This tutorial will show you how to compress and decompress files and directories using the tar command in Linux.
Tar Command Syntax
The basic syntax of the tar command is shown below:
tar [option] [archive-name] [files or directories]
A brief explanation of each option is shown below:
- -c: Used to create a tar archive.
- -x: Used to extract from the tar archive.
- -t: Used to display a list of files inside the tar archive.
- -r: Used to add an additional file in the tar archive.
- -W: Used to verify a tar archive.
- -z: Used to create a tar archive using gzip.
- -j: Used to create a tar archive using bzip.
- -v: Used to display verbose information.
- -f: Used to specify archive file name.
How to create tar backup file?
To create a tar backup file, first identify the files and folders that would be part of your backup. Let’s assume we want to take backup of /home /etc and /opt folder. Run following tar command,
$ tar <options> {tar-backup-filename} {files-folders-to-be-backed-up}
tar -cvpf system-back.tar /home /etc /opt
This will create a tar ball in the present working directory. In above tar command, we have used following options
- c – Create new archive
- v – display verbose output while creating tar file
- f – archive file name
- p – preserve permissions
As you have seen that we have not used any compression options to compress tar file. So, to compress the tar backup file during the archive use -z ( gzip compression) or -j (bzip2 compression)
Creating tar backup along with gzip compression
Use ‘z’ in tar command to use gzip compression. This time tar backup file will have extension either .tgz or .tar.gz
tar -zcvpf system-back.tgz /home /etc /opt
Creating tar backup along with bzip compression
Use ‘j’ option in tar command to use bzip2 compression, this time tar backup file will have extension either .tbz2 or .tar.bz2
tar -jcvpf system-back.tbz2 /home /etc /opt

How to append a file to tar backup?
To append a file to the existing tar backup file, use ‘-r’ option, complete command would like below:
Syntax: $ tar -rvf {tar-backup} {new-file-to-be-appended}
Let’s assume we want to append /root/app.yaml file to system-backup.tar, run
touch greencloud.txt
tar -rvf system-back.tar /root/greencloud.txt
Note: We can not append files or folders to compressed tar backup as it is not supported.
How to exclude file while creating tar backup?
To exclude a file while creating tar backup, use ‘-X’ option followed by the exclude file. To use exclude feature we must create a exclude file which will have file name to be excluded.
Create a file exclude.txt containing 2 paths /etc/debconf.conf and /etc/hosts
nano exclude.txt
cat exclude.txt
/etc/debconf.conf
/etc/hosts
$
Run following command to exclude files mentioned in exclude.txt while creating tar backup of /etc
tar -X exclude.txt -zcpvf etc-backup.tgz /etc
How to view the contents of tar backup?
To view the contents of tar backup, use ‘-t’ option, complete options would be ‘-tvf’. Example is shown below:
tar -tvf system-back.tgz | grep -i etc/fstab

How to extract tar backup?
Use ‘-x’ option in tar command to extract tar backup, complete option would be ‘-xpvf’. Example is shown below
tar -xpvf system-back.tgz
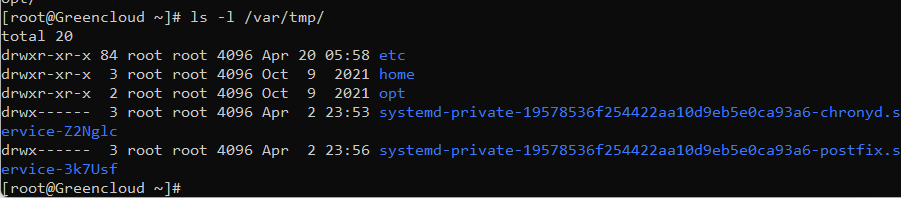
This command will extract system-back.tgz in the current working directory. In case you want extract it in a particular folder then use ‘-C’ option followed by the folder path. In the following example we are extracting system-back.tgz in /var/tmp folder.
tar -xpvf system-back.tgz -C /var/tmp/
ls -l /var/tmp/
How to verify tar backup integrity?
For tar ball, use ‘-tf’ option and redirect the output to /dev/null file,
tar -tf system-back.tar > /dev/null
If above command does not generate any output on the screen then we can say that there is no corruption.
In case of corruption, we will get the output something like below,

To verify the integrity of compressed tar backup, use following
For .tgz / .tar.gz
gunzip -c system-back.tgz | tar -t > /dev/null
For .tbz2 / .tar.bz2
tar -tvf system-back.tbz2 > /dev/null
Above commands should not produce any output on the screen. In case, there is an output then we can say that there might be some corruption in compressed tar backup.
Conclusion
The above guide taught you how to compress and extract files and directories with the tar command. I hope you can now you the tar command to backup and restore files and directories.
