
How to Install and Configure TLS/SSL on AlmaLinux 9
To install and configure TLS/SSL on AlmaLinux 9, you need to set up a web server (such as Apache or Nginx) and install an SSL/TLS certificate to enable secure HTTPS connections. The following guide provides a detailed, step-by-step process using Apache (httpd) as the web server, as it is widely used on AlmaLinux. If you prefer Nginx or have specific requirements, please clarify, and I can tailor the instructions accordingly.
Prerequisites
- AlmaLinux 9 system: Ensure the system is fully updated using sudo dnf update -y.
- Root or sudo privileges: Necessary for installing packages and editing configuration files.
- Domain name: A fully qualified domain name (FQDN) pointing to your server’s public IP address via DNS (for production environments).
Setting Up FQDN
Run the following command to set up the FQDN of your AlmaLinux machine. In this case, the server will have the fqdn greencloudvps.example.net.
hostnamectl set-hostname greencloudvps.example.net
echo "nameserver 8.8.8.8" | sudo tee -a /etc/resolv.conf
Now open the /etc/hosts file using the following nano editor command.
nano /etc/hosts
Insert the following configuration and be sure to change the IP address, FQDN, and hostname.
Your_IP greencloudvps.example.net
Save the file and exit the editor when finished.
Lastly, run the following command to verify the FQDN of your system and ensure that it’s pointed to the proper local IP address.
hostname -f
ping -c3 greencloudvps.example.net
- Web server: Apache or Nginx installed and running.
- Firewall: Ports 80 (HTTP) and 443 (HTTPS) must be open to allow traffic.
- Network access: The server must be accessible from the internet if using Let’s Encrypt.
Step 1: Install Apache Web Server
If Apache is not already installed, follow these steps to set it up.
-
- Install Apache:
dnf install httpd -ymv /etc/httpd/conf.d/welcome.conf /etc/httpd/conf.d/welcome.conf.org # rename or remove welcome pageThis installs the Apache web server package.
- Start and enable Apache:
systemctl start httpd
systemctl enable httpd
This ensures Apache starts automatically on system boot.
- Verify Apache is running:
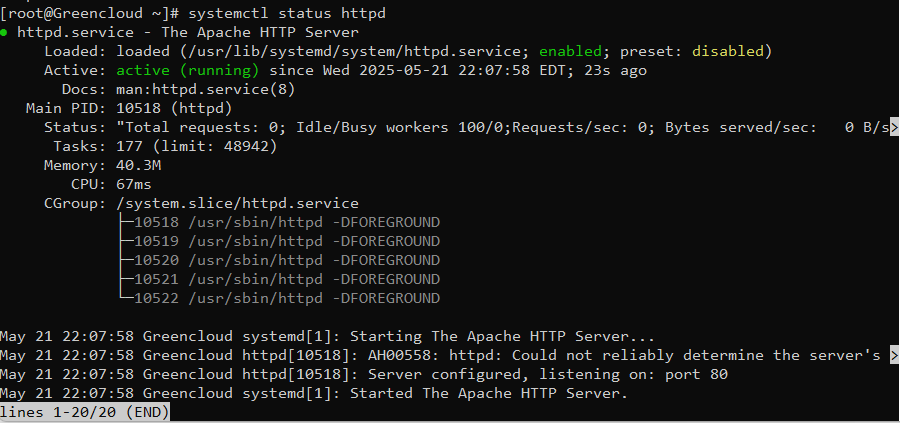
systemctl status httpdCheck the output to confirm the service is active and running.

Add firewall rules:
firewall-cmd --permanent --add-service=http firewall-cmd --permanent --add-service=httpsfirewall-cmd --reload - Configure httpd. Replace the Server name with your own environment.
[root@Greencloud ~]# nano /etc/httpd/conf/httpd.conf
# line 91 : change to admin's email address
ServerAdmin [email protected]
# line 100 : change to your server's name
ServerName www.greencloudvps.example.net:80
# line 149 : change (remove [Indexes])
Options FollowSymLinks
# line 156 : change
AllowOverride All
# line 169 : add file name that it can access only with directory's name
DirectoryIndex index.html index.php index.cgi
# add follows to the end
# server's response header
ServerTokens Prod
[root@Greencloud ~]# systemctl enable --now httpd
- Test Apache: Access http://your_server_ip or http://your_domain in a browser to confirm Apache is serving content (you should see the default Apache page).
- Install Apache:
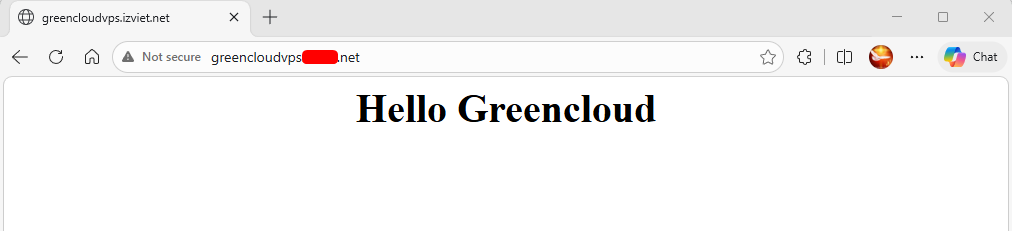
Create an HTML test page and access it from any client computer with a web browser. It’s OK if the following page is shown.
[root@Greencloud ~]# nano /var/www/html/index.html
<html>
<body>
<div style="width: 100%; font-size: 40px; font-weight: bold; text-align: center;">
Hello Greencloud
</div>
</body>
</html>
Step 2: Install mod_ssl for Apache
The mod_ssl module enables SSL/TLS support for Apache.
- Install mod_ssl:
dnf install mod_ssl -yThis package provides SSL/TLS functionality and creates a default SSL configuration file at /etc/httpd/conf.d/ssl.conf.
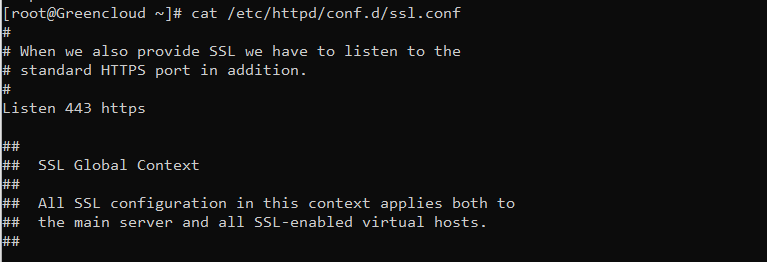
- Verify installation: Apache automatically configures It to listen on port 443 (HTTPS). You can check this in /etc/httpd/conf.d/ssl.conf.

Step 3: Obtain an SSL/TLS Certificate
To enable HTTPS, you need an SSL/TLS certificate. This guide uses Let’s Encrypt, a free and automated Certificate Authority (CA), with Certbot for simplicity. If you have a commercial certificate, skip to Step 4 for manual configuration.
Install Certbot
- Install the EPEL repository (required for Certbot):
dnf install epel-release -y - Install Certbot and the Apache plugin:
dnf install certbot python3-certbot-apache -y
Request a Let’s Encrypt Certificate
- Run Certbot to obtain and install the certificate:
certbot certonly --webroot -w /var/www/html -d greencloudvps.example.net- Replace yourdomain.com with your actual domain name.
- Include www.yourdomain.com if you want the certificate to cover the www subdomain.
- Follow the interactive prompts to:
- Provide an email address for renewal and security notices.
- Agree to the Let’s Encrypt terms of service.
- Choose whether to redirect HTTP traffic to HTTPS (recommended).
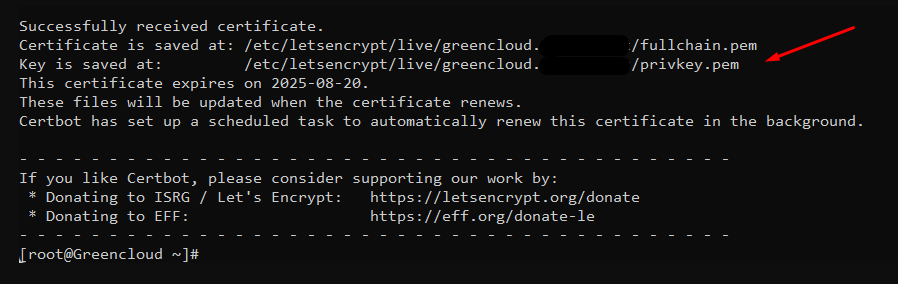
- Verify certificate files: Certbot stores certificates in /etc/letsencrypt/live/yourdomain.com/. Key files include:
- fullchain.pem: The server certificate and intermediate chain.
- privkey.pem: The private key.

- Automatic Apache configuration: Certbot modifies Apache’s configuration to use the certificate and enables HTTPS. It may also create a new virtual host file (e.g., /etc/httpd/conf.d/yourdomain.com-le-ssl.conf) for the HTTPS configuration.
Step 4 – Verify the Configuration
Test the Apache configuration syntax:
apachectl configtestIf you do not intend to use the default SSL virtual host (e.g., you manage certificates per-domain manually):
-
dit /etc/httpd/conf.d/ssl.conf:
nano /etc/httpd/conf.d/ssl.conf -
Locate the lines around line 85 (or search for SSLCertificateFile) and comment them out:
# SSLCertificateFile /etc/pki/tls/certs/localhost.crt
# SSLCertificateKeyFile /etc/pki/tls/private/localhost.key
The default /etc/httpd/conf.d/ssl.conf file is a sample/template and is not required for production use when managing certificates with Certbot or custom virtual hosts.
-
Rename (or remove) the file to prevent it from being loaded:
mv /etc/httpd/conf.d/ssl.conf /etc/httpd/conf.d/ssl.conf.disabled(Using .disabled or .bak is safer than deletion.)
If the output reports “Syntax OK”, restart Apache to apply changes:
systemctl restart httpdFor an independent evaluation of the TLS setup, use an online scanner such as SSL Labs.
Step 5 – Certificate Renewal
certbot renew --dry-runManual TLS Configuration (Advanced – When Not Using Certbot –apache)
If certificates are obtained separately (e.g., via DNS-01 challenge or another CA), place them in a secure directory (commonly /etc/letsencrypt/live/example.com/) and configure Apache manually.
Example virtual host configuration (create or edit a file in /etc/httpd/conf.d/greencloudvps.example.net.conf):
<VirtualHost *:443>
    ServerName example.com
    ServerAlias www.example.com
    DocumentRoot /var/www/html

    SSLEngine on
    SSLCertificateFile      /etc/letsencrypt/live/example.com/fullchain.pem
    SSLCertificateKeyFile   /etc/letsencrypt/live/example.com/privkey.pem

    # Recommended modern security settings (2025–2026 standards)
    SSLProtocol             all -SSLv2 -SSLv3 -TLSv1 -TLSv1.1
    SSLCipherSuite          ECDHE-ECDSA-AES256-GCM-SHA384:ECDHE-RSA-AES256-GCM-SHA384:ECDHE-ECDSA-CHACHA20-POLY1305:ECDHE-RSA-CHACHA20-POLY1305:ECDHE-ECDSA-AES128-GCM-SHA256:ECDHE-RSA-AES128-GCM-SHA256
    SSLHonorCipherOrder     on

    # Enable HSTS (after initial testing)
    Header always set Strict-Transport-Security "max-age=31536000; includeSubDomains"
</VirtualHost>apachectl configtest
systemctl restart httpd