
How to Setup Remote Logging with Rsyslog on Debian 12
Rsyslog is an open-source logging system daemon that collects, filters, stores, and forwards log messages from operating systems and applications. It is a powerful and flexible logging system that supports multiple protocols, including TCP, UDP, and RELP (Reliable Event Logging Protocol). You can use Rsyslog to centralize logs for your servers, applications, and databases.
This guide will show you how to install rsyslog and set up remote logging on the Debian 12 server. You’ll also set up a Linux server to send logs remotely to the Rsyslog server.
Prerequisites
To begin this guide, you need the following:
- A Debian 12 server
- A non-root user with administrator privileges
- A Linux machine as a client for testing
Installing Rsyslog
Before you start, you need to install Rsyslog on your Debian server. In this step, you’ll install Rsyslog through APT, then start and enable the Rsyslog service.
apt update
apt install rsyslog
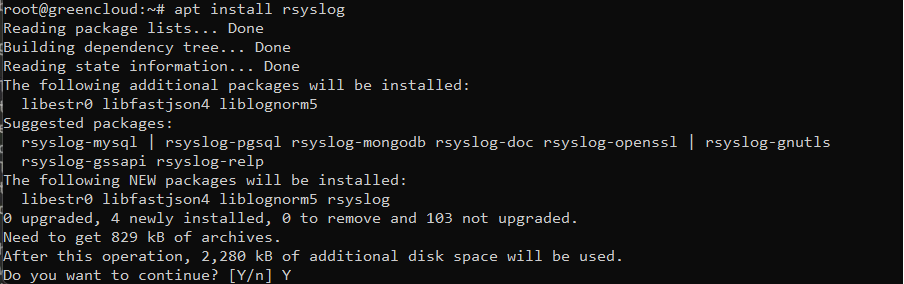
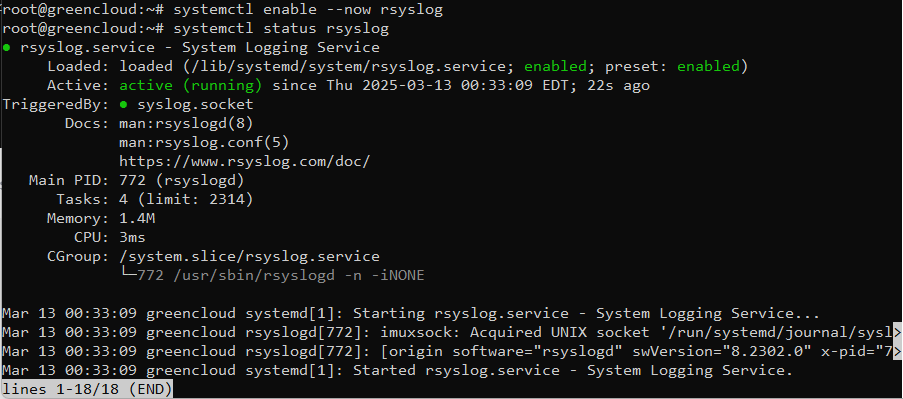
After the installation, run the ‘systemctl‘ command below to start and enable the ‘rsyslog‘ server. Then, verify it to ensure it is running.
systemctl enable --now rsyslog
systemctl status rsyslog
In the following output, you can see that Rsyslog is running and enabled.
Setting up UFW (Uncomplicated Firewall)
After Rsyslog is installed, you’ll install and configure UFW (Uncomplicated Firewall). You’ll open port ’22’ for the OpenSSH service and port ‘514’ for Rsyslog. And then you’ll start and enable the UFW service.
To install UFW, run the following ‘apt‘ command. Input ‘Y‘ to confirm the installation.
apt install ufw
After the installation is finished, run the following ‘ufw’ command to enable the ‘OpenSSH‘ profile and allow access to port ‘514’. The ‘OpenSSH‘ profile will allow SSH access, and port ‘514‘ is the syslog port.
ufw allow ssh
ufw allow 514
Now, start and enable UFW with the command below. Type ‘y‘ to confirm, and you’ll get an output such as ‘Firewall is active and enabled at system startup‘.
ufw enable
Lastly, check the UFW status with the following command.
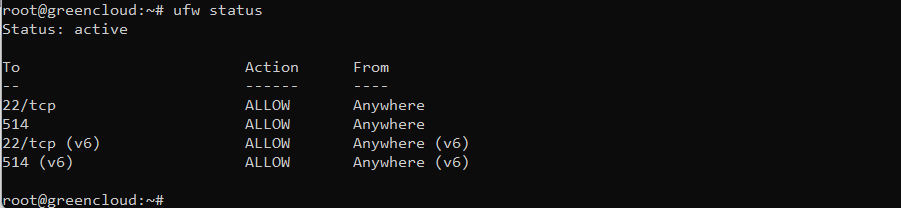
ufw status
In the output below, you can see UFW with the status active, OpenSSH profile, and port ‘514‘ enabled.
Rsyslog to receive logs from the remote server
Now that you’ve installed Rsyslog and configured UFW, you’re ready to set up Rsyslog to receive logs from remote servers. To achieve this, you need to modify the ‘/etc/rsyslog.conf’ file and configure:
- Enable the ‘imudp‘ module to receive logs from remote servers via UDP
- Optional: enable the ‘imtcp‘ to receive logs via TCP
- Enable the ‘AllowedSender‘ option to allow specific subnets to send logs remotely
- Adding a custom template for Rsyslog
- Check Rsyslog configuration
- Start, enable, and verify the Rsyslog service
Let’s get started.
First, edit the ‘/etc/rsyslog.conf‘ file using the following ‘nano‘ editor.
nano /etc/rsyslog.conf
Uncomment the following lines to enable the ‘imudp‘ module and enable the Syslog to log in to the Rsyslog server.
# provides UDP syslog reception
module(load="imudp")
input(type="imudp" port="514")
$AllowedSender UDP, 127.0.0.1, x.x.177.0/24
Additionally, if you need to enable Syslog via TCP, enable the ‘imtcp‘ module like the following:
# provides TCP syslog reception
module(load="imtcp")
input(type="imtcp" port="514")
$AllowedSender TCP, 127.0.0.1, x.x.177.0/24
Separate remote logs from local logs using a template and a dedicated directory. Add at the end of the file:
# Template saves logs by hostname and date
template(name="RemoteHostDaily"
type="string"
string="/var/log/remoteservers/%hostname%/%$year%/%$month%/%$day%.log"
)

# Main rule: Only process logs from remote sources.
if $fromhost-ip != '127.0.0.1' then {
action(type="omfile" dynaFile="RemoteHostDaily")
& stop
}
Save the file and exit the editor when done.
Next, run the ‘rsyslogd‘ command below to check the Rsyslog configuration and ensure you have the proper configuration.
rsyslogd -f /etc/rsyslog.conf -N1
When no error occurs, run the ‘systemctl‘ command below to restart the ‘rsyslog‘ service and apply your changes.
systemctl restart rsyslog

Lastly, check the ‘rsyslog‘ service status to ensure it is running.
systemctl status rsyslog
Additionally, check port ‘514‘ on your server to ensure Rsyslog is running.
ss -tulpn | grep 514
You can see below that Rsyslog uses the UDP port ‘514′.

Sending logs to the Rsyslog server
Now that you’ve configured remote logging with Rsyslog on your Debian server, let’s try sending logs from the ‘x.x.177.9 to the ‘x.x.177.21’ server. To do this, you need the following:
- Install the Rsyslog package on your machine
- Edit the Rsyslog configuration and define which logs will be sent to the removed Rsyslog server
- Optional: Setting up the disk queue buffer for Rsyslog
Install the ‘rsyslog’ package with the ‘apt‘ command below. Enter ‘Y‘ to confirm the installation.
apt install rsyslog
Now open the default configuration ‘/etc/rsyslog.conf‘ file with the ‘nano‘ editor.
nano /etc/rsyslog.conf
Add the following configuration to send logs to the Rsyslog server ‘x.x.177.21’.
Find the line: *.*;auth,authpriv.none -/var/log/syslog
Comment it out
Replace with something like:
*.* @@x.x.177.21:514Now add the following to set up a queue buffer for Rsyslog.
# Define Disk Queue Buffer in case the server goes down
$ActionQueueFileName queue # define a file name for disk assistance.
$ActionQueueMaxDiskSpace 1g # The maximum size that all queue files together will use on disk.
$ActionQueueSaveOnShutdown on # specifies that data should be saved at shutdown
$ActionQueueType LinkedList # holds enqueued messages in memory which makes the process very fast.
$ActionResumeRetryCount -1 # prevents rsyslog from dropping messages when retrying to connect if the server is not responding,
Save the file and exit the editor.
Next, run the ‘rsyslogd‘ command below to check and verify your Rsyslog configuration.
rsyslogd -f /etc/rsyslog.conf -N1
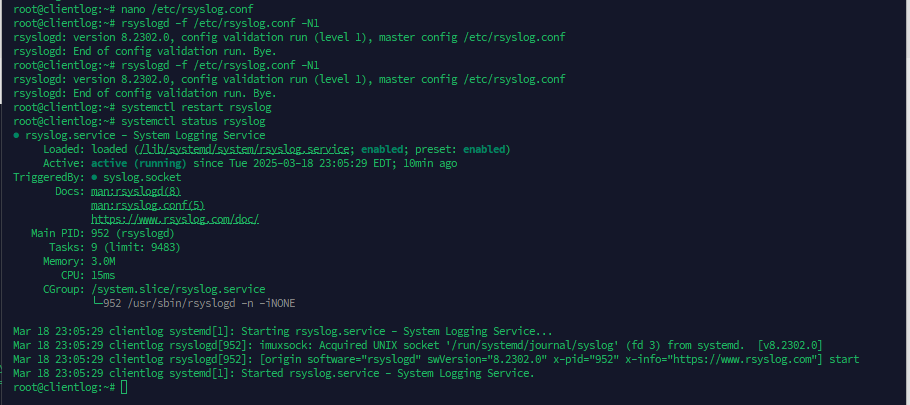
When no error occurs, run the ‘systemctl‘ command below to restart Rsyslog and verify it to ensure it is running.
systemctl restart rsyslog
systemctl status rsyslog
You can see below that the Rsyslog service is running
Checking log files on the Rsyslog server
To ensure that your Rsyslog is working, you need to check the log directory that you’ve configured in the template. In this example, log files from remote servers will be stored in the ‘/var/log/remoteservers’ directory.
Check the log directory ‘/var/log/remoteservers‘ with the command below. This will show you the directory of each server.
ls -lR /var/log/remoteservers/
Now check the log directory of your server, which is stored in the ‘/var/log/servers/server-ip‘ directory. You’ll see multiple log files available on the Rsyslog server.
You can now check log files with the ‘cat‘ or ‘tail‘ command to see details of logs.
cat /var/log/remoteservers/<name-client>/$(date +%Y/%m/%d).log
tail -f /var/log/remoteservers/<name-client>/$(date +%Y/%m/%d).log
Conclusion
Congratulations! You’ve completed the installation of Rsyslog on the Debian 12 server. You’ve also configured remote logging via Rsyslog and sent the log to the server via Syslog UDP. For the next step, you may also set up both TCP and UDP input modules and integrate them with log systems such as Rsyslog or Logstash.
