Ubuntu/Debian/CentOS IPv6 Network Configuration
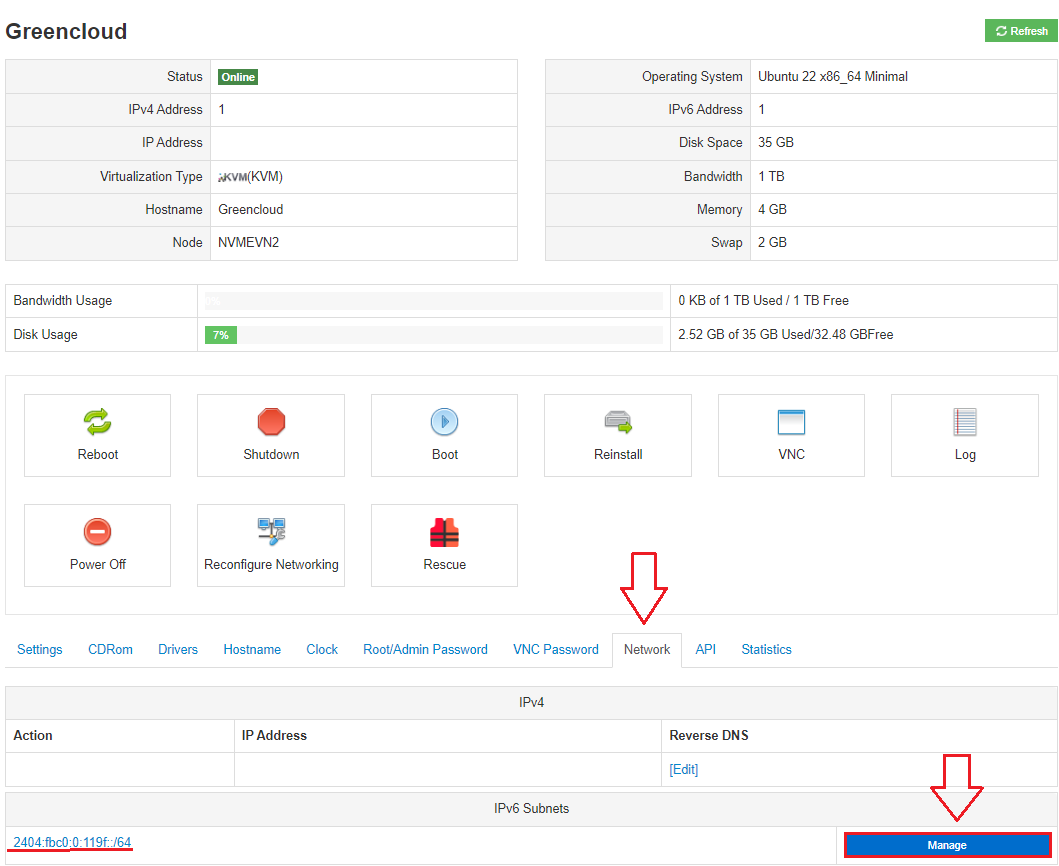
Firstly, log in to your SolusVM Control Panel, choose your VPS and navigate to the Network Tab:
You can follow this guide to access the SolusVM control panel or in the client area:
1. Log in to your SolusVM account and navigate to the “Virtual Servers” page.
2. Click on the “Network” tab. under the “IPv6 Addresses” select “Manage” .
3. Enter the IPv6 address you want to add in the “IPv6 Address” field. The address should have a /64 prefix. Like expamle 2404:fbc0:0:119f::2
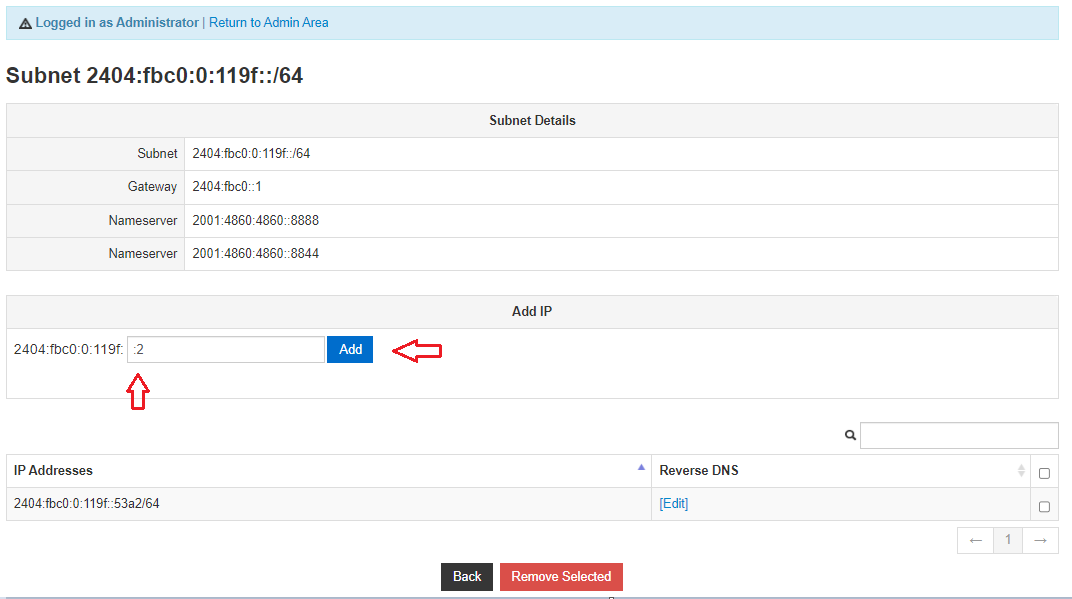
Click on the “Add” button to add the IPv6 address to the virtual server.
4 . Once the IPv6 address has been added, it will be listed under the “IPv6 Addresses” section.
You can repeat the above steps to add multiple IPv6 addresses to your virtual server with a /64 prefix. Additionally, make sure that your hosting provider has assigned you a block of IPv6 addresses with a /64 prefix, as this is the standard prefix length for IPv6 subnets.
After that, you have both ways to configure IPv6.
Method 1: Configure on SolusVM or in the client area.
First, login your account to SolusVM or in the client area and choose “Reconfigure network”
After that, verify your configuration by pinging ipv6 enabled site such as ipv6.google.com:
root@Greencloud:~# ping6 ipv6.google.com
PING ipv6.google.com(hkg12s33-in-x0e.1e100.net (2404:6800:4005:800::200e)) 56 data bytes
64 bytes from hkg12s33-in-x0e.1e100.net (2404:6800:4005:800::200e): icmp_seq=1 ttl=59 time=30.1 ms
64 bytes from hkg07s21-in-x0e.1e100.net (2404:6800:4005:800::200e): icmp_seq=2 ttl=59 time=21.0 ms
64 bytes from hkg12s33-in-x0e.1e100.net (2404:6800:4005:800::200e): icmp_seq=3 ttl=59 time=20.9 ms
^C
--- ipv6.google.com ping statistics ---
3 packets transmitted, 3 received, 0% packet loss, time 2003ms
rtt min/avg/max/mdev = 20.944/23.999/30.090/4.306 ms
Method 2: You need should to update and configure files for IPv6 configuration:
For CentOS :
Open the “/etc/sysconfig/network-scripts/ifcfg-eth0” file in your preferred text editor.
Add the following lines to the file to configure your IPv6 address:
IPV6INIT=yes
IPV6_AUTOCONF=no
IPV6_DEFAULTGW=2404:fbc0:0000:0000:0000:0000:0000:0001
IPV6ADDR_SECONDARIES="2404:fbc0:0:119f::2/64"
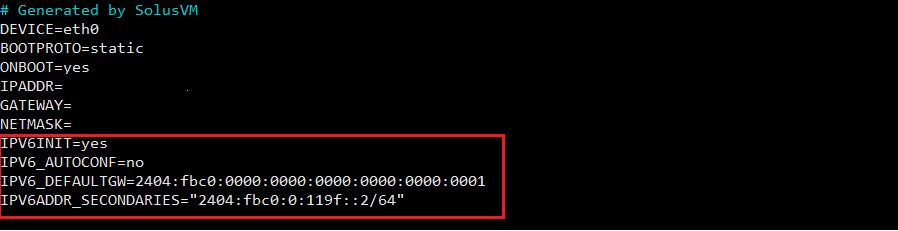
The “IPV6INIT” variable must be set to “yes” to enable IPv6 on the interface.
The “IPV6ADDR” variable is used to specify the IPv6 address and prefix length. In this example, we are using the subnet “2404:fbc0:0:119f::2/64”. Make sure to use an IPv6 address and subnet that is assigned to your server by your hosting provider.
Save the changes to the file and exit the text editor.
Open the “/etc/sysconfig/network” file in your preferred text editor.
Find the line that says “NETWORKING=” and change the value to “yes”. The line should look like this:
NETWORKING=yes
Save the changes to the file and exit the text editor.
Restart the network service to apply the changes:
systemctl restart network
After completing these steps, the network service should be enabled and your CentOS server should be configured to use the IPv6 address that you added to the “/etc/sysconfig/network-scripts/ifcfg-eth0” file. You can verify that the IPv6 address is correctly configured by running the following command:
ip -6 addr show eth0
For Debian or Ubuntu
Open the sysctl.conf file using the following command:
nano /etc/sysctl.conf
Add the following lines at the end of the file:
net.ipv6.conf.all.accept_ra = 0
net.ipv6.conf.eth0.autoconf = 0
net.ipv6.conf.eth0.accept_ra = 0
net.ipv6.conf.all.autoconf = 0
Save the file and exit the editor.
That’s it! You have now enabled IPv6 on your Debian or Ubuntu server and configured it to forward IPv6 traffic. Note that you will still need to configure IPv6 addresses on your network interfaces as described in the previous answer.
- Open the file “/etc/network/interfaces” in your preferred text editor.
- Find the section for the network interface that you want to configure for IPv6. It should look something like this:
auto eth0
iface eth0 inet static
Add the following lines to the section to configure your IPv6 address with a /64 prefix:
iface eth0 inet static
 up ip addr add 2404:fbc0:0:119f::2/64 dev eth0
 up ip -6 route add 2404:fbc0::1 dev eth0
 up ip -6 route add default via 2404:fbc0::1
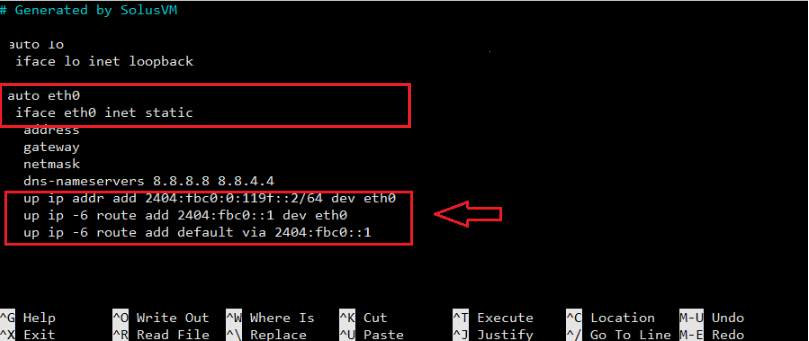
The “iface eth0 inet6 static” line tells the system to use a static IPv6 address configuration for the interface. The “address” line specifies the IPv6 address that you want to assign to the interface, and the “netmask” line specifies the prefix length (in this case, /64).
Save the changes to the file and exit the text editor.
Restart the networking service to apply the changes:
systemctl restart networking.service
Verify that the IPv6 address has been added to the interface by running the following command:
ip -6 addr show eth0
This should display the IPv6 address that you added in the previous steps.
That’s it! You should now have successfully configured IPv6 on your Ubuntu server using the file “/etc/network/interfaces” with a /64 prefix.

