How To Use The Telnet Command In Linux
Since the days of mainframes and remote terminals, accessing and working with remote systems is critical.
Telnet was introduced in 1969 as a standard protocol for establishing a remote connection with another device or server. Once the connection has been established, you can run commands on the remote system.
In this comprehensive guide, we’ll discuss how to use the Telnet command in Linux. We’ll show you how to install and set up relevant packages and then go through several application scenarios of the Telnet protocol.
Let’s start with an introduction to the Telnet protocol.
What is Telnet?
Telnet is a communication protocol and command-line tool that allows users to remotely connect to and interact with devices, servers, and systems over a network, often the Internet. It provides a basic, text-based interface for establishing connections with remote hosts. Network admins use Telnet for tasks like configuring networking equipment, diagnosing issues on remote servers, and testing network services.
Perhaps the best-known fact about Telnet is that Telnet doesn’t offer encryption. As such, data transferred through Telnet is not secure. That’s why, over the years, network admins have started using better-secured alternatives like SSH to protect confidential or sensitive operations.
Despite this critical security flaw, admins still use Telnet to manage remote devices and servers because of its ease of use. Since the protocol transfers data in cleartext, it is speedy. However, we strongly recommend SSH over Telnet for critical data transfer.
Install Telnet on Linux
Telnet is not usually included with major Linux distributions because of the popularity of SSH as the preferred way of working with remote servers so the first step is to install the required packages.
RHEL Based Distributions
If you are on an RHEL-based distribution (Fedora or CentOS), follow these steps to install Telnet on your system. Note that you will work with Yum as your package manager.
Step 1: Install Telnet Packages
Before installing Telnet, update the system’s package index:
# yum update
Next, install the telnet server packages with the following command:
# yum install telnet telnet-server -y
Step 2: Enable the Telnet Service
Run the following commands to launch and enable the Telnet service on your system
# systemctl start telnet.socket
# systemctl enable telnet.socket
Step 3: Configure the Firewall on the Target Machine
The final step is configuring the target system’s firewall to accept Telnet connections. The default port is 23 but you can change this on the target system. However, we’ll use the default port to demonstrate firewall configuration.
For this, run the following command in the terminal
# firewall-cmd --permanent --add-port=23/tcp
Next, apply these commands and reload the firewall rules to allow incoming Telnet connections:
# firewall-cmd --reload
Debian Based Distributions
If you are on a Debian-based distribution, like Ubuntu, you will work with apt as the default package manager. You should follow these steps to install Telnet packages on these distributions.
Step 1: Install Telnet Packages
run the following command to set up Telnet
# apt install telnetd -y
Step 2: Launch the Telnet Service
Run the following command to launch the Telnet service
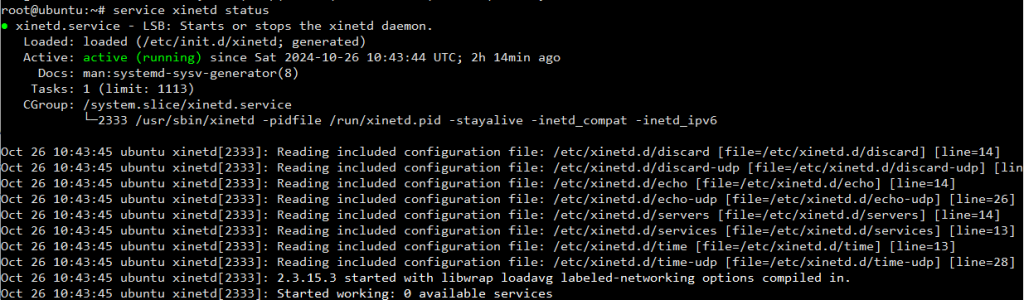
# service xinetd status
Or
# systemctl status inetd
Step 3: Configure the Firewall on the Remote System
The final step of the process is to configure the firewall on the target system to allow incoming Telnet connections. The default port is 23 and we’ll use it in this tutorial:
Run the following command on the remote system to allow traffic to port 23:
# ufw allow 23/tcp
Next, restart the firewall service to make sure the new rules are in force:
# ufw reload
How to Use Telnet in Linux
Important: Before working with Telnet in Linux, ensure that the firewall on the remote system allows connection on port 23, the default Telnet port.
The Telnet command has the following syntax:
telnet [options] [remote_server_address] [port]
Here, the [port] and [options] parameters are optional. In addition, the Telnet command accepts both numeric and symbolic addresses for [remote_server_address].
You can enter the telnet command in the terminal to enter the interactive telnet mode.

You can use this interactive shell to connect to remote servers, check the current status of the telnet service, and run commands on connected systems.
Once done, enter quit to leave the Telnet shell and terminate the session:

Check for Open Ports
Although not a secure option for establishing a remote connection, telnet is a great way to check if a specific port is open on a server. Check if a certain port is answering any calls by specifying the port number in the command. Doing so allows you to see what’s going on in a network and if a port is responsive or not.
1. Use the following syntax:
telnet [server_address] [port]

2. Not specifying a port number defaults to port 23. For example, to check if port 22 is open on a server, run:
telnet google.com 22

The connection breaks, which means that the specified port is not open.
3. However, trying port 80 yields a different result:
telnet google.com 80

The output shows that the port has been open since the connection was established.
Download Web Page to File
telnet allows users to connect to port 80 of a website and download the HTML source code to the terminal. This allows you to save and inspect the source code, check it for errors, etc.
1. For example, the following command connects to port 80 on google.com:
telnet google.com 80
2. After establishing the connection, download the HTML web page by running:
GET /index.html
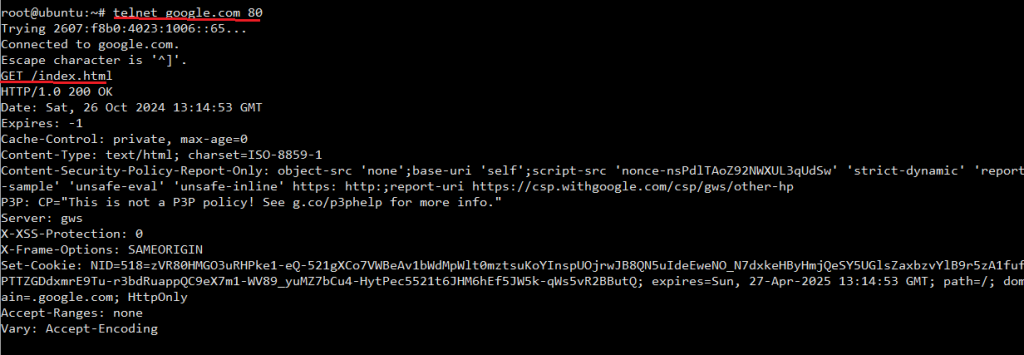
The screenshot above shows that the command has downloaded the homepage source code.
3. Save the code to a file or inspect it in the terminal.
Connect to Remote System
If you decide to use telnet for remote connections despite its lack of security, do it by specifying the remote machine’s IP address.
telnet [remote_machine_IP]
Make sure that telnet is installed on both machines and port 23 is allowed through the firewall on the remote machine.
When prompted, enter the account username and password to log in to the system. After logging in, you can operate the other machine remotely.
For example:
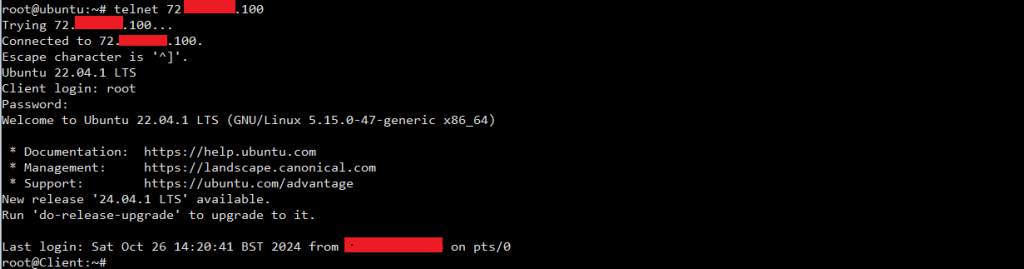
After the connection is established, you are in control of the remote machine.
Conclusion
This tutorial showed how to use the telnet command in Linux. Although it has poor security features and isn’t recommended for remote connections, the command has other uses that make it beneficial.
Next, see how SSH works and why it is more secure than telnet.

