How to Set Up Squid Proxy for Private Connections on Ubuntu 20.04
Introduction
Proxy servers are a type of server application that functions as a gateway between an end user and an internet resource. Through a proxy server, an end user is able to control and monitor their web traffic for a wide variety of purposes, including privacy, security, and caching. For example, you can use a proxy server to make web requests from a different IP address than your own. You can also use a proxy server to research how the web is served differently from one jurisdiction to the next, or avoid some methods of surveillance or web traffic throttling.
Squid is a stable, popular, open-source HTTP proxy. In this tutorial, you will be installing and configuring Squid to provide an HTTP proxy on a Ubuntu 20.04 server.
Prerequisites
To complete this guide, you will need:
- An Ubuntu 20.04 server and a non-root user with sudo privileges.
You will use the domain name your_domain in this tutorial, but you should substitute this with your own domain name, or IP address.
Step 1 — Installing Squid Proxy
Squid has many use cases beyond routing an individual user’s outbound traffic. In the context of large-scale server deployments, it can be used as a distributed caching mechanism, a load balancer, or another component of a routing stack. However, some methods of horizontally scaling server traffic that would typically have involved a proxy server have been surpassed in popularity by containerization frameworks such as Kubernetes, which distribute more components of an application. At the same time, using proxy servers to redirect web requests as an individual user has become increasingly popular for protecting your privacy. This is helpful to keep in mind when working with open-source proxy servers which may appear to have many dozens of features in a lower-priority maintenance mode. The use cases for a proxy have changed over time, but the fundamental technology has not.
Begin by running the following commands as a non-root user to update your package listings and install Squid Proxy:
Squid will automatically set up a background service and start after being installed. You can check that the service is running properly:
systemctl status squid.service

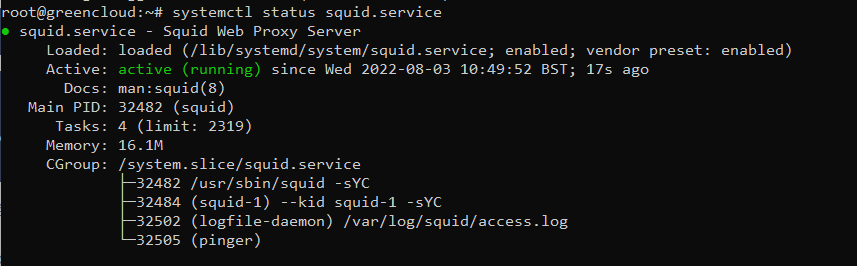
By default, Squid does not allow any clients to connect to it from outside of this server. In order to enable that, you’ll need to make some changes to its configuration file, which is stored in /etc/squid/squid.conf. Open it in nano or your favorite text editor:
Begin by navigating to the line containing the phrase http_access deny all. You should see a block of text explaining Squid’s default access rules:

From this, you can see the current behavior – localhost is allowed; other connections are not. Note that these rules are parsed sequentially, so it’s a good idea to keep the deny all rule at the bottom of this configuration block. You could change that rule to allow all, enabling anyone to connect to your proxy server, but you probably don’t want to do that. Instead, you can add a line above http_access allow localhost that includes your own IP address, like so:
acl localnet src your_ip_address
- acl means an Access Control List, a common term for permissions policies
- localnet in this case is the name of your ACL.
- src is where the request would originate from under this ACL, i.e., your IP address.
After making that change, save and close the file. If you are using nano, press Ctrl+X, and then when prompted, Y and then Enter.
At this point, you could restart Squid and connect to it, but there’s more you can do in order to secure it first.
Step 2 — Securing Squid
Most proxies, and most client-side apps that connect to proxies (e.g., web browsers) support multiple methods of authentication. These can include shared keys, or separate authentication servers, but most commonly entail regular username-password pairs. Squid allows you to create username-password pairs using built-in Linux functionality, as an additional or an alternative step to restricting access to your proxy by IP address. To do that, you’ll create a file called /etc/squid/passwords and point Squid’s configuration to it.
First, you’ll need to install some utilities from the Apache project in order to have access to a password generator that Squid likes.
apt install apache2-utils
htpasswd -c /etc/squid/passwords your_squid_username

cat /etc/squid/passwords

After verifying that your username and password have been stored, you can update Squid’s configuration to use your new /etc/squid/passwords file. Using nano or your favorite text editor, reopen the Squid configuration file and add the following highlighted lines:
auth_param basic program /usr/lib/squid3/basic_ncsa_auth /etc/squid/passwords
auth_param basic realm proxy
acl authenticated proxy_auth REQUIRED
...
http_access allow authenticated
nano /etc/squid/squid.conf
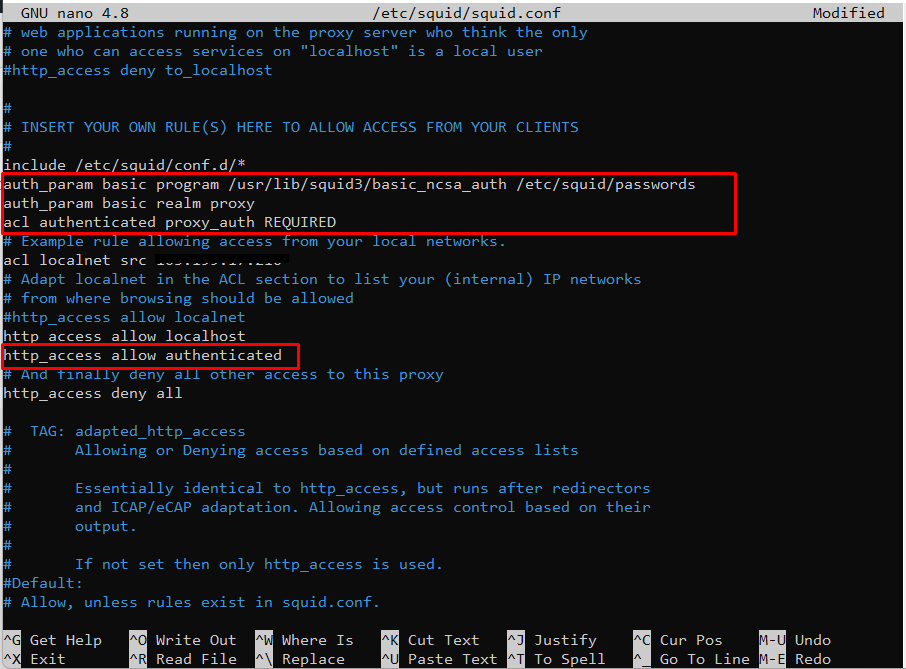
These additional directives tell Squid to check in your new passwords file for password hashes that can be parsed using the basic_ncsa_auth mechanism, and to require authentication for access to your proxy. You can review Squid’s documentation for more information on this or other authentication methods. After that, you can finally restart Squid with your configuration changes. This might take a moment to complete.
Step 3 — Connecting through Squid
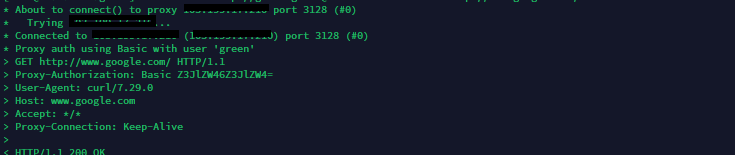
In order to demonstrate your Squid server, you’ll use a command line program called curl, which is popular for making different types of web requests. In general, if you want to verify whether a given connection should be working in a browser under ideal circumstances, you should always test first with curl. You’ll be using curl on your local machine in order to do this – it’s installed by default on all modern Windows, Mac, and Linux environments, so you can open any local shell to run this command:
curl -v -x http://your_squid_username:your_squid_password@your_server_ip:3128 http://www.google.com/
Check Proxy Working on Browser
You can configure the proxy on the browser according to the instructions:
https://green.cloud/docs/how-to-use-http-proxies-on-your-browsers/
You can check IP for working proxy authentication at: https://whoer.net/fr
Conclusion
In this tutorial, you learned to deploy a popular, open-source API endpoint for proxying traffic with little to no overhead. Many applications have built-in proxy support (often at the OS level) going back decades, making this proxy stack highly reusable.

