How to Set Up SoftEther VPN Server on Ubuntu 22.04
SoftEther VPN (Virtual Private Network) is open-source software developed by the SoftEther VPN Project. It is a versatile solution that supports various VPN protocols and features. SoftEther VPN can be installed on various operating systems, including Windows, Linux, macOS, FreeBSD, and Solaris.
SoftEther VPN on a VPS provides a versatile and secure VPN solution that enables users to protect their privacy, bypass restrictions, and securely access remote resources over the internet. Whether for personal or business use, SoftEther VPN offers a powerful tool for ensuring secure and private communication online.
This tutorial will show you how to install SoftEther VPN on Ubuntu 24.04.
Step 1: Install Dependencies
It is preferable to upgrade the system’s package cache as your first action. Enter the following command to achieve this:
# apt update
Install the necessary dependencies using the following command once your cache and system packages have been updated:
# apt install build-essential gnupg2 gcc make
It is now time to install SoftEther VPN’s most recent stable version after installing all required dependencies.
Step 2: Download SoftEther VPN Server
SoftEther doesn’t have a prebuilt package for Ubuntu in the official repositories, so you’ll need to compile it from source.
- Go to the SoftEther website to download the latest stable version of SoftEther VPN Server: SoftEther Download Page
- You can also download it directly via
wgetfrom the terminal:
# wget https://github.com/SoftEtherVPN/SoftEtherVPN_Stable/releases/download/v4.39-9772-beta/softether-vpnserver-v4.39-9772-beta-2022.04.26-linux-x64-64bit.tar.gz
Step 3: Extract and Install SoftEther VPN Server
- Extract the downloaded tar file
# tar xvf softether-vpnserver-*.tar.gz
- Navigate to the SoftEther directory
# cd vpnserver/
The command to install dependency packages is as follows:
# apt install gcc binutils gzip libreadline-dev libssl-dev libncurses5-dev libncursesw5-dev libpthread-stubs0-dev
- Compile the VPN server
# make
Once the build process is complete, move the vpnserver directory to /usr/local/:
cd ..
mv vpnserver /usr/local/
Step 4: Create a Systemd Service File for SoftEther VPN
Add the following lines:
#!/bin/sh
# chkconfig: 2345 99 01
# description: SoftEther VPN Server
DAEMON=/usr/local/vpnserver/vpnserver
LOCK=/var/lock/subsys/vpnserver
test -x $DAEMON || exit 0
case "$1" in
start)
$DAEMON start
touch $LOCK
;;
stop)
$DAEMON stop
rm $LOCK
;;
restart)
$DAEMON stop
sleep 3
$DAEMON start
;;
*)
echo "Usage: $0 {start|stop|restart}"
exit 1
esac
exit 0
Save and close the file, then create the required directory and set the proper permissions to the systemd service file using the command below:
# mkdir /var/lock/subsys
# chmod 755 /etc/init.d/vpnserver
Next, start the SoftEther VPN with the following command:
/etc/init.d/vpnserver start
You will get the following output:

Next, enable the SoftEther VPN service to start at system reboot:
update-rc.d vpnserver defaults
Step 5: Configure SoftEther VPN Server
Next, change the directory to /usr/local/vpnserver and configure the SoftEther VPN using the following command:
cd /usr/local/vpnserver
./vpncmd
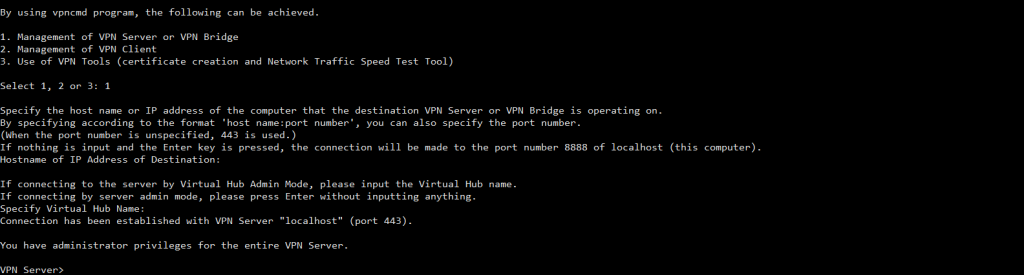
You will be asked to select the VPN component:

Type 1 and press Enter twice. You will get the following output:
Next, run the following command to set a password:
ServerPasswordSetYou should see the following output:

Next, run the following command to create a hub and set a password:
HubCreate myhubYou will get the following output:

Next, enter the hub using the following command:
Hub myhubSample output:

Next, allow the hub to work as a virtual LAN, run the following command:
SecureNatEnableSample output:

Next, create a VPN user with the following command:
UserCreate vpnuserSample output:

Next, set a password for the VPN user using the command below:
UserPasswordSet vpnuserSample output

Next, enable the IPsec to get Multi-Protocol working using the following command:
IPsecEnableAnswer all the questions as shown below:

Finally, exit from the VPN configuration wizard using the following command:
exitStep 6: Configure UFW Firewall
You can use this command to install and enable the UFW firewall if it is not installed:
# apt install ufw
# ufw enable
Then, you will need to allow ports 443,8888, 5555, 992, and 1194 through the firewall.
# ufw allow 443/tcp
# ufw allow 8888/tcp
# ufw allow 5555/tcp
# ufw allow 992/tcp
# ufw allow 1194/udp
Once all the required rules are added, reload the UFW firewall using the following command:
# ufw reload
Conclusion
By following the installation and configuration steps outlined in this guide, users can set up their own SoftEther VPN Server instance on Ubuntu 24.04 and customize it according to their specific requirements. Whether you’re a small business looking to establish a secure remote access solution or an individual user wanting to protect your online privacy, SoftEther VPN provides the tools and capabilities needed to achieve these goals

