How to Install Zabbix Agent and Add Windows Host to Zabbix Monitoring
In the previous article, we looked at how you can add Linux servers to the Zabbix server for monitoring. In this guide, we switch gears and focus our spotlight on how you can add a Windows host system to the Zabbix server for monitoring.
For this tutorial, we will add the Windows server 2019/2022 data center edition to Zabbix Server.
Step 1: Download and Install Zabbix Agent on Windows
As we saw when adding Linux hosts, the first step when adding a host to the Zabbix server is to install the Zabbix agent on the host system first. With that in mind, head out to the official Zabbix agents download page and download the Zabbix Window’s agent.
By default, this will download it in the ‘Downloads’ folder as shown.
Method 1: Install via cmd
Once downloaded, right-click on the zipped file and select ‘Extract All’
This unzips it into 2 folders: bin and conf folder. The bin folder contains the Zabbix agent executable file while the conf folder contains the Zabbix agent configuration file – zabbix.agentd.conf
1. Then manually installed and started on the system using windows Command Prompt as in the following example:
C:\Users\caezsar><full system path to zabbix_agentd.exe> --config <full system path to zabbix_agentd.win.conf> --install
For example, suppose you’ve downloaded and extracted the Zabbix agent zip archive to C:\Users\Administrator\Downloads\zabbix_agent-5.0.33-windows-amd64-openssl, run the following command to install the service:
C:\Users\Administrator\Downloads\zabbix_agent-5.0.33-windows-amd64-openssl\bin\zabbix_agentd.exe --config C:\Users\Administrator\Downloads\zabbix_agent-5.0.33-windows-amd64-openssl\conf\zabbix_agentd.conf --install
2. After the service has been installed on your Windows host, open zabbix_agentd.win.conf file and manually edit the following parameters:
zabbix_agentd.win.conf
Server=IP of Zabbix Server
ServerActive=IP of Zabbix Server
Hostname=use the FQDN of your windows host
3. To start the service just type:
C:\Users\Administrator\Downloads\zabbix_agent-5.0.33-windows-amd64-openssl\bin\zabbix_agentd.exe --start
To stop the service run the same command as above with --stop argument and to uninstall the service use the --uninstall argument.
C:\Users\Administrator\Downloads\zabbix_agent-5.0.33-windows-amd64-openssl\bin\zabbix_agentd.exe --stop
C:\Users\Administrator\Downloads\zabbix_agent-5.0.33-windows-amd64-openssl\bin\zabbix_agentd.exe --uninstall
Method 2: Install via msi file
1. A second and more convenient method to install and automatically configure the Zabbix agent on Windows environments is by downloading the Zabbix Agent installer MSI package specific to your system architecture.
2. Once the Zabbix agent MSI file has been downloaded on your system, run it and supply the required information in order to configure and install the agent on the target monitored host as follows:
Hostname: use the FQDN of your windows host (the hostname value should match the “Full Computer name” configured for your machine)
Zabbix server Name: use the IP of the Zabbix Server
Agent Port: 10050
Remote Command: check this value
Active Server: IP of Zabbix Server
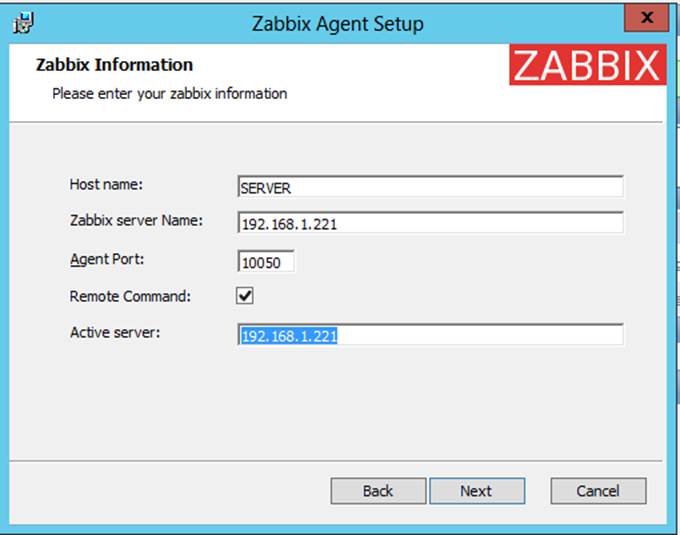
If you need to modify the Zabbix configuration file with other custom values at a later date, the conf file can be found on the %programfiles%Zabbix Agent path.
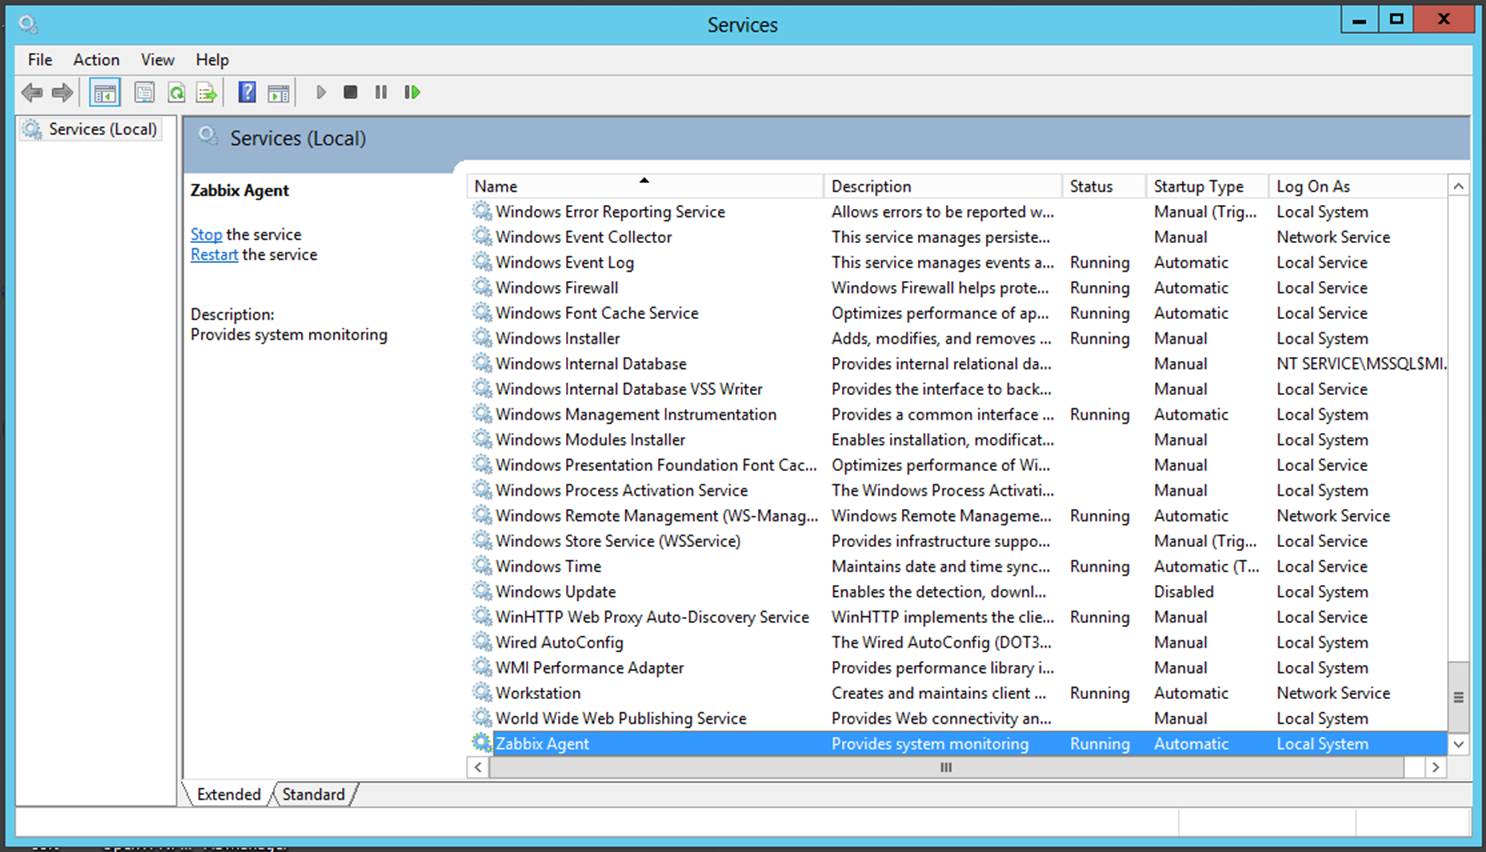
After you’ve finished the setup, open Windows Command Prompt with Administrator privileges, run services.msc command in order to open Windows Services utility, and locate the Zabbix Agent service to check if the service is running and automatically started after reboot.
services.msc
From this console, you can manage the service (start, stop, pause, resume, enable or disable).
Step 2: Configure Windows Firewall and Test Zabbix Agent
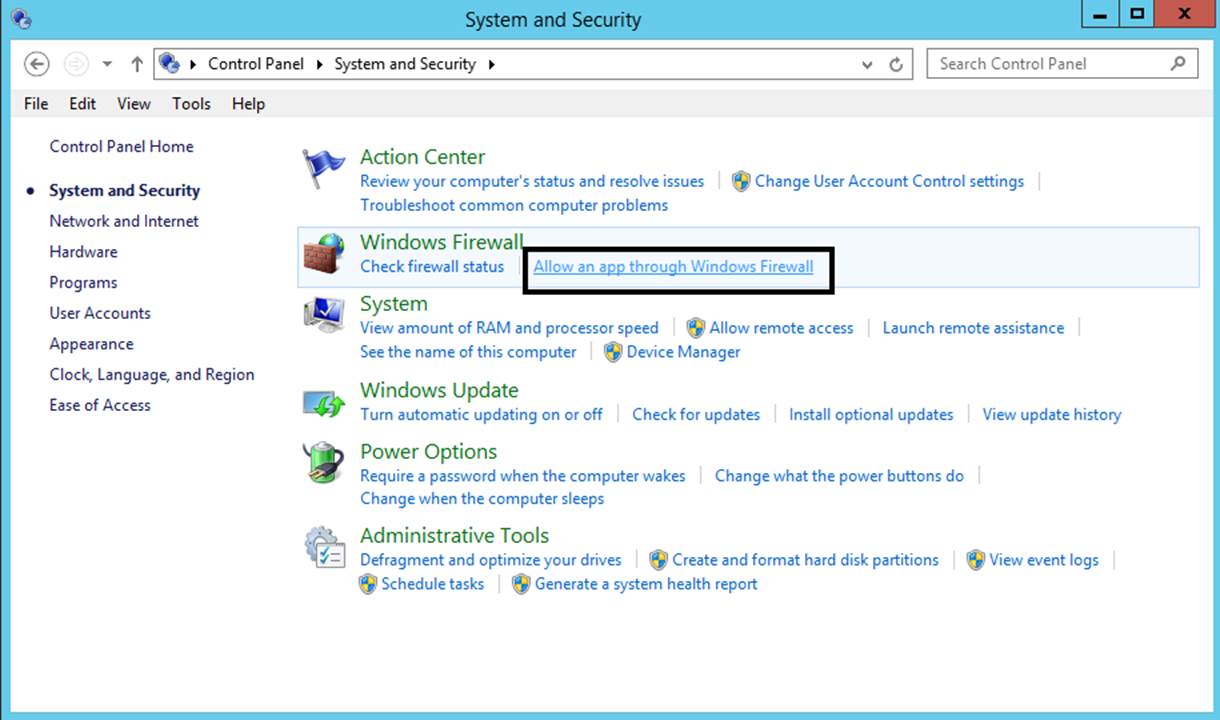
7. Almost all Windows-based systems have Windows Firewall active and running, therefore Zabbix agent port must be opened in the firewall in order to communicate with the Zabbix server.
In order to open the Zabbix agent port in the windows firewall, open Control Panel -> System and Security – > Windows Firewall and hit on Allow an app through Windows Firewall.
8. Next, click on Allow another app button, and a new window should open. Use the Browse button to navigate and add Zabbix agent executable file (usually found in %programfiles%Zabbix Agent if you installed it using the MSI program), then hit on Add button to add the service.
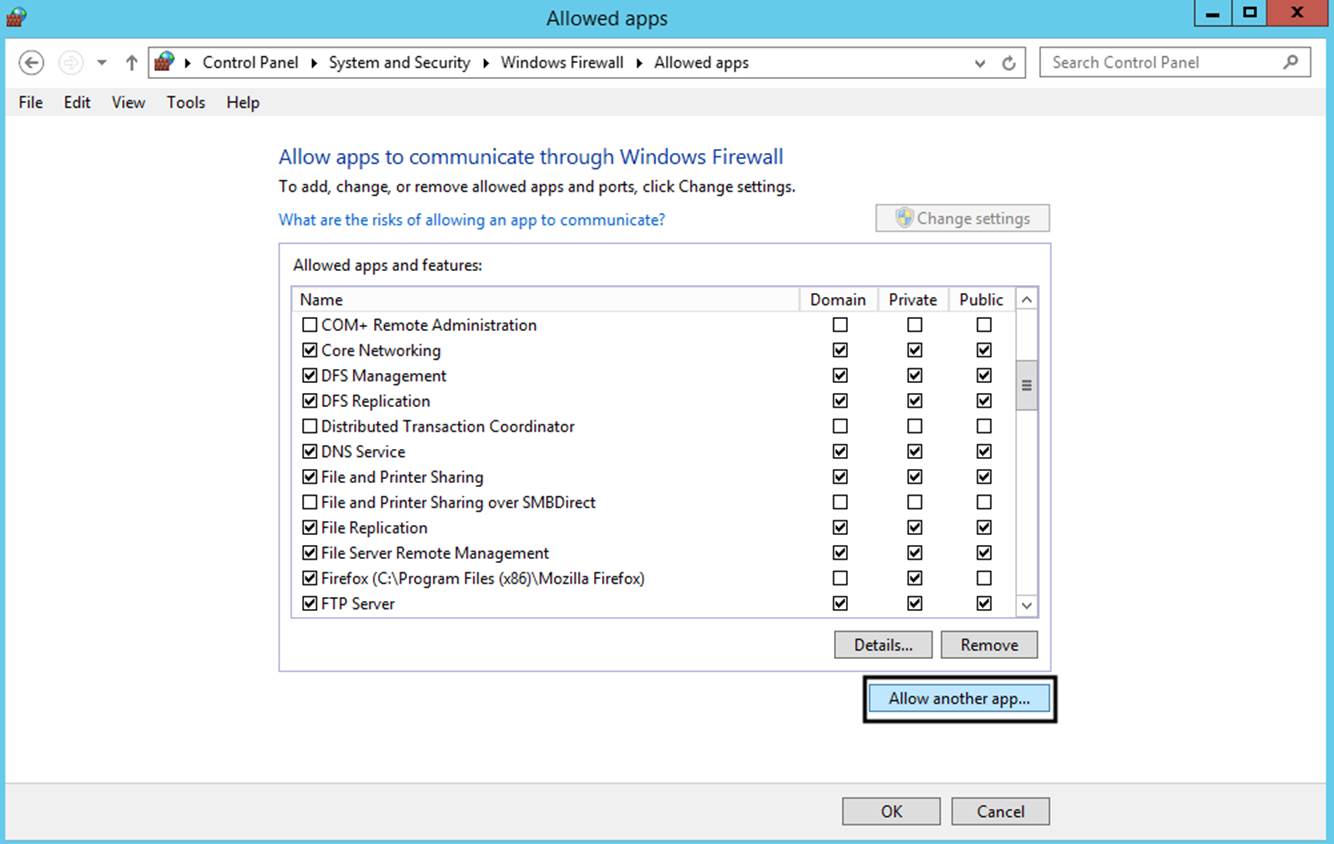
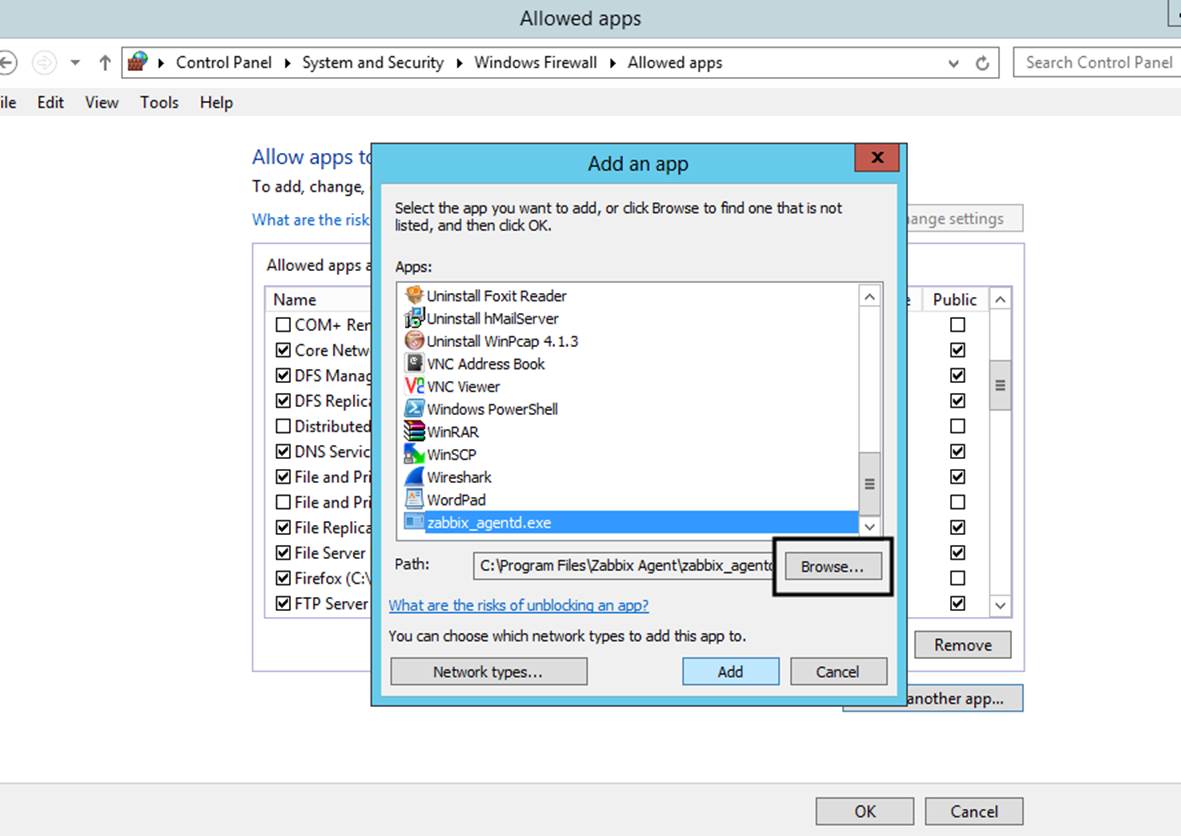
9. Next, make sure you check and open the firewall rule on the network segment where the Zabbix server is located in your network and hit the OK button to finish and apply the configuration.
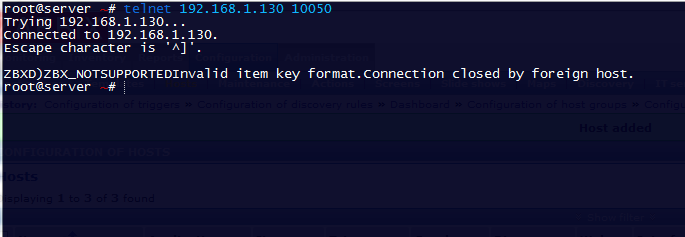
10. In order to test if the Zabbix agent running on windows is reachable from the Zabbix server-side, use telnet or netcat command on Zabbix server against windows agent IP-Port and a Connected message should appear. Hit Enter key to generate an error message and automatically disconnect from the agent:
telnet <Windows_agent IP Address> 10050
Step 3: Add Zabbix Agent Monitored Windows Host to Zabbix Server
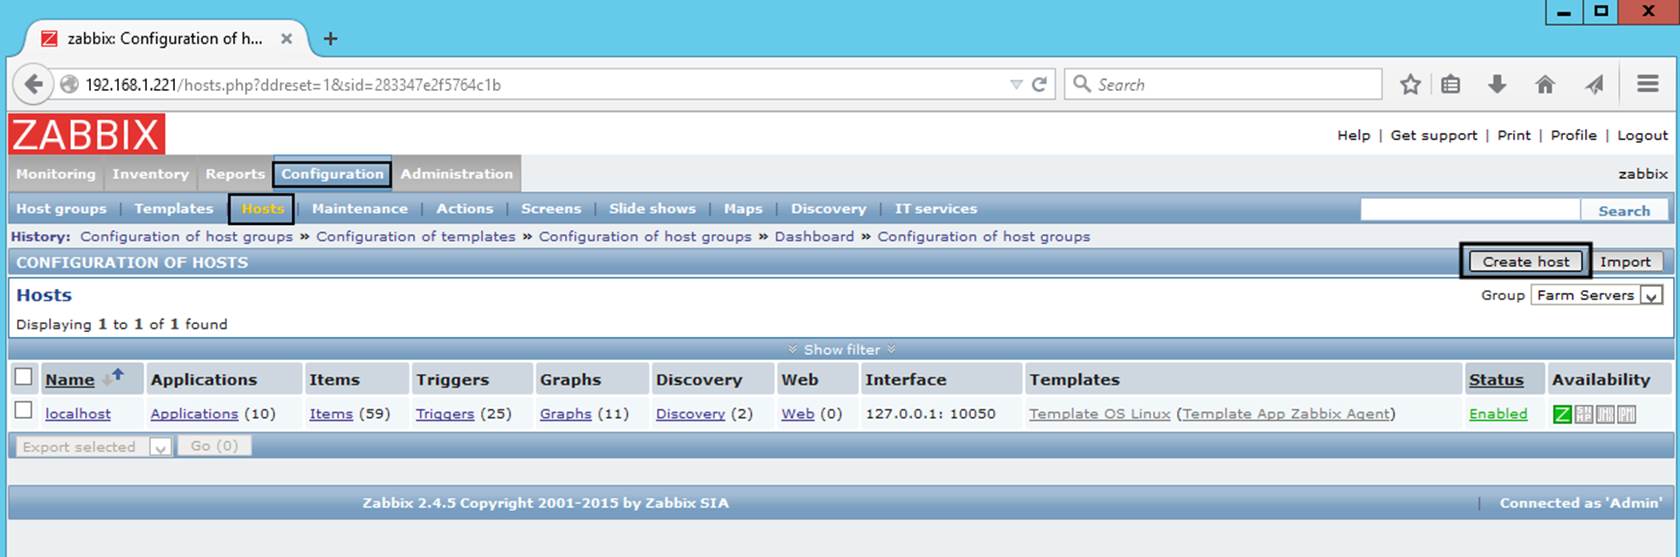
11. Once the windows agent has been tested from the command line and everything looks fine, go to Zabbix Server web interface, move to Configuration tab -> Hosts, and hit on Create Host button in order to add the Windows monitored host.
12. On the next screen, fill out the Windows host details such as hostname, visible name and IP address.
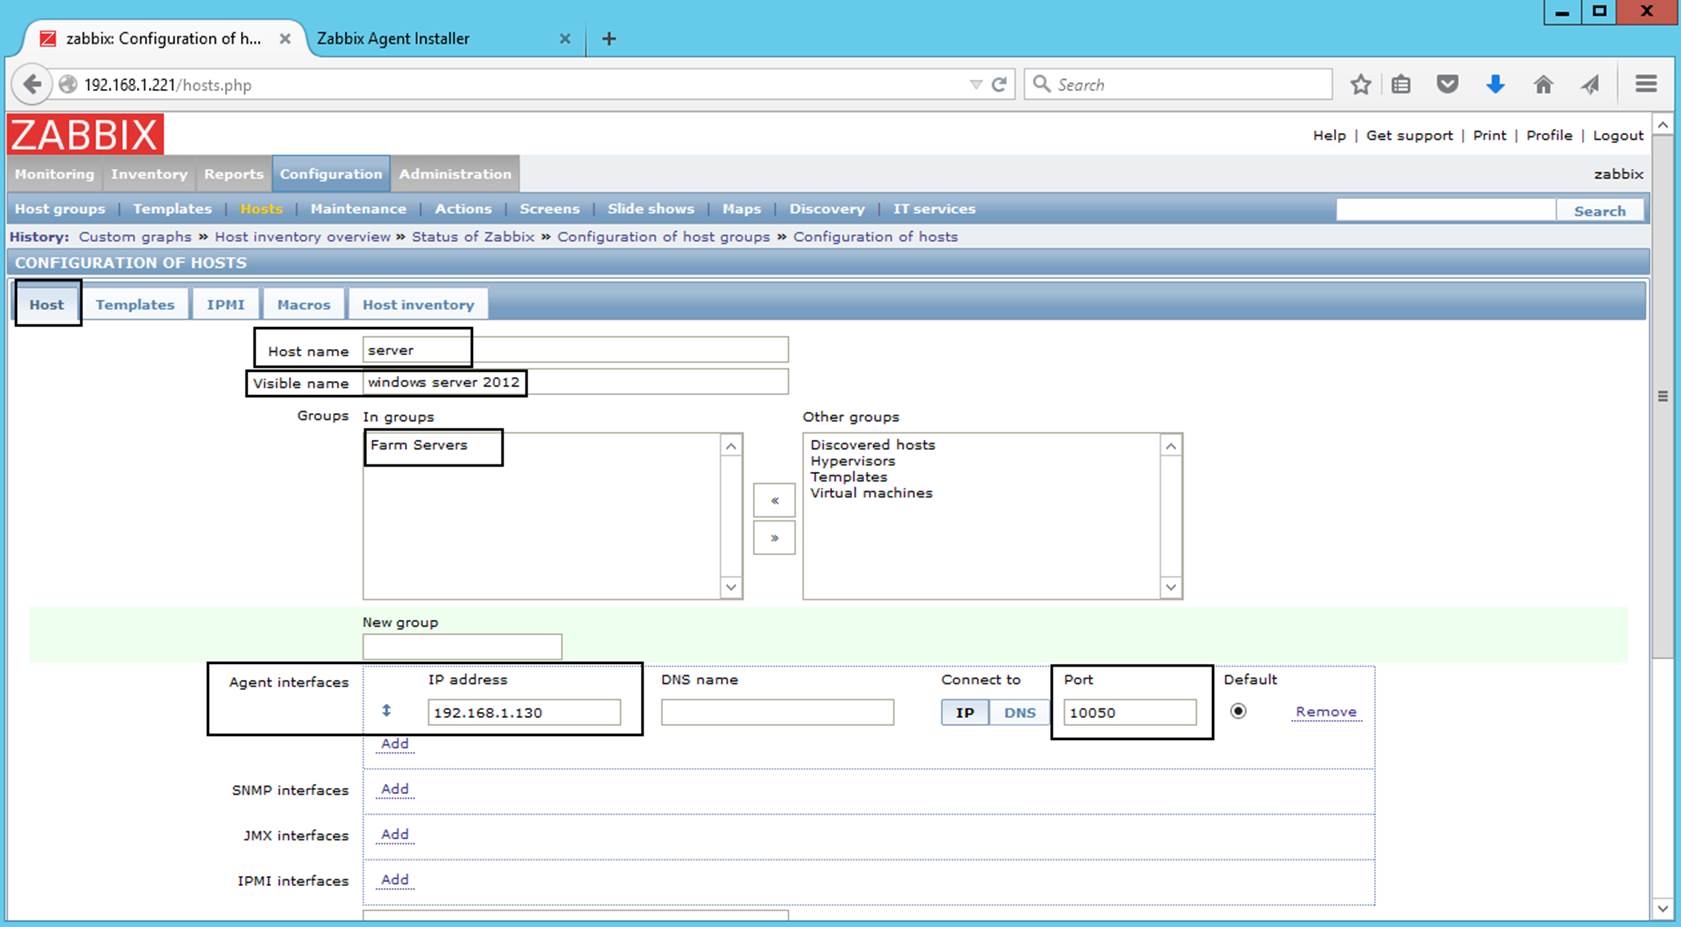
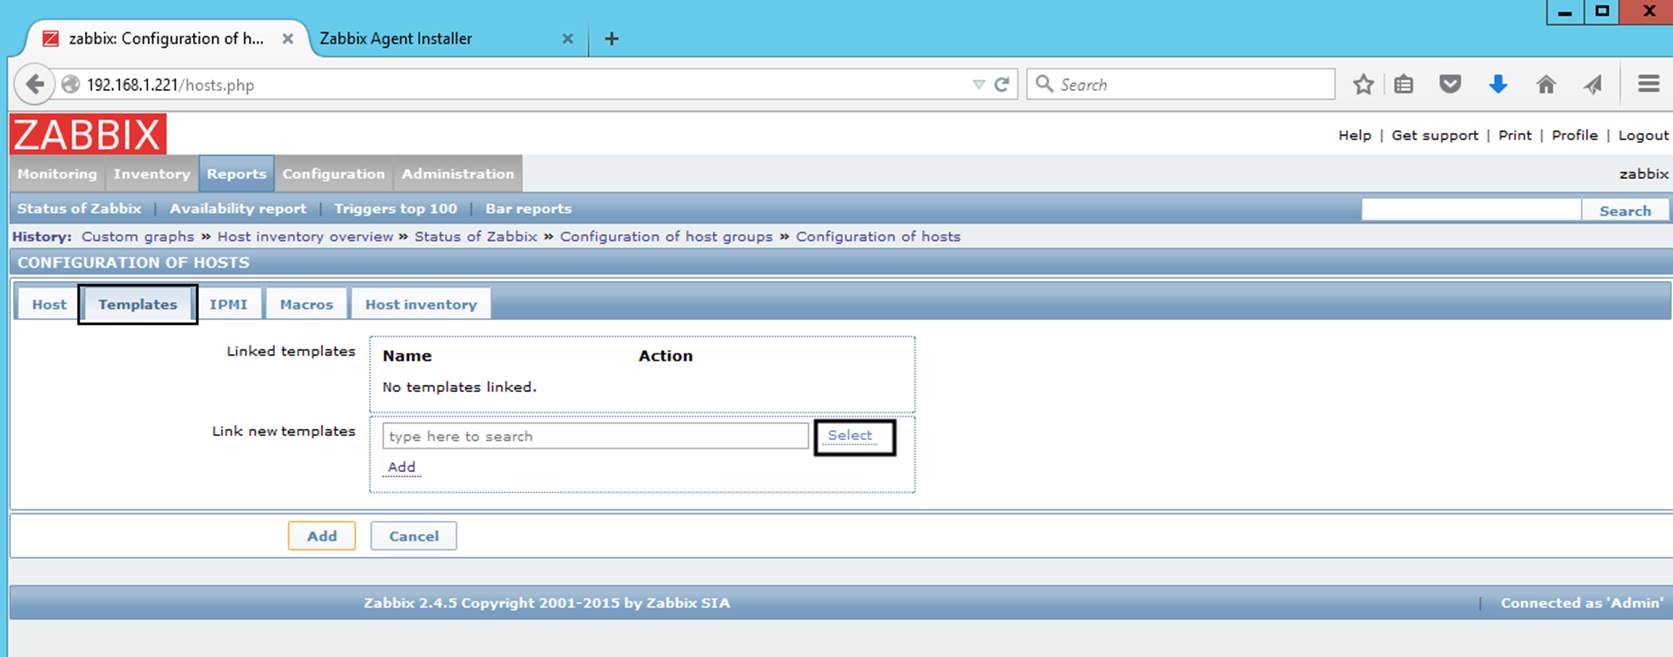
For the ‘Groups’ section, click on the ‘Select’ button and click on the ‘Templates/Operating system’ option.
14. On the dashboard, check the Windows host listed as shown below. Note that the state is indicated ‘Enabled’ with the Zabbix icon ‘ZBX’ in green color..
15. To graph the metrics associated with the Windows host system, click on ‘Monitoring’ –> ‘Hosts’. Click on the Windows host and select ‘Graphs’.
Finally, the Zabbix server will start graphing the system metrics shipped by the Zabbix agent which is residing on the Windows server host system. There are various metrics that you can monitor including network Interface statistics, CPU usage and utilization, Disk space usage, and Memory utilization to mention a few.
Summary
In this article, we have guided Install Zabbix Agent and Add Windows Host to Zabbix Monitoring. Hope this article will be useful for you

