How to Install Java on MacOS
Introduce
Java is one of the world’s most popular and widely used languages, used to develop everything from mobile apps and enterprise software to scientific computing. One of the most significant advantages of Java is that it can run almost anywhere after being compiled. This article shows you how to install the Java Development Kit (JDK) and the Java Runtime Environment (JRE) on macOS.
Prerequisites
A system running macOS 10.7.3 and above.
Administrative access to the system.
Install Java on Mac
Multiple Java Development Kit builds are available for download and installation. Oracle maintains the original, closed source Oracle JDK, but the company also helps develop the open source version of the environment called OpenJDK.
The differences between Oracle JDK and OpenJDK are primarily in licensing, and this tutorial shows you how to install both versions on macOS.
Option 1: Install Oracle JDK
Oracle JDK is available for download on Oracle’s website. Follow the steps below to download and install it on Mac.
- Browse to Oracle’s Java Downloads page.
- Select the macOS tab and download the DMG installer for your processor architecture.
download the Arm 64 DMG Installer if running the M1 CPU chip or x64 DMG on Intel-based CPUs.

- Open the downloaded DMG file and run the PKG file inside

- Select Continue on the installer’s introductory screen.

- Select Install in the window that appears.

- Provide your administrative credentials to start the JDK installation.

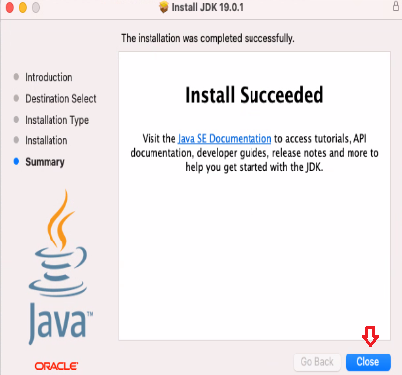
- Wait for the installer to finish copying the files, then select Close.
- Confirm JDK was installed successfully by running java -version in the terminal:
java -version

Option 2: Install OpenJDK
The alternative option is to install OpenJDK with Homebrew. OpenJDK is open-source, production-ready, and offers the same features as Oracle’s commercial implementation.
Install OpenJDK with Homebrew by following the steps below:
Installing the Latest Version
- Update the Homebrew formulae by typing:
brew update

- Next, run the following command to search for the available java formula. Homebrew uses formulas to manage packages and applications.
brew search java

You can see below that there are many versions of Java available. The java formula is the alias for the most recent release.
- Run the below command to get detailed information (info) about the java formula.
brew info java

As you can see below, at this time of writing, the latest Java release is 19, which is not installed yet.
- Now, run the following brew install command to install java on your Mac.
brew install java
Once installed, run the below ln command to create a symbolic link (symlink) that points to the installed Java version.
In the command below, the following paths are as follows
sudo ln -sfn /usr/local/opt/openjdk/libexec/openjdk.jdk /Library/Java/JavaVirtualMachines/openjdk.jdk
Enter your password when prompted to complete the process.
- Finally, run the below command to print the installed Java version.
java --version

The output below confirms you have successfully installed the latest version of Java on your Mac, where:
- OpenJDK is an open-source implementation of the Java platform.
- JDK is the Java Development Kit, a set of tools for developing Java applications.
Congratulations! You have successfully installed the latest Java release on your Mac.
Option 3: Install JRE on Mac
The Java Runtime Environment (JRE) is a part of the JDK installation. If you only want install JRE without the entire development kit, follow the steps below:
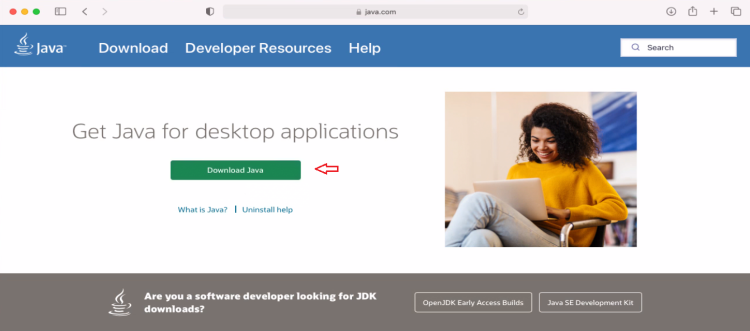
- Browse to the Java website.
- Click the Download Java button.
- On the next page, click the Download Java button and wait for the DMG installer to download.

- Open the DMG file and double-click the file inside.

- Select Install and authenticate to start the installation process.


- Select Close to finish the installation.

How to Uninstall Java on Mac
To uninstall Oracle JDK, follow the steps below:
- In a terminal window, navigate to the JavaVirtualMachines directory:
cd /Library/Java/JavaVirtualMachines
- List the contents of the directory:
ls
The directory contains JDK installations. The example below shows a system with JDK 19 installed.

- Delete an installation by typing its version number. For example, to uninstall JDK 19, type:
sudo rm -rf jdk-19.jdk
Note: If you installed OpenJDK using Homebrew, you can uninstall it with the following command:
brew uninstall openjdk@[version-number]
Conclusion
This tutorial provided installation instructions for installing the Java Development Kit and Java Runtime Environment on macOS. If you are interested in Java development, check out our pick of the best Java IDEs.
Good Luck!

