How to install FreeRADIUS and Daloradius on Ubuntu 22.04
This guide is to help you install FreeRADIUS and Daloradius on Ubuntu LTS servers. FreeRADIUS is an open-source, high-performance, modular, scalable, and feature-rich RADIUS server. It ships with both server and radius clients, development libraries, and numerous additional RADIUS-related utilities.
FreeRADIUS supports request proxying, with fail-over and load balancing, as well as the ability to access many types of back-end databases.
RADIUS, which stands for “Remote Authentication Dial-In User Service“, is a network protocol used for remote user authentication and accounting. It provides AAA services; namely Authorization, Authentication, and Accounting.
Features of FreeRADIUS
- Flexible Configuration through a wide range of methods to select user configurations.
- Complete support for RFC 2865 and RFC 2866 attributes.
- EAP with EAP-MD5, EAP-SIM, EAP-TLS, EAP-TTLS, EAP-PEAP, and Cisco LEAP EAP sub-types
- Vendor Specific Attributes for almost one hundred vendors, including BinTec, Foundry, Cisco, Juniper, Lucent/Ascend, HP ProCurve, Microsoft, USR/3Com, Acc/Newbridge and many more.
What is daloRADIUS?
On the other side, daloRADIUS is an advanced RADIUS web management platform written in PHP and JavaScript. It is mainly aimed at managing Hotspots and general-purpose ISP deployments powered by the FreeRADIUS server. Some good features of daloRADIUS include:
- Has a database abstraction layer with support for many database systems – MySQL, SQLite, PostgreSQL, MsSQL, and Oracle
- Advanced user management
- Powerful graphical reporting and accounting
- Integrates with GoogleMaps for geo-location
- Has a billing engine
1. Update system
Start by updating your system packages to the latest version:
apt update && apt -y upgradeReboot the system after doing an upgrade
[ -f /var/run/reboot-required ] && reboot -fOnce the system is up, begin the installation FreeRADIUS and Daloradius on your Ubuntu system.
2. Install Apache and PHP
Daloradius will require php and Apache web server to be installed on the host system.
Install Apache web server by running:
apt -y install apache2For installation of PHP on Ubuntu run:
apt -y install vim php libapache2-mod-php php-{gd,common,mail,mail-mime,mysql,pear,db,mbstring,xml,curl,zip}Check the version of php installed:
$ php -v
3. Install MariaDB and Create database
Next is to install the MariaDB server and create a database for daloRADIUS:
apt update && apt install mariadb-serverOnce installed and running, create a database for FreeRADIUS, this will be used at a later stage.
database name: radius
database user: radius
database user password: Green@1234
If you have a dedicated database server, replace localhost with the IP of source FreeRADIUS Server.
$ mysql -u root -p
CREATE DATABASE radius;
GRANT ALL ON radius.* TO radius@localhost IDENTIFIED BY "Green@1234";
FLUSH PRIVILEGES;
QUIT
4. Install and Configure FreeRADIUS
You can view versions of freeradius available in your Ubuntu:
$ apt policy freeradius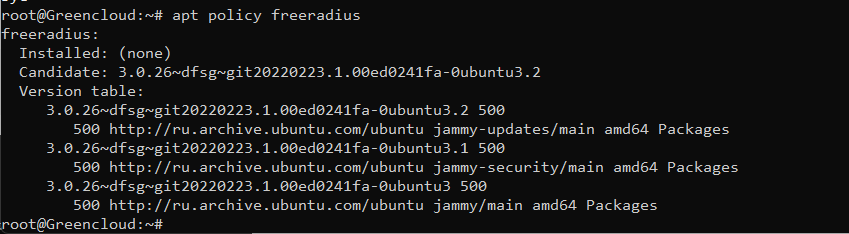
Install FreeRadius packages from official Ubuntu APT repository with the commands below:
apt -y install freeradius freeradius-mysql freeradius-utilsAmong the packages installed are mysql module and utils package.
Import the freeradius MySQL database scheme:
mysql -u root -p radius < /etc/freeradius/*/mods-config/sql/main/mysql/schema.sqlCheck tables created:
$ mysql -u root -p -e "use radius;show tables;"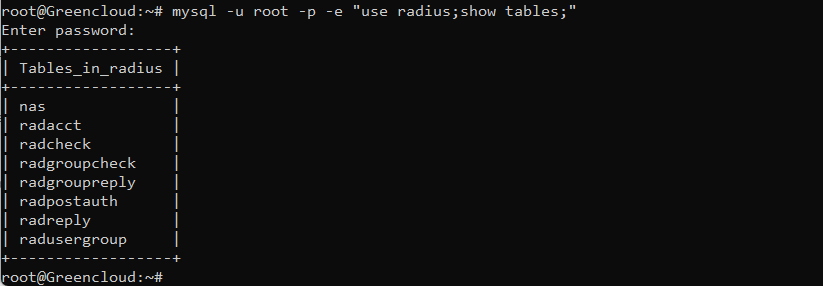
Create a soft link for sql module under /etc/freeradius/version/mods-enabled/
ln -s /etc/freeradius/*/mods-available/sql /etc/freeradius/*/mods-enabled/Configure SQL module and change the database connection parameters to suit your environment.
nano /etc/freeradius/*/mods-enabled/sqlYour SQL section should look similar to below.
sql {
driver = "rlm_sql_mysql"
dialect = "mysql"

# Connection info:
server = "localhost"
port = 3306
login = "radius"
password = "Green@1234"

# Database table configuration for everything except Oracle
radius_db = "radius"
}

# Set to ‘yes’ to read radius clients from the database (‘nas’ table)
# Clients will ONLY be read on server startup.
read_clients = yes

# Table to keep radius client info
client_table = "nas"
Comment SSL sections in mysql
        mysql {
                # If any of the files below are set, TLS encryption is enabled
#               tls {
#                       ca_file = "/etc/ssl/certs/my_ca.crt"
#                       ca_path = "/etc/ssl/certs/"
#                       certificate_file = "/etc/ssl/certs/private/client.crt"
#                       private_key_file = "/etc/ssl/certs/private/client.key"
#                       cipher = "DHE-RSA-AES256-SHA:AES128-SHA"
#
#                       tls_required = yes
#                       tls_check_cert = no
#                       tls_check_cert_cn = no
#               }

                # If yes, (or auto and libmysqlclient reports warnings are
                # available), will retrieve and log additional warnings from
                # the server if an error has occured. Defaults to 'auto'
                warnings = auto
        }
Then change group right of /etc/freeradius/3.0/mods-enabled/sql
chgrp -h freerad /etc/freeradius/*/mods-available/sql
chown -R freerad:freerad /etc/freeradius/*/mods-enabled/sql
Restart freeradius service:
systemctl restart freeradius.service5. Install and Configure Daloradius
We need to install Daloradius to get FreeRADIUS web administration interface.
apt -y install git
git clone https://github.com/lirantal/daloradius.git
Configuring daloradius
- Now import Daloradius mysql tables
mysql -u root -p radius < daloradius/contrib/db/fr3-mariadb-freeradius.sql
mysql -u root -p radius < daloradius/contrib/db/mariadb-daloradius.sql- Configure daloRADIUS database connection details:
mv daloradius /var/www/Then change permissions for http folder and set the right permissions for the daloradius configuration file.
cd /var/www/daloradius/app/common/includes/
cp daloradius.conf.php.sample daloradius.conf.php
chown www-data:www-data daloradius.conf.php
You should now modify the filedaloradius.conf.php to adjust the MySQL database information. Open the daloradius.conf.php and add the database username, password and db name.
nano daloradius.conf.phpEspecially relevant variables to configure are:
$configValues['CONFIG_DB_HOST'] = 'localhost';
$configValues['CONFIG_DB_PORT'] = '3306';
$configValues['CONFIG_DB_USER'] = 'radius';
$configValues['CONFIG_DB_PASS'] = 'Green@1234';
$configValues['CONFIG_DB_NAME'] = 'radius';
Create var directory and its subdirectories, then change their ownership:
cd /var/www/daloradius/
mkdir -p var/{log,backup}
chown -R www-data:www-data var
Configure Apache web server
Configure Apache ports:
tee /etc/apache2/ports.conf<<EOF
Listen 80
Listen 8000

<IfModule ssl_module>
    Listen 443
</IfModule>

<IfModule mod_gnutls.c>
    Listen 443
</IfModule>
EOF
Configure virtual host for operators:
tee /etc/apache2/sites-available/operators.conf<<EOF
<VirtualHost *:8000>
    ServerAdmin operators@localhost
    DocumentRoot /var/www/daloradius/app/operators

    <Directory /var/www/daloradius/app/operators>
        Options -Indexes +FollowSymLinks
        AllowOverride None
        Require all granted
    </Directory>

    <Directory /var/www/daloradius>
        Require all denied
    </Directory>

    ErrorLog \${APACHE_LOG_DIR}/daloradius/operators/error.log
    CustomLog \${APACHE_LOG_DIR}/daloradius/operators/access.log combined
</VirtualHost>
EOF
Configure virtual host for users:
tee /etc/apache2/sites-available/users.conf<<EOF
<VirtualHost *:80>
    ServerAdmin users@localhost
    DocumentRoot /var/www/daloradius/app/users

    <Directory /var/www/daloradius/app/users>
        Options -Indexes +FollowSymLinks
        AllowOverride None
        Require all granted
    </Directory>

    <Directory /var/www/daloradius>
        Require all denied
    </Directory>

    ErrorLog \${APACHE_LOG_DIR}/daloradius/users/error.log
    CustomLog \${APACHE_LOG_DIR}/daloradius/users/access.log combined
</VirtualHost>
EOF
Enable the created virtual hosts:
a2ensite users.conf operators.confCreate other directories.
mkdir -p /var/log/apache2/daloradius/{operators,users}Disable the default virtual host:
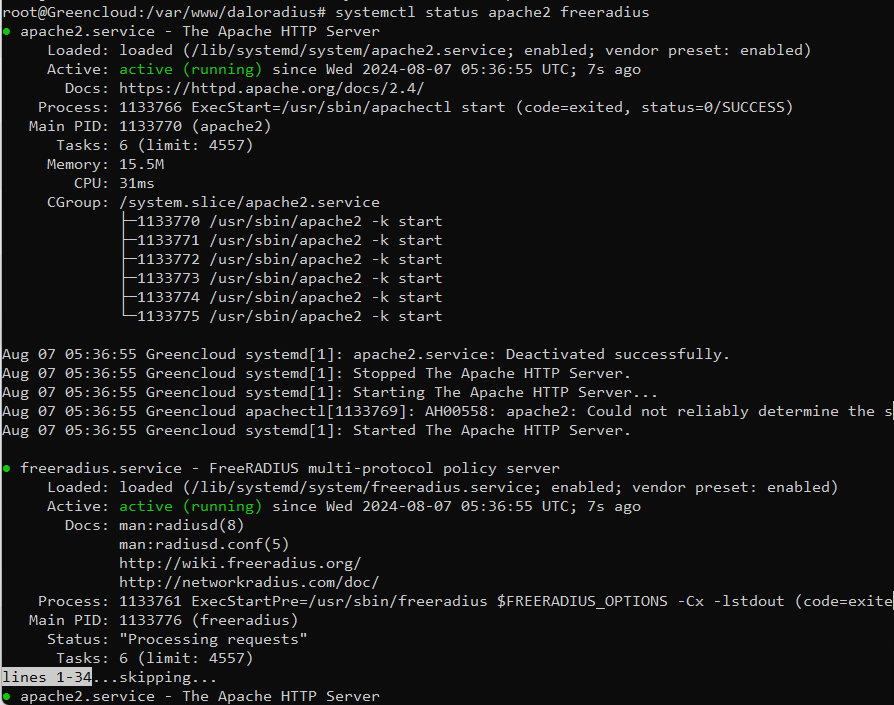
a2dissite 000-default.confTo be sure everything works, then restart services.
systemctl restart apache2 freeradiusCheck services.
$ systemctl status apache2 freeradius
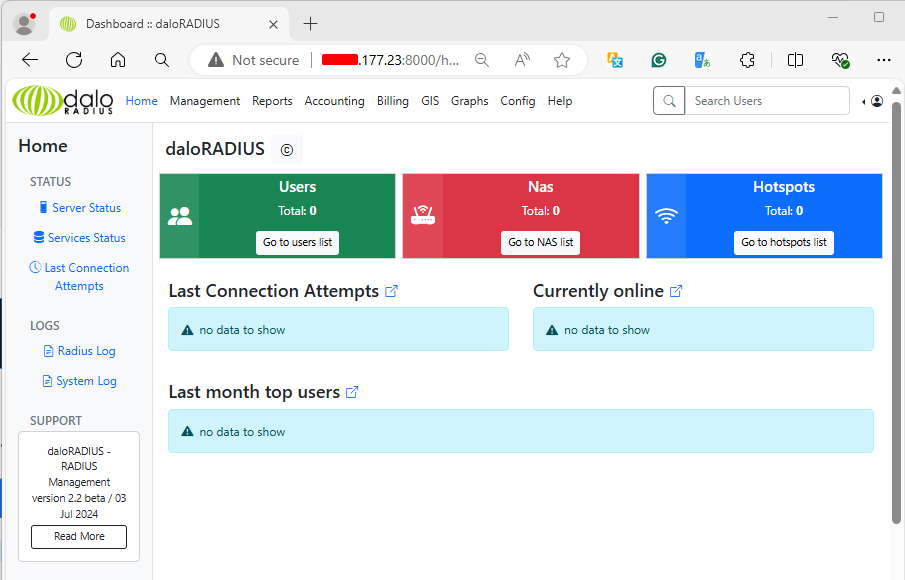
Access the service on the following URLS:
- RADIUS management application: http://<ip>:8000/
- RADIUS user portal application: http://<ip>
RADIUS management application portal will look like this.
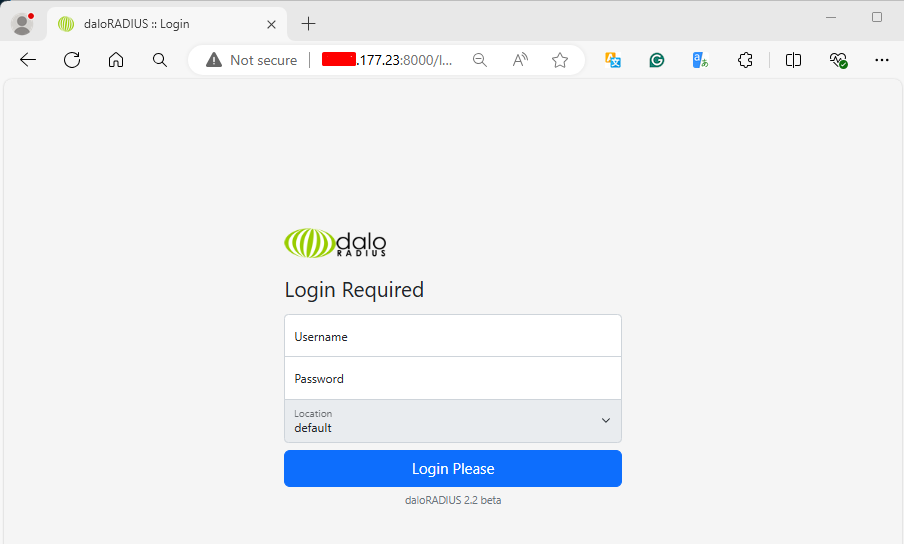
Default login details are:
Username: administrator
Password: radius
Change the password after first login to secure your setup.
Read more on daloRADIUS Configurations
