How to Configure SMTP Server on Linux
SMTP is your ideal protocol for email server management. Commonly known as Simple Mail Transfer Protocol, SMTP stands out as a standard internet communication protocol designed and used for electronic mail transmission.It routes emails by using third-party service providers to send emails through servers. This protocol comes in handy for companies or enterprises with large volumes of emails. Notably, SMTP has no downtimes, sends emails to your inbox rather than your spam folder, and has an analytics section on the dashboard. Thus, you do not need a lot of time and resources to manage your email servers.
Step 1: Update Your Server
The first step is to log in to your server and update it. You can log in using SSH, ensuring your server runs on the latest Ubuntu packages. Instead of SSH, you can also use CTRL+ALT+T to access your server. You can then execute the following command:
apt update
Step 2: Install Postfix
Once your server is up to date, install Postfix using the following command to install the email utilities:
apt install postfix
A Postfix configuration window will pop up in the process of installation. The window will be shown below:

The configuration comes with Internet Site as the default mail configuration type. That is the recommended type of configuration for this particular purpose. Thus, you should press TAB, select OK, and then press ENTER.
Step 3: Configure Postfix
Now, configure Postfix to enable it to send and receive emails from the running server. In this case, the running server is the localhost. You can achieve this configuration process by setting up Postfix to listen exclusively on the loopback interface. This interface is a virtual network used by servers to communicate internally.
Make the relevant modifications by editing the primary Postfix configuration file (main.cf), which exists in etc/postfix. However, back up the file before you make any edits. You may need the original version.
cp /etc/postfix/main.cf /etc/postfix/main.cf.backup
You can then access the file using the following commands:
nano /etc/postfix/main.cf
Find the following lines from the file:
mailbox_size_limit = 0
recipient_delimiter = +
inet_interfaces = all
Focus on inet_interfaces and set its value to loopback-only, as indicated below.
mailbox_size_limit = 0
recipient_delimiter = +
inet_interfaces = loopback-only
Step 4: Apply Changes and Start the Postfix Server
Ensure that you save the file once you make the necessary changes in the Postfix configuration file. You can then enable Postfix and start it using the following utilities:
Step 5: Configure Firewall
The firewall may restrict Postfix. You can allow all Postfix functions in the firewall using the following commands:
ufw allow Postfix

ufw allow "Postfix SMTPS"

ufw allow "Postfix Submission"
Step 6: Test the STMP Server
Use Telnet to confirm if the server is functioning properly. The following command should help:
telnet VPS_install_Postfix 25
A perfectly working Postfix should return the following results:
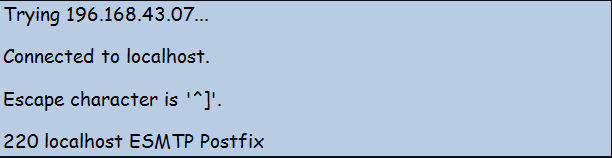
Proceed to install the mail-sending packages of Postfix. This is possible using the following command:
apt install bsd-mailx
Run the following command once the installation is complete. The utility should help finish up the setup process.
Use the mailx command to send a test message to a real email account you use every day.
mailx [email protected]
When prompted, enter test or whatever you want for a subject, and then press ENTER.
Subject: test
You’ll then be presented with just a cursor and the ability to write the body of your test email. Just write the single word test again and press ENTER again.
test
You need to tell mailx that you’re done writing your message; to do that we have to end the message with a single . and press ENTER one final time. You’ll immediately see EOT as confirmation of that.
.
EOT
When testing, please feed in your actual email address where necessary.
Conclusion
The tutorial provided a step-by-step guide on how to set up an STMP server with Postfix. As you probably know, a Postfix server allows the implementation of the SMTP protocol to help manage mail sending. It is fast, easy to configure, and incredibly secure hence popular among enterprises that handle bulk emails.
