How to Add Swap Memory on FreeBSD 14
Introduction
Swap space enhances your system’s memory capacity, ensuring smooth operation when the physical RAM is fully utilized. In cases of memory shortages, the server offloads inactive processes to the swap memory, maintaining system stability. This mechanism helps prevent crashes and shutdowns, particularly when managing multiple applications simultaneously.
This guide provides step-by-step instructions for adding swap memory on FreeBSD 14.0.
Prerequisites
Before you begin, ensure the following:
- Backup your data. Always create a backup of important data before making system changes.
- Root or sudo access to the FreeBSD 14 system.
- Sufficient free disk space to create the swap file.
- An understanding of the required swap size (typically 1.5–2 times the amount of physical RAM).
- Caution when editing system files, as improper configurations can cause errors.
1.Create swap space on an existing partition.
Step1: Checking Existing Partitions
Input:
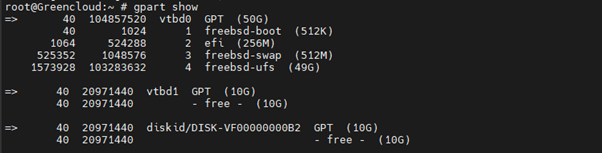
$ gpart show
output:

The third partition is currently unallocated; we will create a swap space on it.
Step 2: Check Existing Swap Memory
Before adding swap space, it’s essential to verify whether there is any existing swap memory configured on the system. You can do this by executing the following command:
$ swapinfo
Output:
Device 1K-blocks Used Avail Capacity
Step 3: Creating a Swap Partition:
Input:
$ gpart add -t freebsd-swap -s 512M vtbd0
Output:
vtbd0p3 added
-t freebsd-swap: This specifies the type of the partition as swap.
-s 512M: This sets the size of the swap partition to 512MB.
vtbd0: This is the name of your disk.
Step 4: Enable the Swap Partition
After creating the partition, you need to enable it. Use the following command:
Input:
$ swapon /dev/vtbd0p3
Output:

Make sure to replace p3 with the correct partition number if it’s different (check with “gpart show vtbd0” to confirm).
You can delete the partition using the following command:
$ gpart delete -i 3 vtbd0
- -i 3: Specifies the index of the partition to delete (in this case, the third partition).
- vtbd0: The name of the disk.
Step 5: Verify the Swap Partition
You can verify that the swap partition has been successfully created and enabled by using:
Input:
$ swapon -s
This will list all active swap partitions.
Step 6: Configure Automatic Swap on Boot
To ensure that the swap partition is automatically enabled on boot, you need to add it to the /etc/fstab file. Open the file in your preferred text editor (e.g., vi or nano):
$ nano /etc/fstab
Add the following line at the end of the file:
/dev/vtbd0p3 none swap sw 0 0
Step 7: Final Verification
After editing /etc/fstab, you can reboot the system to ensure the swap is enabled automatically:
$ reboot
Once the system is back up, you can run “swapon -s” again to check if the swap is active.
2. Create a New SwapFile:
Swap file is a file on the disk used as a virtual memory space to store data when the physical memory (RAM) on the system is insufficient to meet the demands of running applications and processes.
Step 1: Create a New SwapFile:
Input:
$ dd if=/dev/zero of=/swapfile bs=1M count=4096
Output:
4096+0 records in

4096+0 records out

4294967296 bytes transferred in 3.250181 secs (1321454854 bytes/sec)
dd: Command used to copy and convert data.
if=/dev/zero: Input file, which provides a stream of zeros.
of=/swapfile: Output file, where the zeros are written (creating a swap file).
bs=1M: Block size set to 1 Megabyte.
count=4096: Number of blocks to write (4096 blocks).
The output confirms that 4096 blocks were read and written, indicating successful creation of the memory block device. The byte transfer information provides performance metrics for the operation.
Step 2: Create a Memory Block Device:
Input:
mdconfig -a -t vnode -f /swapfile -u 0
This command creates a memory block device that points to the /swapfile file, assigning it to /dev/md0.
- mdconfig is used to manage memory disk devices in FreeBSD and similar systems. The options -a, -t vnode, and -f specify that a new vnode (virtual node) should be added, referencing the specified file.
Step 3: Enable the Memory Block Device as Swap:
$ swapon /dev/md0
This command activates the /dev/md0 memory block device, enabling it as swap memory.
check again with swapinfo:

Step 4: Enable Automatic Mounting for a Swap File:
Configure Automatic Mounting in the fstab File
To add swap space, run the following command:
Input:
$ echo "/dev/md0 none swap sw 0 0" | sudo tee -a /etc/fstab
Output:
/dev/md0 none swap sw 0 0
3. Block Storage
Block Storage devices attached to your server follow the vtbd naming scheme. The first block device is designated as vtbd1, with any additional devices incrementing sequentially (e.g., vtbd2 for the second device). To create swap memory using the Block Storage device attached to your server, please follow the steps below.
We have attached a 10GB hard drive; please check again using “gpart show”
Step 1: Delete Partition:
Input:
$ gpart destroy vtbd1
Output:
vtbd1 destroyed
The command gpart destroy vtbd1 deletes the partition table and all data on the specified partition vtbd1.
Step 2: Initialize the block storage device attached to your server with a GPT partition table.
Input:
$ gpart create -s GPT vtbd1
Output:
vtbd1 created
Step 3: Create a new swap0 partition on the device and configure it to be used as swap space.
Input:
$ gpart add -t freebsd-swap -l swap0 vtbd1
Output:
vtbd1p1 added
Step 4: Format and enable the swap partition:
$ swapon /dev/vtbd1p1
Step 5: Configure the File System Table (fstab) for Automatic Mounting
Automatic mounting allows the server to mount the swap memory at boot. Follow the steps below to enable automatic mounting of your swap memory created from a swap file or a block storage device.
Enable Automatic Mounting for Block Storage
Modify the /etc/fstab file to include your block storage device path:
Input:
$ echo "/dev/vtbd1p1 none swap sw 0 0" | sudo tee -a /etc/fstab
Output:
/dev/vtbd1p1 none swap sw 0 0
4. Remove Swap Memory
Follow the steps below when detaching swap memory from your server.
Remove Swapfile:
Disable the swap device:
Delete the memory block device:
Remove the entry from /etc/fstab to disable automatic mounting:
Remove Block Storage:
Delete the memory block device.
$ mdconfig -d -u 0
Disable the swap partition:
$ swapoff /dev/vtbd1p1
Remove the swap partition entry from /etc/fstab.
$ sed -i '' '/\/dev\/vtbd1p1/d' /etc/fstab
Conclusion
In this article, you learned how to add swap memory on FreeBSD 14.0 to enhance your system’s ability to manage processes efficiently. By utilizing either a swap file or a block storage volume, you extended your system’s memory capacity, improving performance and stability under load.
You also gained insights into configuring the file system table (fstab) for automatic mounting of swap space, ensuring that the system recognizes and activates the swap memory upon boot. These steps are essential for optimizing resource management on your FreeBSD server, allowing it to handle more processes simultaneously without running out of memory.
Implementing swap memory is a crucial practice for maintaining optimal system performance, especially in environments with limited physical RAM
