How to configure static IP address on AlmaLinux
Configure static IP address via command line
There are several methods we can use to configure a static IP address on AlmaLinux via command line. Which one you choose will mostly boil down to personal preference. Follow along with the step by step instructions for any of the methods below.
The first thing we want to do is find the interface that we want to modify. To list all the interfaces on our system, we can use the command:
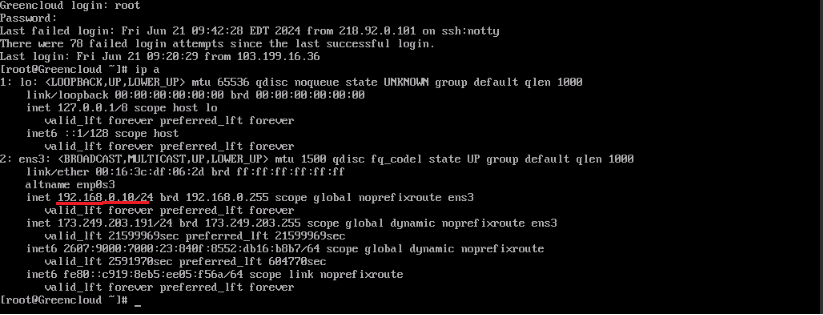
# ip a

On our test machine, the interface we’re interested in working with is ens3 .Take note of your interface name, as you’ll need to know it when following along with the steps below.
Method 1: Using Network Manager
Determine the name of your network interface,common names for interface include ens3, eth0, enp3s0 and many more.If you are using Greencloud server the network interface will default to eth0 ,you can edit the configuration in the file /etc/sysconfig/network-scripts/ifcfg-eth0
As in the article our network interface is ens3 .That we know our Interface Name, we will navigate to /etc/NetworkManager/system-connections/ directory, where all the NetworkManager’s configuration files would be placed.
Create a new .nmconnection file for your network interface. You can use a text editor, For example, nano or vi, to create a file for the ens3 interface,
# cd /etc/NetworkManager/system-connections/# nano ens3.nmconnectionOut put

In the editor, add the following content, replacing the placeholder values with your actual network configuration:
[connection]
id=ens3
uuid=b0edd16d-9d21-3d80-bd95-639ad808ad5c
type=ethernet
autoconnect-priority=-999
interface-name=ens3
timestamp=1715608862

[ethernet]
[ipv4]
address=192.168.0.10/24
dns=8.8.8.8,8.8.4.4;
gateway=192.168.0.1
method=manual
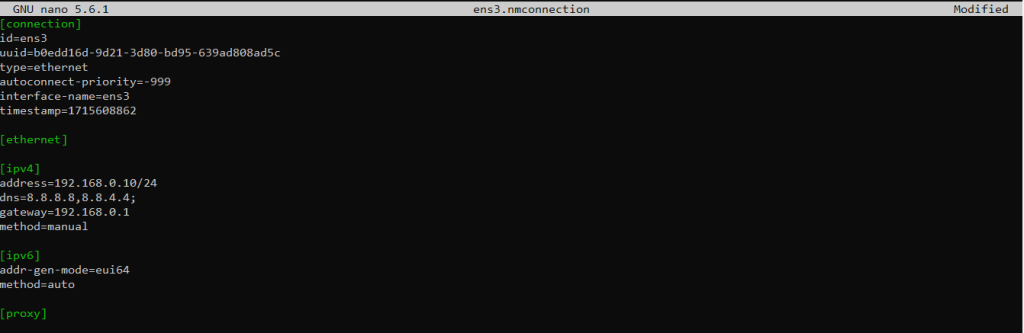
Note: Replace “interface” ens3 with the actual interface name that is on your server.
Replace “address” 192.168.0.10/24 with the actual IP address that is assigned to your server.
Replace “gateway” 192.168.0.1 with the actual Gateway address assigned to the server.
For DNS, you can use the standard Google IP address or from CloudFlare,
- Google: 8.8.8.8, 8.8.4.4
- CloudFlare: 1.1.1.1
Save and exit from the file.
Method 2: Using nmtui
Other than changing the parameters of a network interface by modifying its file manually or by using the nmcli utility, we can also control NetworkManager by using a text user interface. To launch it we just invoke nmtui in our terminal.
# nmtui
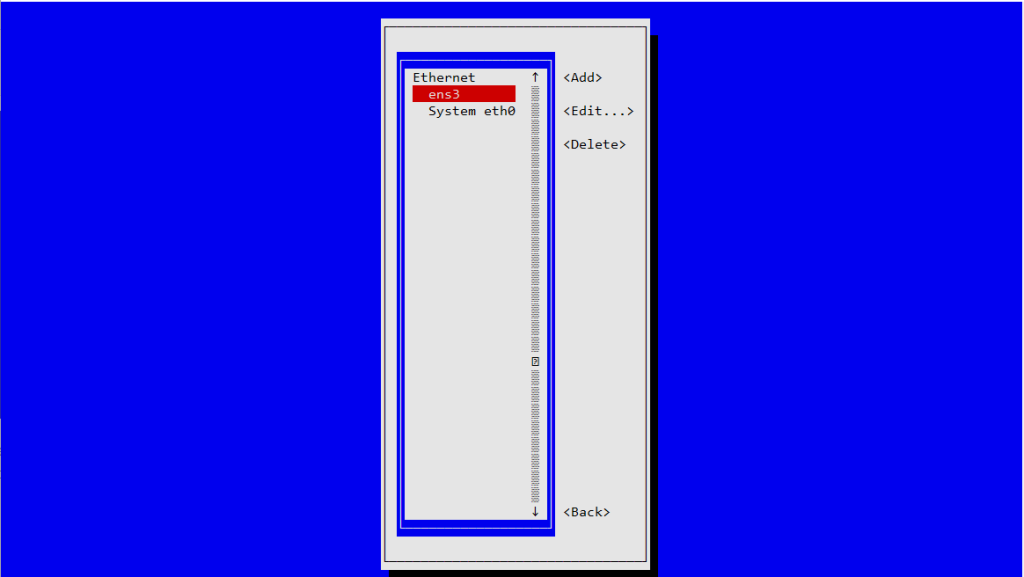
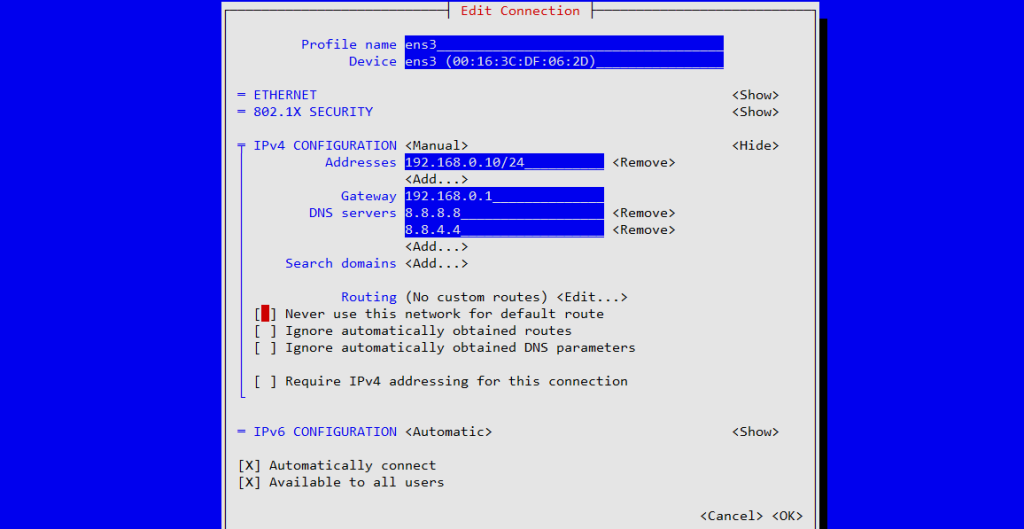
Select “Edit a connection” and then the name of the interface you want to configure. Then, you can proceed in changing the desired values. For example:

Now, choose the specific network interface you want to configure, such as “ens3″ from the provided list within the nmtui interface. This selection will direct you to the configuration settings for the chosen network connection.
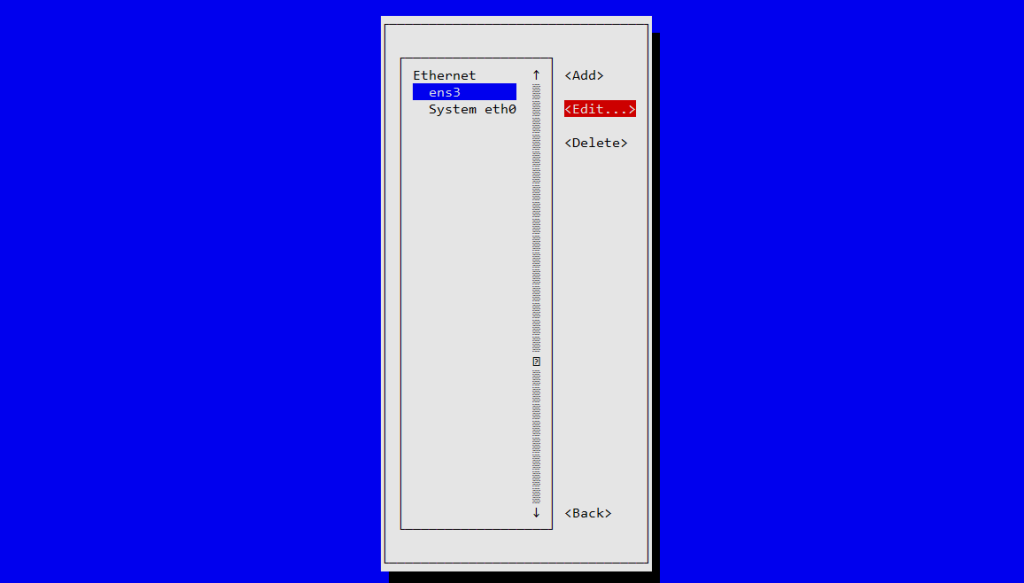
Choose the “Edit” option for the selected network interface in the nmtui interface and press Enter. This step grants access to the configuration settings, allowing you to modify parameters such as IP address, gateway, DNS, and other connection details.
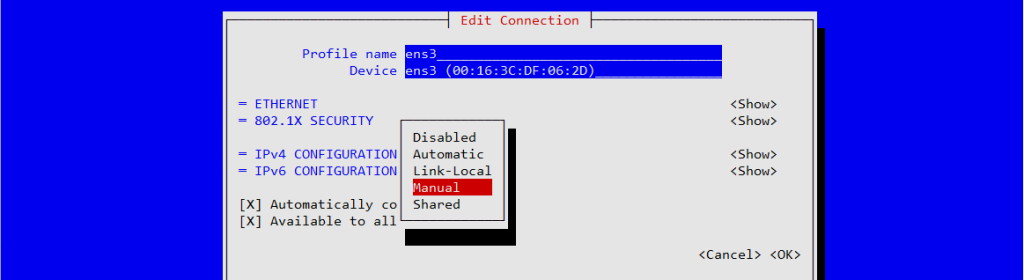
To modify the IPv4 configuration, navigate to the “IPv4 CONFIGURATION” option within the network interface settings. If it currently displays “Automatic,” select it and change the setting to “Manual” to enable manual configuration of the IPv4 settings.
Click the “Addresses” option and type the desired IP address and subnet mask. Here we entered “192.168.0.10/24” as the IP address and subnet mask. Click “OK” to save the configuration.
Click on the “Activate a connection” option and select the previously edited connection. First Deactivate the connection and Activate it again. Press Enter to activate the edited connection.

To exit nmtui after configuring network settings, choose the “Back” option to return to the main menu. Subsequently, select “Quit” and press Enter to exit the nmtui interface

To apply the settings, we need to reload the interface connection.
# nmcli connection down ens3 && nmcli connection up ens3
Method 3 – using nmcli
Without any command arguments, the nmcli command displays detailed information about all the network interfaces – both active and inactive.
# nmcli
Some of the information displayed includes the state of the network connection, hardware type of the network adapter associated with the interface, MAC address, IPv4 and IPv6 addresses and default routes.

To get a brief summary of the network interfaces run the command:
# nmcli device status
OR
# nmcli dev status
In this section, we will demonstrate how you can configure a static IP address with the following values:
- IP address: 192.168.0.10/24
- Default gateway: 192.168.0.1
- Preferred DNS: 8.8.8.8, 8.8.4.4
- IP addressing static
To set the static IP address with the connection name or profile called static-ip, IPv4 address 192.168.2.150, and default gateway 192.168.2.150 we will run the command:
# nmcli con add type ethernet con-name "static-ip" ifname ens3 ipv4.addresses 192.168.0.10/24 gw4 192.168.0.1
Note: In case you want to disable dhcp ip and configure static ip then run below,
# nmcli con add type ethernet con-name "static-ip" ifname ens3 ipv4.method manual ipv4.addresses 192.168.0.10/24 gw4 192.168.0.1
Next, we will configure the DNS server as follows.
# nmcli con mod static-ip ipv4.dns "8.8.8.8 8.8.4.4"
To activate the connection we will run the command:
# nmcli con up static-ip ifname ens3
Use the below command to restart the server networking service.
# nmcli networking off
# nmcli networking on
or
# systemctl restart NetworkManager
We have simply added another IP address to our network interface enp0s3. To confirm that the IP address was successfully added, we will run the command: ip a
Enabling / Disabling a network connection
In this section, we will explore how you can manage the connection by either activating or deactivating them. To disable or deactivate a connection, run the command:
# nmcli con down id "static-ip" ifname ens3
To bring up or enable a connection, run the command:
# nmcli con up id "static-ip" ifname ens3
Configure static IP address via GUI
If you’re running the default GNOME GUI on AlmaLinux, you can follow the steps below to configure a static IP address.
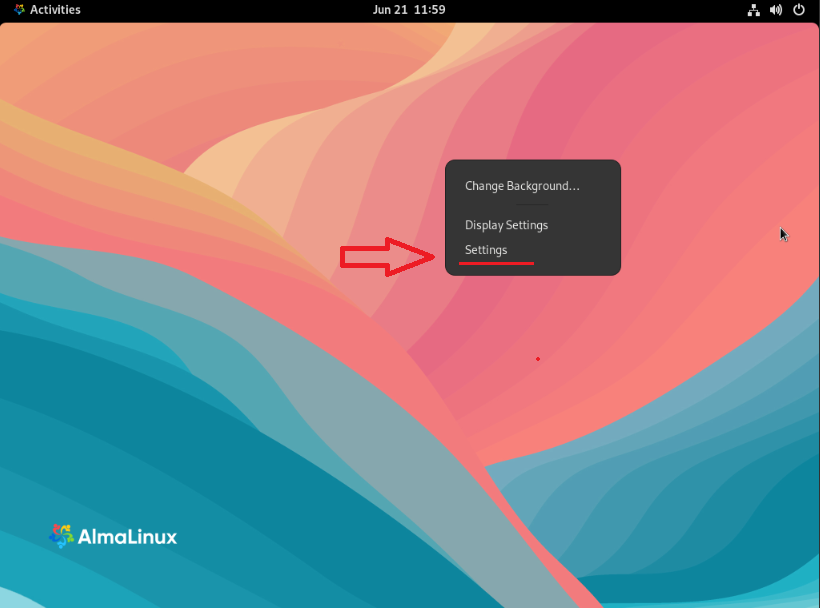
Step 1: First, click on the top right taskbar area of the GNOME desktop to open the network settings menu.
Step 2: Next, open the settings for the network interface you wish to configure.
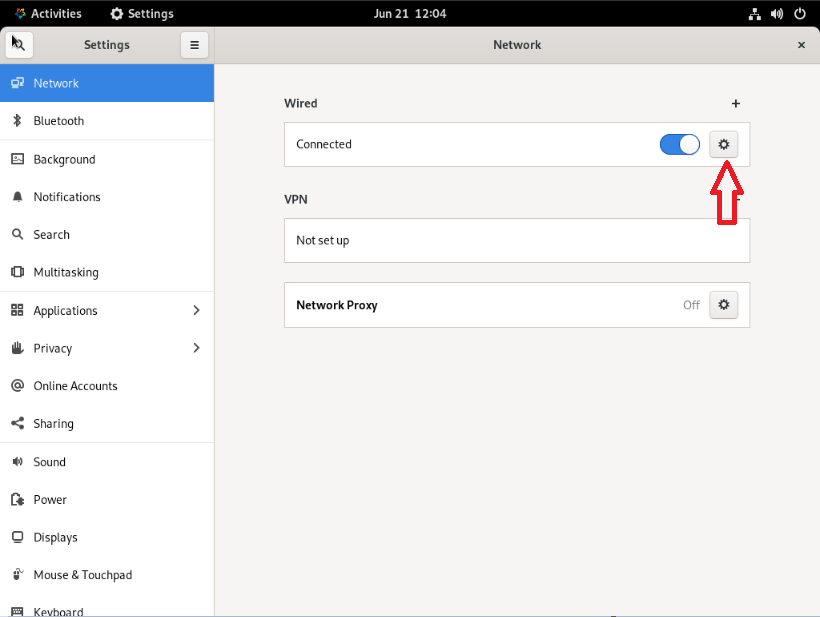
Open the network settings of the interface that you want to configure
Step 3: Click on the IPv4 or IPv6 tab, depending on which type of IP you want to configure. Then, select “manual” and fill in your desired IP address, subnet mask, and default gateway. Optionally, you can also fill in a DNS server. Click “apply” when you’re done.
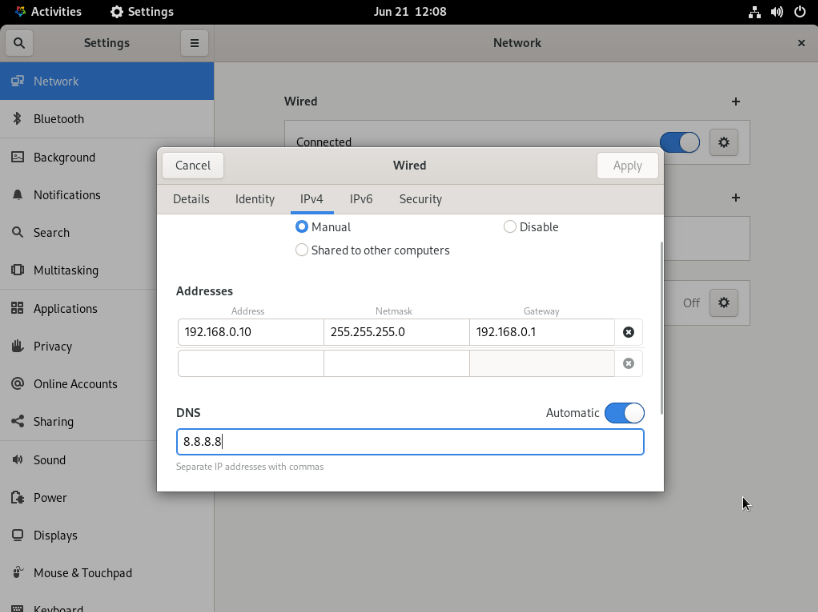
Fill out the desired network information for the interface
How to restart network on Almalinux
Restart the network via command line
Use the below command to restart the server networking service.
# nmcli networking off
# nmcli networking on
or
# systemctl restart NetworkManager
Restart the network via GUI
If running the default GNOME GUI on AlmaLinux. Then the simplest way to restart the network is to click on the top right settings area of the taskbar. Next, select the network interface you wish to reset. Finally, click “Turn off.”
- Turn off the network connection.
- Next, click again to turn it back on.
- Turn the network connection back on.
Restart the network via the control function button
If you are using Greencloud server, you can restart the VPS network by clicking “Re-configure Networking” on the server admin control page.
Conclusion
In this guide, we explored multiple methods for setting up a static IP address on AlmaLinux. These methods included using the GNOME GUI, manually editing interface configuration files, employing nmcli commands, and utilizing the nmtui ncurses interface. AlmaLinux offers a variety of options to cater to different preferences and situations when configuring static IPs. Each method is equally effective, so the choice should depend on your personal preference or specific requirements, whether you prefer a graphical interface, text-based configuration, command-line tools, or an ncurses-based approach.

