How to fix "E: Unable to locate package" error on Ubuntu
Ubuntu comes with lots of different packages that you can install for your benefit, but sometimes you can face an error saying “E: Unable to locate package”. This usually happens when you need to follow the proper format of installing that package, or your Ubuntu distribution needs to include the relevant information needed to install that package.
This article will enlist all the possible methods to fix the error “E: Unable to locate package” Error on Ubuntu. There are 4 common methods that you can perform to resolve these issues, as listed below and will be described in this post.
- Solution 1: Check the Package Spelling
- Solution 2: Update and Upgrade All Packages
- Solution 3: Verify the Package Using the Office Ubuntu Packages Website
- Solution 4: Adding Missing Repositories
- Solution 5: Check Your Active Ubuntu Release
In this guide, all the solutions are tested on the latest LTS release of Ubuntu, that is, Ubuntu 22.04
1. Check Package Spelling/Case-Insensitive in Ubuntu
A typo in the name of the package may result in this error. In fact, this is the first thing you should check. For example, to install the Mariadb server on Ubuntu, if you type mariabd-server instead of mariadb-server, you will get the error.
# apt install mariabd-server

In addition, typing a package name in uppercase characters will also contribute to this error. For example, typing MARIADB-SERVER will result in the same error.
Therefore, it is always advisable to check the spelling of the software package in case you run into this error. In addition, ensure that the case is right (mostly lowercase)
2. Update and Upgrade All Packages
The first thing that you should always do in such scenarios is to update and upgrade your system packages. This will ensure that you are running the latest version of all the packages and that everything is up to date:
# apt update && apt upgrade -y
Now, try to install your desired package, and if still, the problem persists, then you can follow the second method.
3. Check Package on Ubuntu Packages Search
Another approach you can take is to check the availability of the package on Ubuntu Packages Search, which is a website that displays information about all packages hosted on the Ubuntu Package archive.
It allows you to browse through a list of packages available for any Ubuntu release and contained in any of the four main repositories provided by Ubuntu [main, multiverse, restricted, and universe].
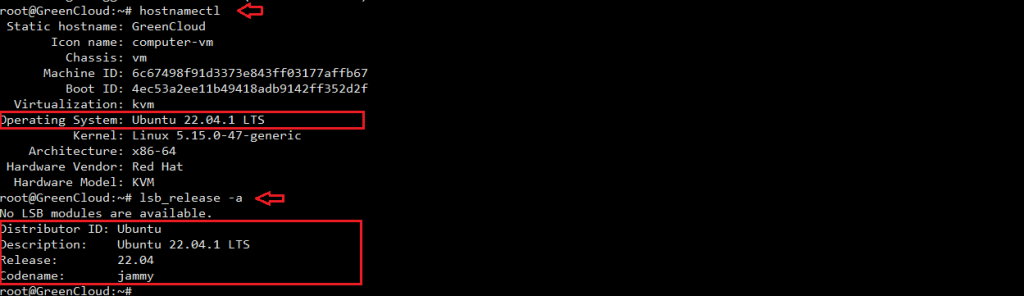
Before you do so, it’s prudent to, first of all, check what Ubuntu release you are using
# hostnamectl
or
# lsb_release -a
From the output provided, you can see that we are running Ubuntu 22.04, jammy
If the package is available, you will get a match. In our case, we got an exact match detailing the OS release, a simple description of the software package, and the repository that provides it (Universe).
A positive result grants you the go-ahead to proceed with the installation of the package. If the package cannot be found, then it is not yet available in the default repositories and cannot the installed directly using the APT package manager.
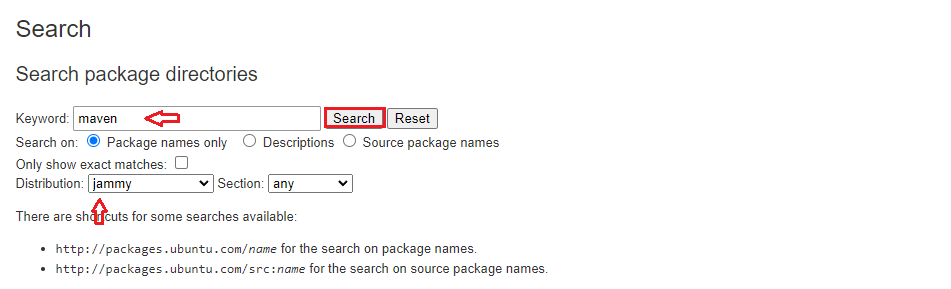
Now, head over to the Keyword search box and type in the name of the package. Next, select your distribution. If you are not sure which repository the package is contained in, set the ‘Section’ option to ‘any’ and click ‘Search’.
In this example, we are searching for the availability of the Maven package.
4. Install Missing Ubuntu Repositories
As we have already seen, Ubuntu provides 4 repositories –
- Main
- Multiverse
- Restricted
- Universe
Each of these provides a set of packages for download on your system. If you are on an older system that is missing any of these repositories, you can add them as follows.
# add-apt-repository main
# add-apt-repository multiverse
# add-apt-repository restricted
# add-apt-repository universe
Once you have added the repository, ensure to update the local cache to notify your system of the new packages provided by it.
# apt update
Now give it another try and, this time, you should be able to install the package without an issue.
5. Check Your Active Ubuntu Release
There are two major releases provided by Ubuntu. The LTS (Long Term Support) is a release that is supported or maintained for 5 years. Support includes bug fixes, patches, and security updates. The latest LTS release is Ubuntu 22.04.
The other release is the standard or interim release, which is supported for nine months. At the moment, the latest standard release is Ubuntu 23.04.
When a release reaches end-of-life (EOL) it stops being supported by Canonical and no longer receives patches, updates, and new software.
To check if you are running an active Ubuntu release, run the following command.
# hwe-support-status --verbose
The command provides the following output. The last sentence will tell if your system is supported or not. In our case, we are running Ubuntu 22.04 which will be supported until April 2027.

If your system is not supported, you will most certainly encounter the error.
If nothing works, perhaps the project itself is discontinued and if that’s the case, you should look for an alternative application.
Conclusion
If you are new to Ubuntu or Linux, things could be overwhelming. This is why I am covering some basic topics like this so that you better understand how things work in your system.
I hope this tutorial helps you handle the package error in Ubuntu.
Good Luck!

