How to install Elasticsearch on CentOS 9 Stream
I. What is Elasticsearch?
Elasticsearch is a search engine based on Lucene software. It provides a full-featured, distributed search engine with an HTTP web interface that supports JSON data. Elasticsearch is developed in Java and is released as open source under the Apache license.
To put it more simply:
Elasticsearchis onesearch engine.Elasticsearchinherited fromLucene ApacheElasticsearchactually acts as a web server, capable of fast search (near realtime) through RESTful protocol.ElasticsearchCapable of data analysis and statisticsElasticsearchruns on its own server and concurrently communicates via RESTful so it doesn’t depend on what the client is written in or what your current system is written in. So integrating it into your system is easy, you just need to send an http request and it will return results.ElasticsearchIt is a distributed system with excellent scalability. Add a node to it and it will automatically expand for you.Elasticsearchis 1open sourcedeveloped withJava.
II. Install Elasticsearch on CentOS 9 Stream
To install Elasticsearch on CentOS 9 Stream we need to follow the following X steps.
Step 1: SSH into your server
To install Elasticsearch on CentOS 9 Stream, we first need to SSH or access your VPS or server with root privileges first.
After successfully SSHing, we continue with step 2 to install Java, because Elasticsearch requires the server to install Java first to allow the installation.
Step 2: Install and Run Elasticsearch.
Installing Java is not required because integrated Java is included in Elasticsearch.
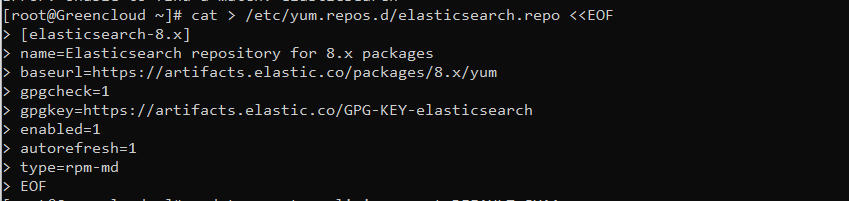
cat > /etc/yum.repos.d/elasticsearch.repo <<EOF
[elasticsearch-8.x]
name=Elasticsearch repository for 8.x packages
baseurl=https://artifacts.elastic.co/packages/8.x/yum
gpgcheck=1
gpgkey=https://artifacts.elastic.co/GPG-KEY-elasticsearch
enabled=1
autorefresh=1
type=rpm-md
EOF
update-crypto-policies --set DEFAULT:SHA1
dnf -y install elasticsearch
Results after installation is complete:

We then start Elasticsearch with the following command:
systemctl enable --now elasticsearch
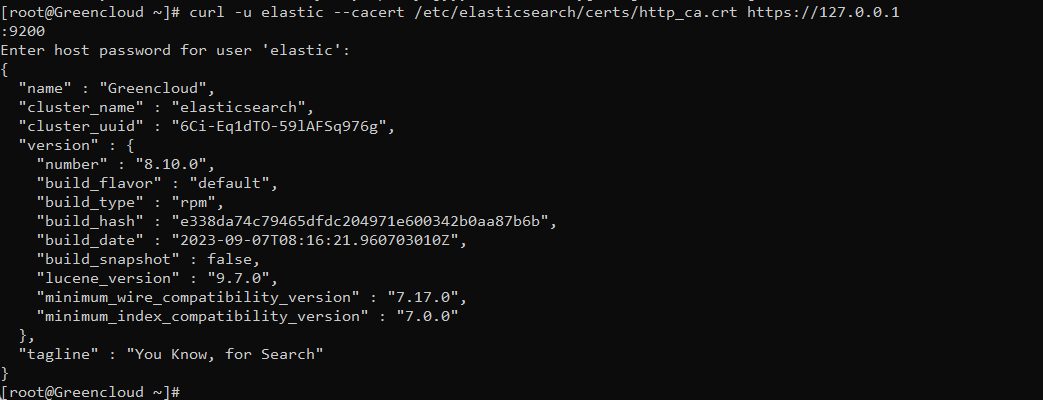
Verify status, the password is the one that is shown during the installation above
curl -u elastic --cacert /etc/elasticsearch/certs/http_ca.crt https://127.0.0.1:9200
Step 3: Enable Remote Access Elasticsearch
However, so far we can only use Elasticsearch right on the local computer. If you want external users to connect to port 9200 then you need to open port 9200 and do a few more steps.
Edit the configuration file of Elasticsearch with the command below:
vi /etc/elasticsearch/elasticsearch.yml
Move to the line 56, remove #this line and edit it to the content below:
network.host: 0.0.0.0
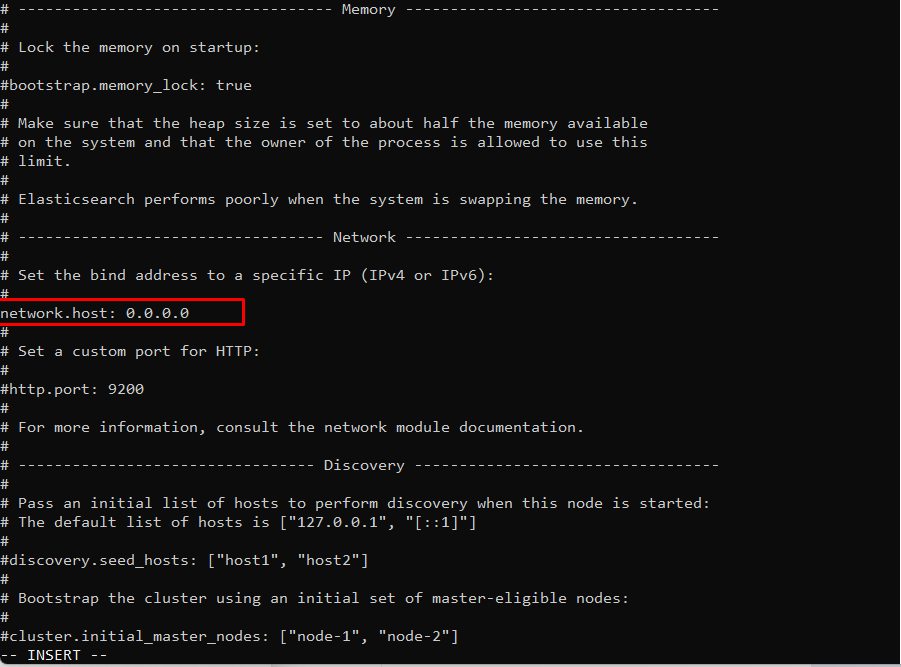
Then remove #the line 17and edit it to the following content:
cluster.name: elastic-cluster
We will then need to restart Elasticsearch with the following command:
systemctl start elasticsearch
If Firewalld is running, allow service ports on all Nodes.
firewall-cmd --add-port={9200/tcp,9300/tcp}
firewall-cmd --runtime-to-permanent
This is the basic usage of Elasticsearch.
Create an Index first, it is like Database on RDB.
Show Index list ([pretty] means it shows JSON with human readable)
[root@Greencloud ~]# curl -u elastic --cacert /etc/elasticsearch/certs/http_ca.crt https://127.0.0.1:9200/_aliases?pretty   # show Index list ([pretty] means it shows JSON with human readable)
Enter host password for user 'elastic':
{
".security-7" : {
"aliases" : {
".security" : {
"is_hidden" : true
}
}
}
}
# create Index
[root@Greencloud ~]# curl -u elastic --cacert /etc/elasticsearch/certs/http_ca.crt -X PUT "https://127.0.0.1:9200/test_index"
Enter host password for user 'elastic':
{"acknowledged":true,"shards_acknowledged":true,"index":"test_index"}
[root@Greencloud ~]# curl -u elastic --cacert /etc/elasticsearch/certs/http_ca.crt https://127.0.0.1:9200/_aliases?pretty    # verify
Enter host password for user 'elastic':
{
".security-7" : {
"aliases" : {
".security" : {
"is_hidden" : true
}
}
},
"test_index" : {
"aliases" : { }
}
}
[root@Greencloud ~]# curl -u elastic --cacert /etc/elasticsearch/certs/http_ca.crt https://127.0.0.1:9200/test_index/_settings?pretty
Enter host password for user 'elastic':
{
"test_index" : {
"settings" : {
"index" : {
"routing" : {
"allocation" : {
"include" : {
"_tier_preference" : "data_content"
}
}
},
"number_of_shards" : "1",
"provided_name" : "test_index",
"creation_date" : "1694751783765",
"number_of_replicas" : "1",
"uuid" : "CyYAlqR2RhaYSiN9nn_gCQ",
"version" : {
"created" : "8100099"
}
}
}
}
}
At this point, the installation of Elasticsearch on CentOS 9 Stream has been successful.
III. Summary
Although the article on installing Elasticsearch on CentOS 9 Stream is relatively long and has many complicated sections, I hope you can do it all. You can now visit the official Elasticsearch Documentation page and learn how to get started with Elasticsearch.

