How to Add Password Protection for a Directory Using cPanel
In certain scenarios, securing a folder with a password on your account is advisable, providing an additional layer of protection for sensitive files. Utilizing cPanel, you can easily implement and remove password protection for directories. This guide will walk you through the steps to manage directory access using cPanel.
How Does Password Protection Work?
It is important to understand how password protection on a folder works. When you choose to password-protect a directory in cPanel, cPanel creates a rule in your .htaccess file. This rule specifies that the folder is protected and the visitor will need to provide the proper username and password to log in and view the files within it.
Note: When a user attempts to access the protected directory through a browser, the site will prompt them to enter a username and password. The name that you choose for the protected directory will also display. Additionally, all the sub-directories that exist within the protected directory will be accessible, once authenticated.
How to setup Password Protect A Directory
Step 1: Log into cPanel
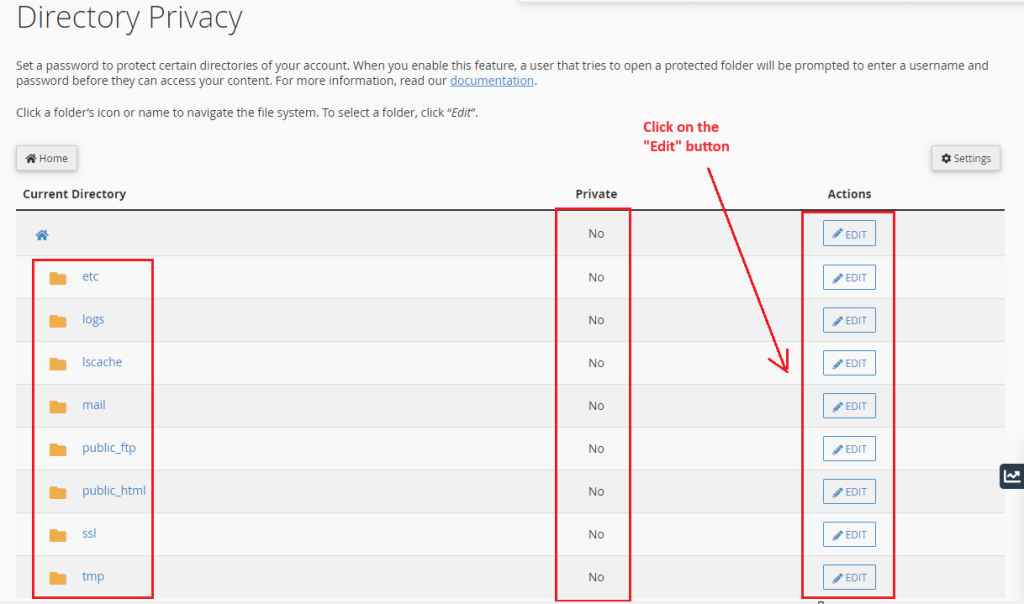
Step 2: Go to the Files section and click on the Directory Privacy icon

Step 3: Click on Edit
This section of the cPanel is dedicated to password protection. Thus, it’s the first step on how to put a password lock on a folder.
You will now see a full list of all of your website’s directories. You can click on a directory to access its subdirectories, which can also be password-protected. On the right-hand side of a directory, you will notice an “Edit” button.
This will allow you to make the directory password-protected. Click on the “Edit” button for the directory you wish to add password protection to.
Note: There is a “Private” column that will tell you if the directory already has a password or not.
Step 4: Enter A Name for the Directory
There are two steps to password-protecting a directory. The first involves picking a name for your directory, and the second is to add a password to a folder.
Check the small checkbox to “Password protect this directory” and it will unlock the textbox below it. In this textbox, you must enter a name for the directory. Click on the “Save” button when you are done.
Note: This does not have to be the actual name of the directory. It will automatically add Protected ‘your directory name’ in this text spot, which will suffice for most websites.
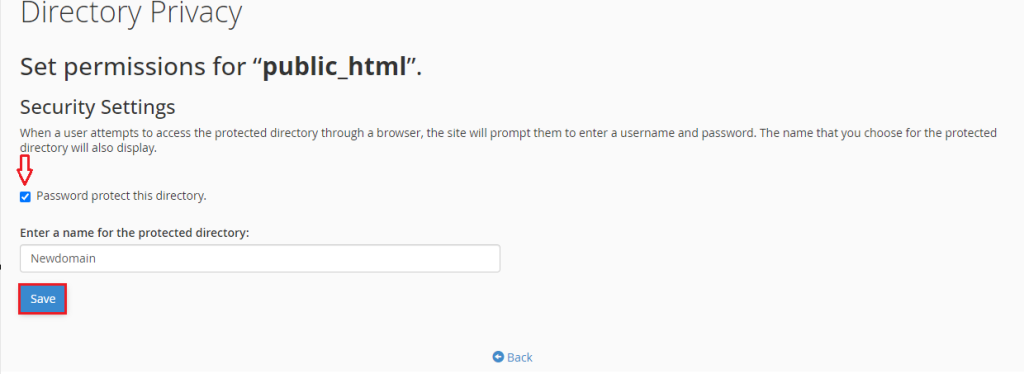
You will now see a success notification signaling that everything happened correctly. Click the Go Back link below it.

Step 5: Password Protect the Directory
The second part of the process is to create a new user that can access the directory. Be aware that if your web browser has autofill turned on, it will enter your information into the fields. This cannot be the same as your information. You must enter a new user name and password.
Make sure that you write down this unique user’s login information. It can cause a lot of problems if lost.
Note: The system will analyze your password or passphrase and reject it with a “password strength” error if it is too short or not sufficiently complex. If you need help making a strong password, check out this tool.
Once you have filled in the necessary information, click the “Save” button.
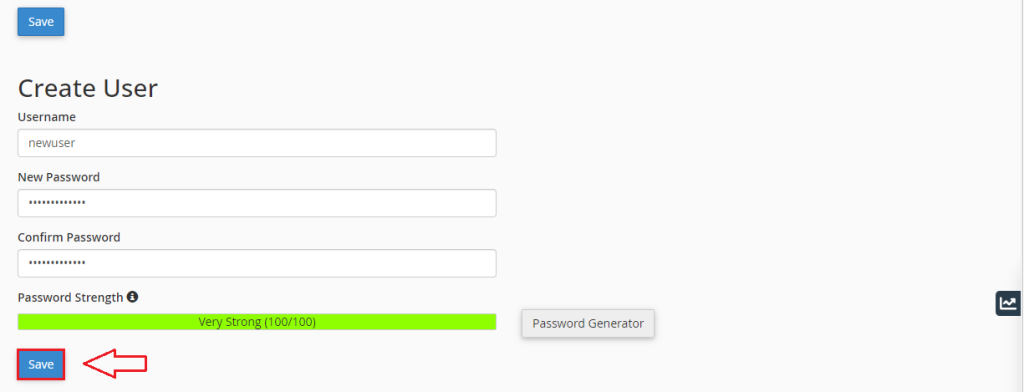
You will once again see the success message, indicating that your directory is now password-protected.

Congratulations on password-protecting your directory.
How to Remove Password Protection
The steps to remove password protection on a directory are fairly quick and simple. One reason you might want to password-protect a directory and then remove the protection is for testing purposes. Or, if you are finally ready to make the folder open to the public, then you can remove the password protection so that everyone can access the files in the directory. The instructions below are the steps for removing the password protection.
Step 1: Log into cPanel
Step 2: Scroll down to the Files section in your cPanel and then click the Directory Privacy icon
Step 3: Select the directory from the list of folders that you want to remove password protection and click on Edit
Step 4: Uncheck the box that says “Password protect this directory“
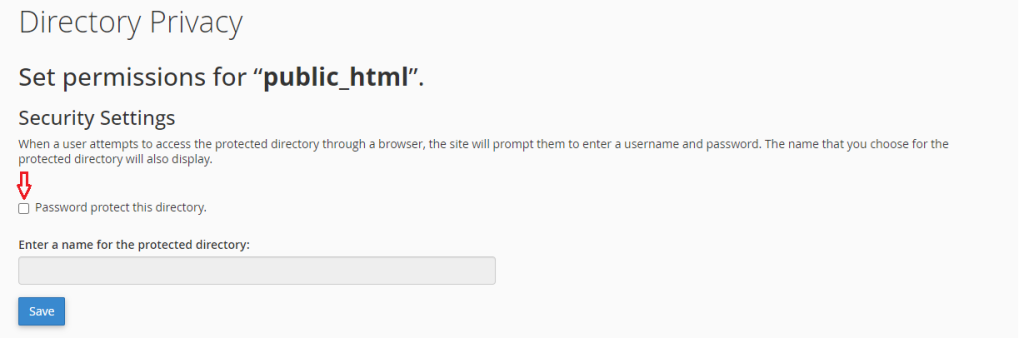
Finally, click the Save button.
Conclusion
Congratulations! You have successfully secured a directory on your web hosting account to prevent unauthorized access. Should you encounter any challenges while enabling directory protection, please don’t hesitate to contact our Technical Support Team for assistance. We’re here to help!

