How to Allow Remote Connections to MySQL in Ubuntu / Debian
Introduction
It is not uncommon to host databases and web servers on the same local machine. However, many organizations are now moving to a more distributed environment.
A separate database server can improve security, hardware performance, and enable you to scale resources quickly. In such use cases, learning how to manage remote resources effectively is a priority.
This tutorial shows you how to enable remote connections to a MySQL database.
Prerequisites
- Access to a terminal window/command line
- Remote MySQL server
- Sudo or root privileges on local and remote machines
MySQL Server Remote Connection
Allowing connections to a remote MySQL server is set up in 3 steps:
- Installation and Edit MySQL config file
- Configure firewall
- Connect to remote MySQL server
Step 1: Installation and Edit MySQL Config File
1.1 Installing MySQL
In this article we will guide on Ubuntu 20.4
Begin by running the following commands as a non-root user to update your package listings
sudo apt update
sudo apt upgrade
Use apt to acquire and install this software:
apt install mysql-server
When prompted, confirm installation by typing Y, and then ENTER.
Ensure that the server is running using the systemctl start command:
mysql_secure_installation
Attention during installation error may occur : SET PASSWORD has no significance for user ‘root’@’localhost’ as the authentication method used doesn’t store authentication data in the MySQL server Error First of all, You need to change the authentication parameters to do so just run this command first: sudo mysql .Then run This ALTER Query to change the authentication parameters: ALTER USER ‘root’@’localhost’ IDENTIFIED WITH mysql_native_password by ‘mynewpassword’; And now, you are able to run mysql_secure_installation
This will ask if you want to configure the VALIDATE PASSWORD PLUGIN.
Note: Enabling this feature is something of a judgment call. If enabled, passwords which don’t match the specified criteria will be rejected by MySQL with an error. It is safe to leave validation disabled, but you should always use strong, unique passwords for database credentials.
Answer Y for yes, or anything else to continue without enabling.
>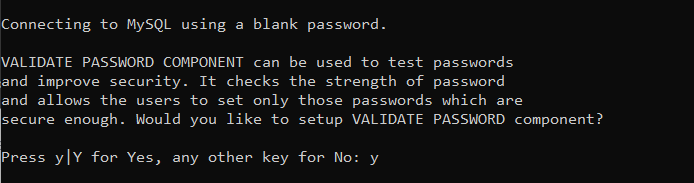
If you answer “yes”, you’ll be asked to select a level of password validation. Keep in mind that if you enter 2 for the strongest level, you will receive errors when attempting to set any password which does not contain numbers, upper and lowercase letters, and special characters, or which is based on common dictionary words.


For the rest of the questions, press Y and hit the ENTER key at each prompt. This will remove some anonymous users and the test database, disable remote root logins, and load these new rules so that MySQL immediately respects the changes you have made. When you’re finished, test if you’re able to log in to the MySQL console by typing:
mysql -uroot -p
CREATE USER statement. These follow this general syntax:CREATE USER 'username'@'localhost' IDENTIFIED BY 'password';
Alternatively, you can create a new user account that will only connect from the remote host with the following command:
CREATE USER 'user'@'remote_server_ip' IDENTIFIED BY 'password';
Note: This command will create a user that authenticates with MySQL’s default authentication plugin, caching_sha2_password. However, there is a known issue with some versions of PHP that can cause problems with this plugin.
If you plan to use this database with a PHP application — phpMyAdmin, for example — you may want to create a remote user that will authenticate with the older, though still secure, mysql_native_password plugin instead:
CREATE USER 'user'@'remote_server_ip' IDENTIFIED WITH mysql_native_password BY 'password';
After CREATE USER, you specify a username. This is immediately followed by an @ sign and then the hostname from which this user will connect. If you only plan to access this user locally from your Ubuntu server, you can specify localhost. Wrapping both the username and host in single quotes isn’t always necessary, but doing so can help to prevent errors.
Run this GRANT statement, replacing greencloud with your own MySQL user’s name, to grant these privileges to your user:
Following this, it’s good practice to run the FLUSH PRIVILEGES command. This will free up any memory that the server cached as a result of the preceding CREATE USER and GRANT statements:
FLUSH PRIVILEGES;
To exit the MySQL console, type:
mysql> exit
1.2 Access mysqld.cnf File
Use your preferred text editor to open the mysqld.cnf file. This example uses the nano text editor in Ubuntu 20.04. Enter the following command in your command-line interface to access the MySQL server configuration file:
sudo nano /etc/mysql/mysql.conf.d/mysqld.cnf
The location of the file may vary based on the distribution and version in use. If the MySQL configuration file is not it its default location try using the Linux find command to detect it.
1.3 Change Bind-Address IP
You now have access to the MySQL server configuration file. Scroll down to the bind-address line and change the IP address. The current default IP is set to 127.0.0.1. This IP limits MySQL connections to the local machine.
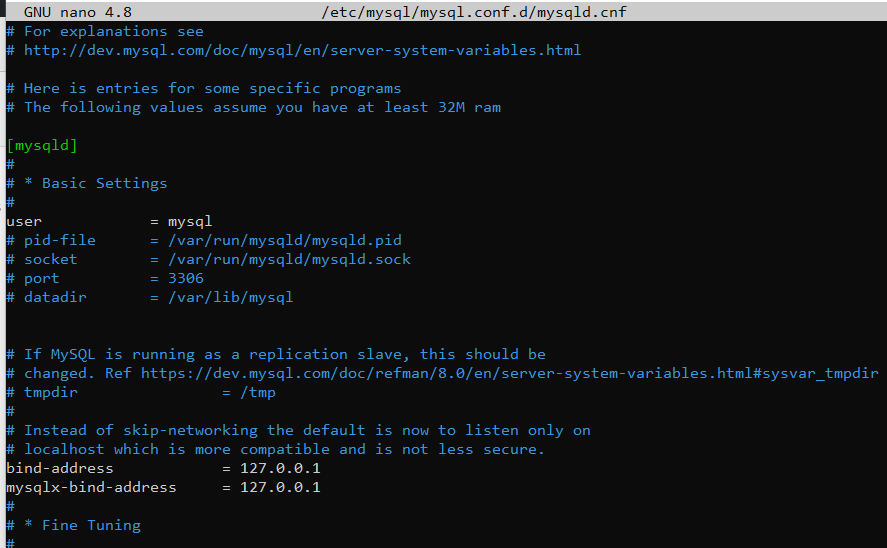
The new IP should match the address of the machine that needs to access the MySQL server remotely. For example, if you bind MySQL to 0.0.0.0, then any machine that reaches the MySQL server can also connect with it.
Once you make the necessary changes, save and exit the configuration file.
1.4 Restart MySQL Service
Apply the changes made to the MySQL config file by restarting the MySQL service:
sudo systemctl restart mysql
Next, your current firewall settings need to be adjusted to allow traffic to the default MySQL port.
Step 2: Set up Firewall to Allow Remote MySQL Connection
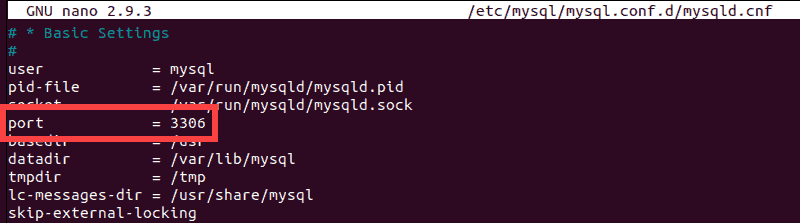
While editing the configuration file, you probably observed that the default MySQL port is 3306.
If you have already configured a firewall on your MySQL server, you need to open traffic for this specific port. Follow the instructions below that correspond to your firewall service in use.
UFW is the default firewall tool in Ubuntu.To install use the command: apt-get install ufw. Type the following command to allow traffic and match the IP and port:
sudo ufw allow from remote_ip_address to any port 3306
The system confirms that the rules were successfully updated.

Step 3: Connect to Remote MySQL Server
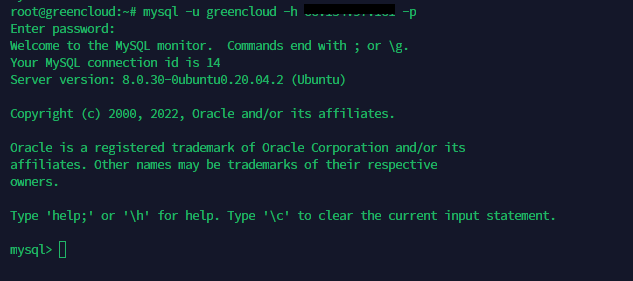
Your remote server is now ready to accept connections. Use the following command to establish a connection with your remote MySQL server:
mysql -u username -h mysql_server_ip -p
The -u username in the command represents your MySQL username. The -h mysql_server_ip is the IP or the hostname of your MySQL server. The -p option prompts you to enter the password for the MySQL username.
You should see an output similar to the one below:
In this article, you have gained valuable insight into the general principles of a remote MySQL connection.
With the appropriate credentials, a user originating from the specified IP address can now access your MySQL server from a remote machine.

