How to Extend Logical and Extended Partitions With fdisk
1. Overview
The fdisk program is a Linux command-line utility for creating and modifying partition tables. It’s a powerful tool and can be dangerous when misused. Hence, only root or users with sudo privileges can alter the partition table using the program.
In this tutorial, we’ll look at what partitions mean. Also, we’ll learn the procedure for extending logical and extended partitions using the current version of the fdisk program.
2. Disk Partitioning
Of course, a drive requires at least one partition before we can format and store files on it. We can partition a disk into one or more logical disks, each of which operates as a separate disk and has its own file system.
Also, a partition table contains the information about the partitions. The fdisk utility recognizes Sun, SGI, and BSD partition tables in addition to GPT (GUID Partition Table) and MBR (Master Boot Record). Many operating systems and disks use the GPT and MBR partition tables.
2.1. Listing Partitions
To list the partition table of a device, we use the fdisk command with the -l option and the device name. However, if we don’t specify any device, it will print the partition tables of all the devices in the /proc/partitions file.
In addition, the partition consists of the device name and partition number. For example, /dev/vda1 is the first partition on the system’s primary hard drive.
Let’s take a look at the GPT partition tables:
fdisk -l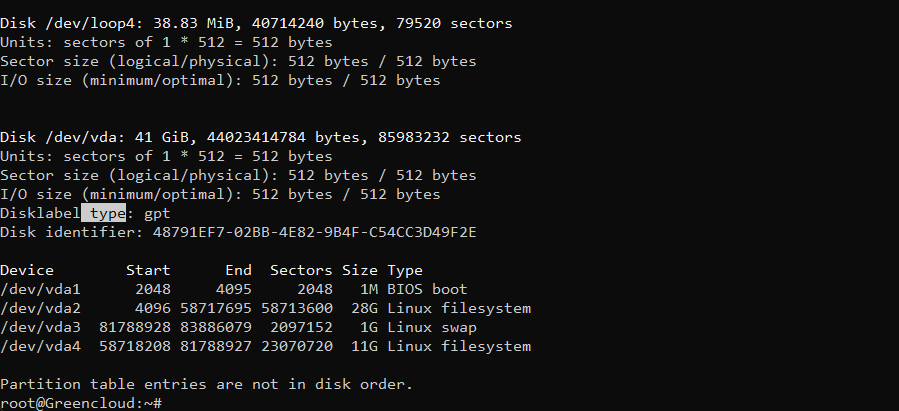
GPT (GUID Partition Table) is the modern standard partition table. It uses 64-bit logical block addresses and allows an unlimited number of partitions. However, some partitioning tools restrict the number of partitions to 128.
The GPT partitioning scheme reserves the first sector for a protective MBR in the GPT specification. Thus, it prevents MBR-only partitioning tools from misrecognizing and overwriting GPT disks.
2.2. Master Boot Record
The Master Boot Record (MBR or DOS-type) has its limitations compared to GPT. Hence, GPT is gradually replacing MBR.
The features of MBR include:
- Support for only four primary partitions
- It reserves the numbers 1-4 for the primary partitions
- For more partitions, we have to make one of the primary partitions an “extended partition.”
- The extended partition contains the logical partitions
- Logical partitions numbering starts from 5
- It works with disks of 2 TB maximum in size
Let’s see an example of an MBR partition table:
 fdisk -l

...

Disk /dev/sda: 465.78 GiB, 500107862016 bytes, 976773168 sectors
Disk model: WDC WD5000AAKX-6
Units: sectors of 1 * 512 = 512 bytes
Sector size (logical/physical): 512 bytes / 512 bytes
I/O size (minimum/optimal): 512 bytes / 512 bytes
Disklabel type: dos
Disk identifier: 0x64ec60b3

Device     Boot   Start       End   Sectors   Size Id Type
/dev/vda1  *       2048   1050623   1048576   512M  b W95 FAT32
/dev/vda2       1052670 976771071 975718402 465.3G  5 Extended
/dev/vda5       1052672   2549759   1497088   731M 83 Linux
/dev/vda6       2551808 976771071 974219264 464.6G 83 Linux
Generally, SATA device names follow the pattern /dev/sd[a-z], while NVMe device names have the pattern /dev/nvme[1-9]n[1-9]. Both SATA and NVMe devices support the GPT and MBR partition tables.
3. Extend Partition with fdisk
The procedure to extend an extended or logical partition with fdisk starts with deleting both partitions. Then, we recreate the partition with the desired endpoint. Using the fdisk expert menu, we can adjust the beginning of the partition to expand it, thereby adjusting the start of the partition and not the endpoint.
3.1. fdisk Command Menu
The command menu allows the use of single-letter commands to specify actions. To enter the command menu of the program, we’ll need the device name from the fdisk -l command output.
Let’s enter the command menu:
fdisk /dev/vda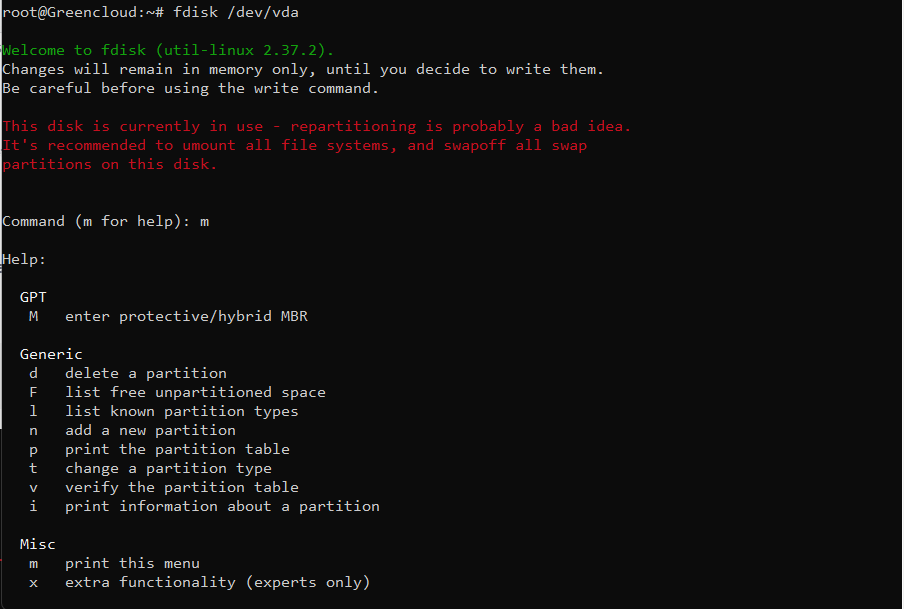
Typing the letter m displays a list of the commands for use in the program.
3.2. Viewing the Partition Table
Using the p command, let’s print the current partition table to the terminal from within the command menu:
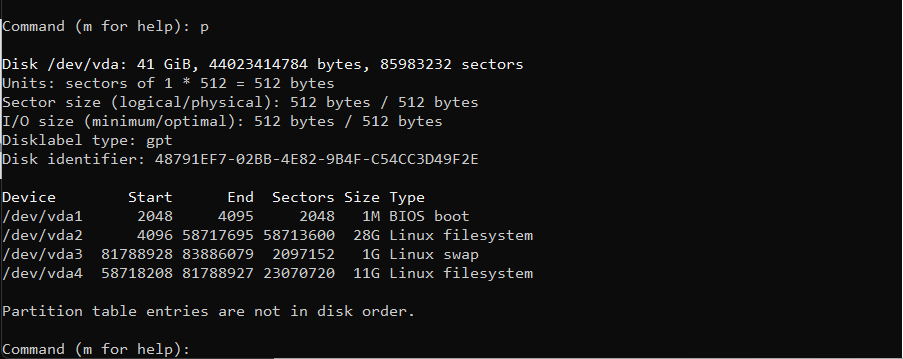
From the output, we have an extended partition and two logical partitions. Following the procedure, we’ll delete the extended and logical partitions, recreate them with our desired endpoint, and then extend the starting points.
3.3. Deleting Partitions
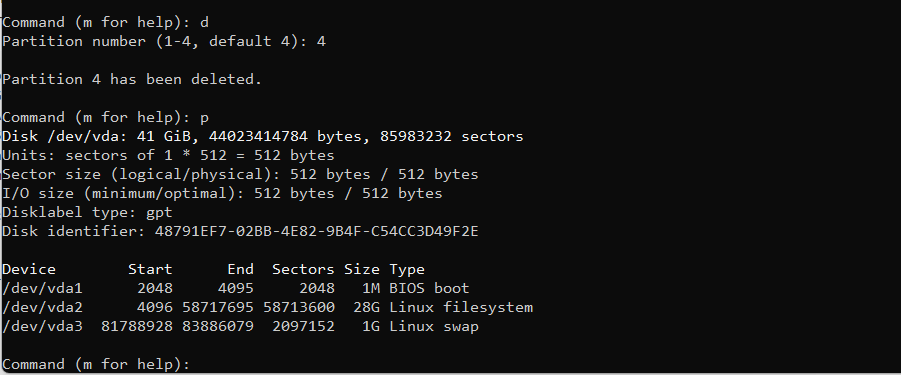
The d command in the command menu deletes a partition.
When entering the d command, the dialogue requires the number of the partition to delete. This is the number associated with the device partition from the p command’s output. For example, to delete the partition at /dev/vda4, we’ll key in 4.
However, deleting the extended partition would remove all the logical partitions under it. Again, if we don’t specify any partition number in the dialogue, the program defaults to the last logical partition.
Let’s delete the extended partition:
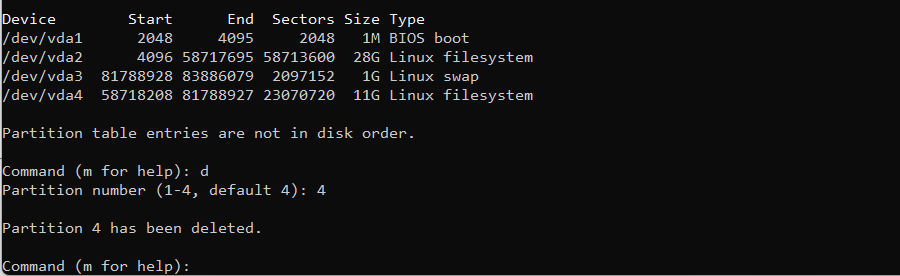
The command dialogue 2 deletes both the extended and logical partitions. After deleting the partition, we can print and confirm our changes by viewing the current partition table:
Next, we’ll recreate the extended and logical partition.
3.4. Creating a Partition
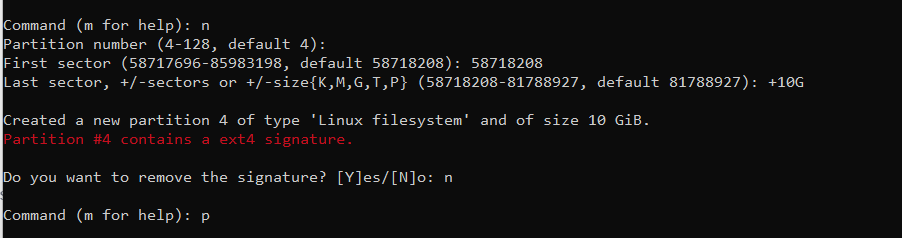
The n command creates a new primary or extended partition. Again, the program will default to a primary partition if no option is selected.
Also, fdisk will number the new partition as /dev/vda4 for this example:

Next, we’ll specify the starting sector of the new partition on the disk. However, pressing Enter accepts the program’s default sector – the first free sector on the disk.
Lastly, we’ll set the last sector of the partition on the disk. Again, we’ll hit Enter to use up all available space after the initial sector.
Also, we can specify a size for the partition. For instance, +10G would result in a ten-gigabyte partition or +800M for an 800-megabyte partition. However, if we don’t specify a unit after the + sign, fdisk uses sectors as the unit. For example, specifying +10000 in the dialogue would result in a partition with 10000 sectors from start to end.
Let’s set the first and last sectors of the partition:
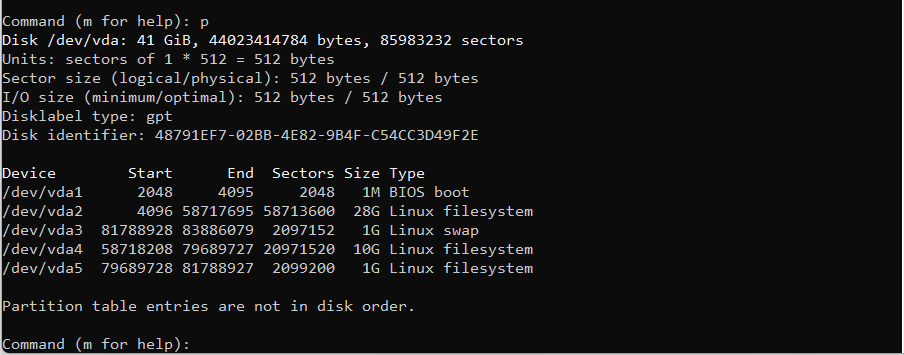
Subsequently, we’ll create a new logical partition. It will begin at the end of /dev/vda1 and take the remaining space of the extended partition. Also, creating a logical partition requires that an extended partition is present.
To illustrate, let’s create a logical partition. The procedure is the same as that of the extended partition. In contrast, the command for creating the logical partition type is l.
Since the logical partition will take up the entire extended partition, we’ll choose the default first and last sectors the program specifies:

To confirm our change, let’s run the p command:
Next, let’s extend the logical partition. We’ll adjust its starting sector in the fdisk expert. The procedure is the same for extending an extended partition.
3.5. fdisk Expert Menu
The x command takes the fdisk program to the expert menu. Also, we can use the m call to view the list of commands available in the expert menu.
The b command adjusts the beginning of the partition. Again, on entering b, the menu prompts for a partition number. It’s the number corresponding to the partition we want to extend.
For example, let’s extend the logical partition /dev/sda5.

Similarly, the p command lists the disk partitions in the expert menu. To confirm our changes, let’s list the disk partitions:
Expert command (m for help): p
Disk /dev/vda: 60 GiB, 64424509440 bytes, 125829120 sectors
Units: sectors of 1 * 512 = 512 bytes
Sector size (logical/physical): 512 bytes / 512 bytes
I/O size (minimum/optimal): 512 bytes / 512 bytes
Disklabel type: gpt
Disk identifier: 7D5A8153-552F-406E-8D69-646CE0085C7C
First usable LBA: 34
Last usable LBA: 125829086
Alternative LBA: 125829119
Partition entries starting LBA: 2
Allocated partition entries: 128
Partition entries ending LBA: 33

Device Start End Sectors Type-UUID UUID Name Attrs
/dev/vda1 2048 4095 2048 21686148-6449-6E6F-744E-656564454649 D0C0454D-28CB-427C-A813-8EF76A8A8B04 primary
/dev/vda2 4096 100468735 100464640 0FC63DAF-8483-4772-8E79-3D69D8477DE4 6CE3CB20-E956-461A-837C-0FA241220EA3 primary
/dev/vda3 121632256 125826559 4194304 0657FD6D-A4AB-43C4-84E5-0933C84B4F4F 8D6D37B7-7628-4E32-9569-BC353CA79E23 primary
/dev/vda4 100468736 117245951 16777216 0FC63DAF-8483-4772-8E79-3D69D8477DE4 82769934-B000-4E5C-845A-B7D4808A30EC
/dev/vda5 117245952 121632255 4386304 0FC63DAF-8483-4772-8E79-3D69D8477DE4 41D44513-52AE-425E-A0DD-9C0B14BAC451 NoBlockIOProtocol

Partition table entries are not in disk order.

Expert command (m for help):
Then, the r command exits the expert menu, and the w command writes the changes to the disk:

If the old partitions are still in use, the program would fail to write changes to the disk.
Next, we’ll format the new partitions with a filesystem using the appropriate mkfs utility.
4. Activating New Partition
Having created the partitions, the next step is to format and mount them to the system directory tree. However, we don’t need to mount the extended partition directly. We’ll only mount the logical partition since the logical partition is inside the extended partition.
4.1. Formatting Partitions
At this point, we are ready to format the partitions for use. We’ll use ext4 for the partition in this illustration, although one can still use any partition format.
Let’s format both partitions to ext4:
mkfs.ext4 -F /dev/vda4; mkfs.ext4 -F /dev/vda5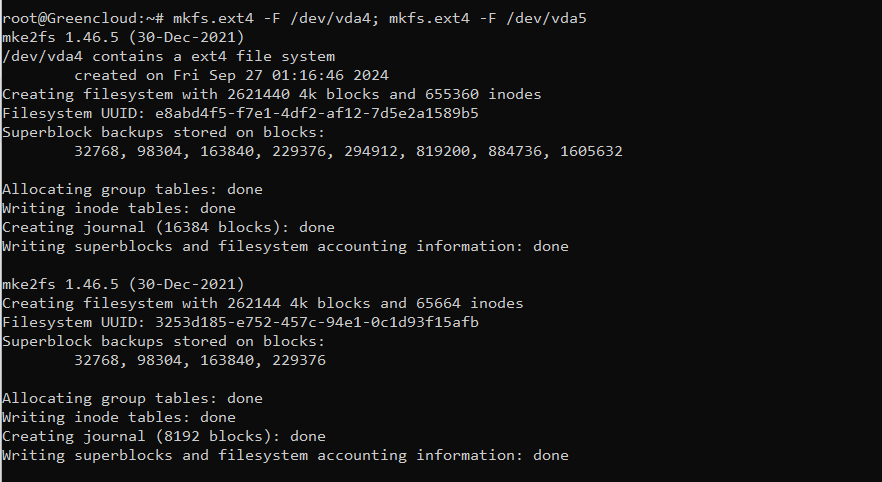
The flag -F would force mkfs to create a filesystem. The option is handy if the specified device is not a partition on a device or if other parameters don’t make sense.
Additionally, to forcefully create a filesystem where the filesystem appears to be in use or is mounted, we can specify the -F option twice, but it’s risky.
4.2. Mounting Partitions
To mount a partition, we’ll first create the mount point with mkdir. Then we’ll mount the partition using the new directory as the mount point.
Now, let’s create the mount point in the /mnt directory:
mkdir -p /mnt/greencloud
The -p switch ensures the creation of the parent directory if it’s not available.
Next, let’s mount the new partition to the new directory:
mount /dev/vda4 /mnt/greencloud
Lastly, partitions will stay mounted until we unmount them or shut down the machine. We can define the mount in the /etc/fstab file to automatically mount a partition when the Linux system boots up.
5. Conclusion
In this article, we’ve learned how to delete, create, and extend partitions in a Linux system from the command line. Also, we’ve seen how to format and mount the partitions after creating a new partition.
However, editing partitions in use can lead to harmful damage. Hence, to edit system partitions, it’s better to back up their content and boot from a Live CD or bootable USB stick. Also, we have to carry out this task carefully when we do it on a public server and note changes to system files for future admins to reference.
