How to Use the chown and chgrp Commands on Linux
When it comes to large organizations, Users and Groups in Linux play an important role in helping keep systems secure and properly functioning.
There can be different levels of users in an organization with different roles and permissions. And you’ll need a good understanding of Linux permissions to manage and/or understand them.
To protect files and directories in Linux from access by certain types of users, we can use the chown and chgrp commands. These commands let you manage which type of user can read, write, and execute a file.
What are Group and User in Linux?
A user is a regular entity that can manipulate files, and directories, and perform various types of actions in a system. We can create any number of users in Linux.
A group contains zero or more users in it. Users in a group share the same permissions. The group allows you to set permissions on the group level instead of having to set permissions for individual users.
Each person should have an individual level of access to the files in the system. Accordingly, there will be a common set of permissions for developers, testers, and admins, in their respective groups.
You want to create a file that should be accessible only to the developers. Can you achieve this without using the concept of groups? Yes – it’s doable. But, that means you’ll have to assign permissions individually to each developer.
The next day, say you get news that your team is expanding to 150 developers and 20 testers due to an immediate client requirement.
Again, you could assign all those additional permissions individually. But, it’s not scalable. It’s so tedious to manage permissions for each and every developer – so why not do it all together if they share common permissions?
Here comes the usefulness of groups. If we have all 10 (or 150) developers in a group called dev_group, we can simply give permission to the group dev_group.
What are Primary and Secondary Groups in Linux?
As the name implies, a primary group is a group that a user belongs to by default.
For example, let’s assume your username is Green, and you create a group called admin. Then you will belong to the group admin by default.
A secondary group is a group to which you can add any number of users.
How to Create a User
You can create a user by using the useradd command. Each user in a Linux system has a unique user id.
useradd [OPTIONS] <user_name>
Let’s create a new user named admin:
useradd admin
How to Create a Group
Groups are created by using the groupadd command. Similar to users, each group in a Linux system has a unique group id.
groupadd [OPTIONS] <group_name>
Let’s create a new group named Green_group:
groupadd Green_group
How to Add a User to a Group
So, we created a user and a group. Let’s add the user (admin) to the group (Green_group). The command to add a user to a group is usermod -aG.
usermod -aG <group_name> <user_name>
Here’s the actual command to add the user admin to Green_group group:
usermod -aG Green_group admin
How to List Out Groups
The list of groups and the users who have permissions in the group are stored in a file called group. It will be located under the /etc directory.
We can see the available groups by reading that file using the cat command like this:
cat /etc/group
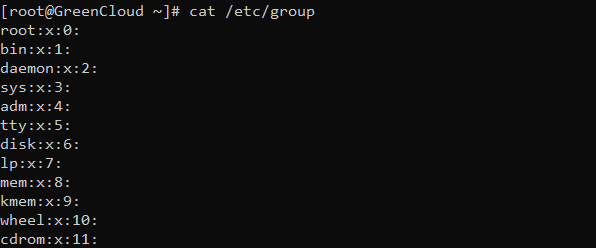
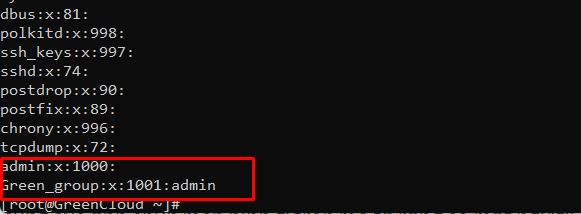
This will be huge file. By default it has 70 to 100 lines. So, I’ve cropped the top and bottom part of the command’s output in the above screenshots.
The last 2 lines of the above screenshot describe that there’s a new user called admin, a new group called Green_group, and the user admin has been added to the Green_group group.
How to Find the Current Owner and Group Ownership of a File
There’s a powerful – and likely familiar – command in Linux which shows the permissions involved in a file/directory. This is the ls -l command:
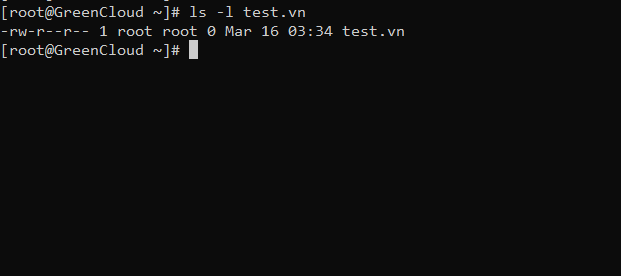
-rw-rw-r-- 1– Permission for file test.vn- 1st occurrence of
root– Owner of the file - 2nd occurrence of
root– Group ownership of the file
How to Change the Owner of a File or Directory
You can use the chown command to change the ownership of a file. The chown command is abbreviated from “change owner”.
From our previous example, we have seen the file test.vn owned by the user named root.
chown <user_name> <file_name>Let’s change the ownership of the file to the user admin using the chown command. We can do that like this:
chown admin test.vn
From the above screenshot, you can clearly see that the owner of the file test.vn has been changed from root to admin.
How to Copy Ownership from One File to Another
You can do this by adding a --reference flag.
chown --reference=<source_file_name> <destination_file_name>Terminal command syntax to copy the ownership of one file to another
Let’s explore this with an example:
Let’s create a new file named copy.sh with my user account root.
The owner of the test.vn file is the admin user (from our previous example). I want the ownership of test.vn file to be copied to the newly created copy.sh file which is owned by the root user.
chown --reference=test.vn copy.sh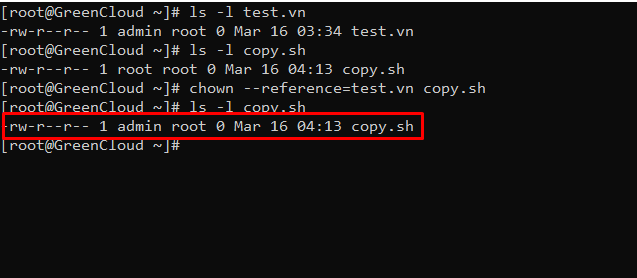
From the above screenshot, you can see that the first command describes the ownership of the test.vn file, which is owned by the admin user.
The second command describes the ownership of the copy.sh file which is owned by the root user.
The third command copies the ownership of the test.vn to the copy.sh file.
The last command again describes the ownership of the copy.sh file which is now owned by admin user.
How to Change Ownership of Multiple Files with a Single Command
You can do this by passing multiple file names to the chown command with one user name. This sets the ownership of all the given files to that particular user.
chown <user_name> file1 file2 ...
Here’s an example where I want to set the ownership of the files copy.sh and test.vn to the admin user:
chown admin copy.sh test.vn

Set ownership of copy.sh and test.vn files to admin user
How to Change the Group Ownership of a File
Almost all the operations related to groups can be achieved with chgrp command (an abbreviation of “change group”). It’s pretty similar to the chown command.
Syntax of the chgrp command:
chgrp <group_name> <file/dir_name>
I have already created a group called Green_group . I do not belong to this group. Let’s change the group ownership of the test.vn file from root to the Green_group group.
chgrp Green_group test.vn
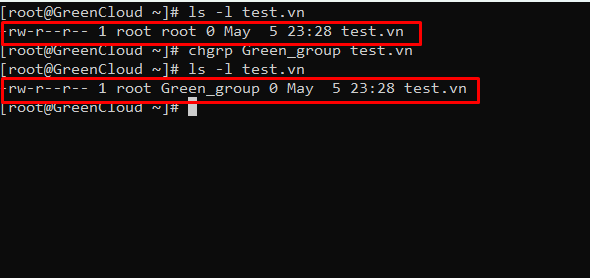
From the above screenshot, you can see that I changed group ownership of the test.vn file from root to Admin.
How to Change the Group Ownership of a Directory
The same syntax for files is applicable to directories also. Here’s a quick example:
chgrp Green_group VPS_test/
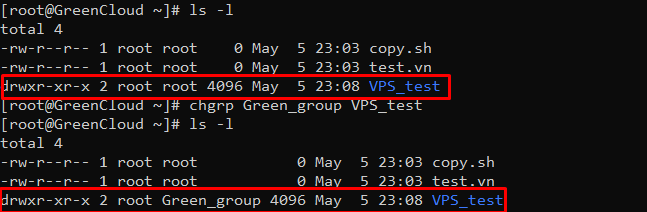
Change group ownership of VPS_test directory to Green_group group
But remember that the above command changes the group ownership of only the files in that directory. To recursively change the group permissions of all the directories inside that directory, we have to add the -R flag to it like this:
chgrp -R Green_group VPS_test/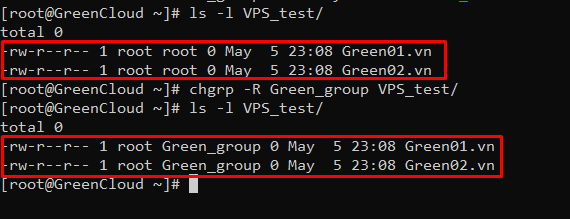
Now the group ownership for all the files and directories inside VPS_test have been changed from root to Green_group.
Conclusion
In this article, you have learned about handling user and group ownership of files and folders. We hope you enjoyed reading it
