How to Install Apache Cassandra on Ubuntu 20.04
Apache Cassandra is a NoSQL database used for storing large amounts of data. It has a distributed architecture and is designed to manage large volumes of data with dynamic replication. It is used by thousands of companies to save and retrieve thousands of terabytes of data. Apache Cassandra is the best choice for you if you are looking for a database management system with scalability and high availability.
In this tutorial, we will guide you to install Apache Cassandra on Ubuntu 20.04.
Step 1: Update the Server OS Packages
You can do this by running the following commands:
apt-get update -y
apt-get upgrade -y
Step 2: Install Java
Apache Cassandra requires Java version 8 to be installed in your system. You can install it using the following command:
apt-get install openjdk-8-jdk -y
Once the installation is completed, verify the installed version of Java with the following command:
java -version
You should get the following output:

Step 3: Install Apache Cassandra
By default, the Apache Cassandra is not available in the Ubuntu default repository. So you will need to add the Cassandra repository to your system.
First, install the required dependencies with the following command:
apt-get install apt-transport-https gnupg2 -y
Next, download and add the GPG key with the following command:
wget -q -O - https://www.apache.org/dist/cassandra/KEYS | apt-key add -
Next, add the Cassandra repository to the APT with the following command:
sh -c 'echo "deb http://www.apache.org/dist/cassandra/debian 311x main" > /etc/apt/sources.list.d/cassandra.list'
Next, update the repository cache and install the Apache Cassandra with the following command:
apt-get update -y
apt-get install cassandra -y
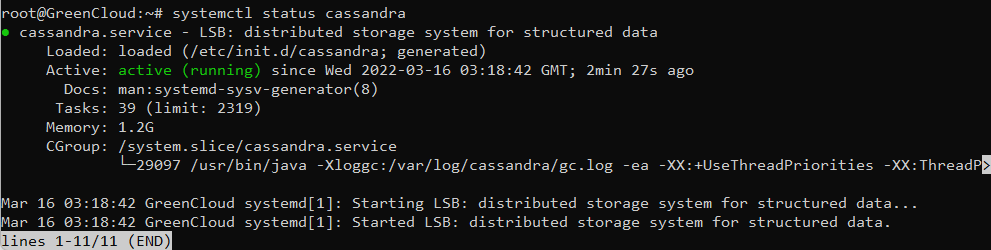
Once the Cassandra has been installed, verify the status of the Cassandra with the following command:
systemctl status cassandra
You should get the following output:
You can also verify the Cassandra using the nodetool command-line utility:
nodetool status
You should get the following output:

Step 4: Configure Apache Cassandra
By default, Apache Cassandra is configured to listen on localhost. You don’t need to configure Cassandra if your client and database is on the same host.
Cassandra also provides a cqlsh command-line tool to interact with Cassandra. You can launch it with the following command:
cqlsh
You should get the following output:

Step 5: Change Cassandra Cluster Name
By default, the Cassandra cluster name is set to “Test Cluster”. You can change it using the the cqlsh utility:
cqlsh
Once connected, run the following command to change the cluster name, in this case, we are setting the cluster name to ‘Green Cloud‘
cqlsh> UPDATE system.local SET cluster_name = 'Green Cloud' WHERE KEY = 'local';
Next, exit from the cqlsh shell with the following command:
cqlsh> exit
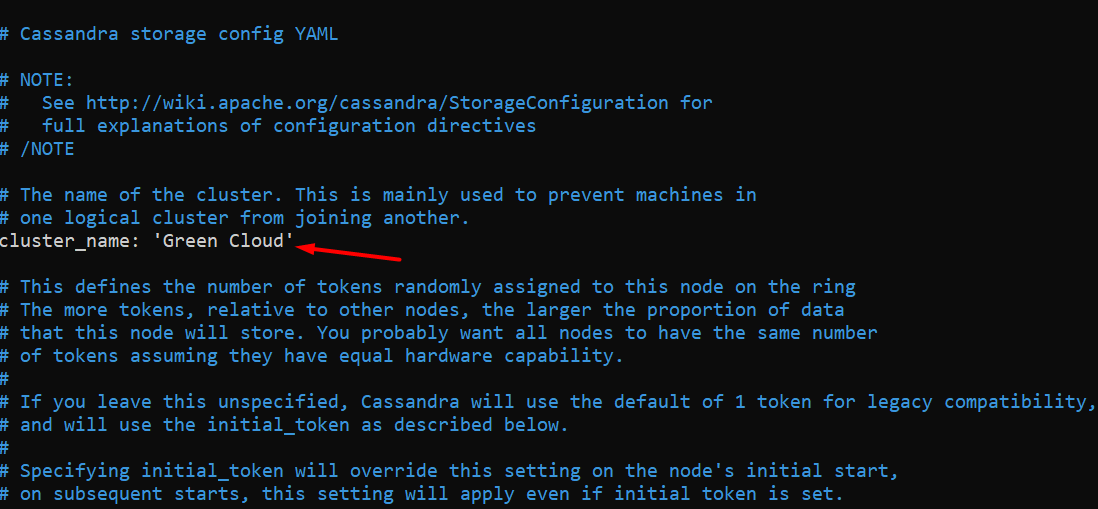
Next, you will also need to define your new cluster name in cassandra.yaml file:
nano /etc/cassandra/cassandra.yaml
Change the following line:
cluster_name: 'Green Cloud'
Save and close the file then clear the system cache with the following command:
nodetool flush system
Next, restart the Cassandra service to apply the changes:
systemctl restart cassandra
Next, verify your new cluster name with the following command:
cqlsh
You should see your new cluster name in the following output:

And that concludes the topic on the installation of Apache Cassandra on Ubuntu 20.04. Good luck !

