How to Install Let’s Encrypt SSL Certificate to Secure Apache on CentOS 7
Introduction
Let’s Encrypt is a Certificate Authority (CA) that provides free certificates for transport Layer Security (TLS) encryption, thereby enabling encrypted HTTPS on web servers. It simplifies the process of creation, validation, signing, installation, and renewal of certificates by providing a software client that automates most of the steps—Certbot.
In this tutorial, you will use Certbot to set up a TLS/SSL certificate from Let’s Encrypt on a CentOS 7 server running Apache as a web server.
Prerequisites
- A DNS A Record that points your domain to the public IP address of your VPS.
- Apache installed on the CentOS 7 server with a virtual host configured. You can learn how to set this up by following our tutorial How To Install the Apache Web Server on CentOS 7.
1. Installing the Certbot Let’s Encrypt Client
To use Let’s Encrypt to obtain an SSL certificate, you first need to install Certbot and mod_ssl, an Apache module that provides support for SSL v3 encryption.
The certbot package is not available through the package manager by default. You must enable Epel repositories with the following command.
yum install epel-releaseNow that you have access to the repository, install all of the required packages:
yum install certbot python2-certbot-apache mod_sslDuring the installation process you will be asked about importing a GPG key. This key will verify the authenticity of the package you are installing. To allow the installation to finish, accept the GPG key by typing y and pressing ENTER when prompted to do so.
With these services installed, you’re now ready to run Certbot and fetch your certificates.
2. Obtaining a Certificate
Using the certbot Let’s Encrypt client to generate the SSL Certificate for Apache automates many of the steps in the process. The client will automatically obtain and install a new SSL certificate that is valid for the domains you provide as parameters.
To execute the interactive installation and obtain a certificate that covers only a single domain, run the certbot command with:
certbot --apache -d your_domainThis runs certbot with the --apache plugin and specifies the domain to configure the certificate for with the -d flag.
If you want to install a single certificate that is valid for multiple domains or subdomains, you can pass them as additional parameters to the command, tagging each new domain or subdomain with the -d flag. The first domain name in the list of parameters will be the base domain used by Let’s Encrypt to create the certificate. For this reason, pass the base domain name as first in the list, followed by any additional subdomains or aliases:
certbot --apache -d your_domain -d www.your_domainThe certbot utility can also prompt you for domain information during the certificate request procedure. To use this functionality, call certbot without any domains:
certbot --apacheThe program will present you with a step-by-step guide to customize your certificate options. It will ask you to provide an email address for lost key recovery and notices, and then prompt you to agree to the terms of service. If you did not specify your domains on the command line, you will be prompted for that as well. If your Virtual Host files do not specify the domain they serve explicitly using the ServerName directive, you will be asked to choose the virtual host file. In most cases, the default ssl.conf file will work.
When the installation is successfully finished, you will see a message similar to this:
IMPORTANT NOTES:
- Congratulations! Your certificate and chain have been saved at:
/etc/letsencrypt/live/your_domain/fullchain.pem
Your key file has been saved at:
/etc/letsencrypt/live/your_domain/privkey.pem
Your certificate will expire on 2021-12-13. To obtain a new or
tweaked version of this certificate in the future, simply run
certbot again with the "certonly" option. To non-interactively
renew *all* of your certificates, run "certbot renew"
- If you like Certbot, please consider supporting our work by:

Donating to ISRG / Let's Encrypt: https://letsencrypt.org/donate
Donating to EFF: https://eff.org/donate-le
The generated certificate files will be available within a subdirectory named after your base domain in the /etc/letsencrypt/live directory.
3. Checking your Certificate Status
In order to test the straightness of your domain SSL/TLS handshake visit the below link and test your certificate on your domain.
https://www.ssllabs.com/ssltest/analyze.html?d=your_domainReplacing your_domain with your base domain:
You will land on a page that immediately begins testing the SSL connection to your server:
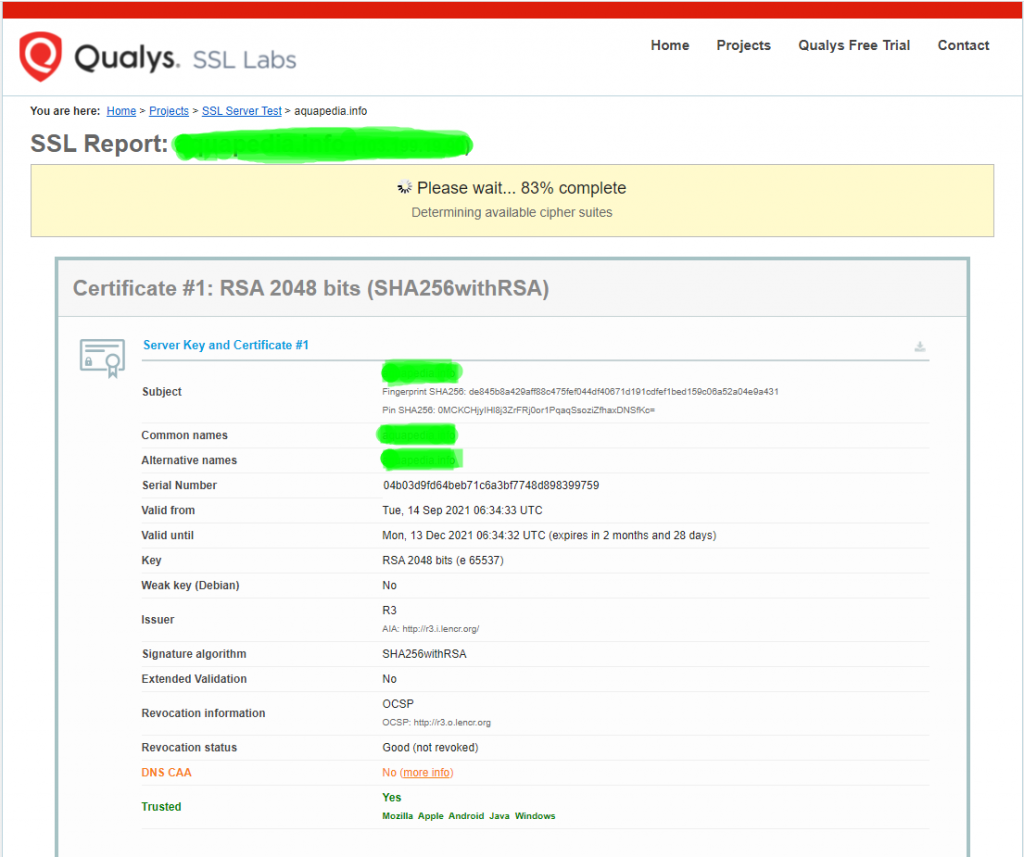
Once the test starts running, it may take a few minutes to complete. The status of the test will update in your browser.
When the testing finishes, the page will display a letter grade that rates the security and quality of your server’s configuration. At the time of this writing, default settings will give an A rating:
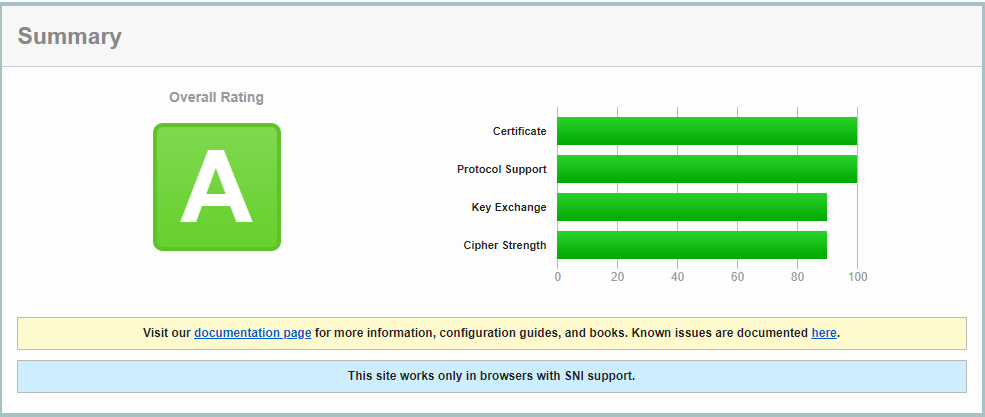
Try reloading your website using https:// and notice your browser’s security indicator. It will now indicate that the site is properly secured, usually with a green lock icon.
With your SSL certificate up and verified, the next step is to set up auto-renewal for your certificate to keep your certificate valid.
4. Setting Up Auto Renewal
Let’s Encrypt certificates are valid for 90 days, but it’s recommended that you renew the certificates every 60 days to allow a margin of error. Because of this, it is a best practice to automate this process to periodically check and renew the certificate.
First, let’s examine the command that you will use to renew the certificate. The certbot Let’s Encrypt client has a renew command that automatically checks the currently installed certificates and tries to renew them if they are less than 30 days away from the expiration date. By using the --dry-run option, you can run a simulation of this task to test how renew works:
certbot renew --dry-runThe output should look similar to this:
Saving debug log to /var/log/letsencrypt/letsencrypt.log

- - - - - - - - - - - - - - - - - - - - - - - - - - - - - - - - - - - - - - - -
Processing /etc/letsencrypt/renewal/aquapedia.info.conf
- - - - - - - - - - - - - - - - - - - - - - - - - - - - - - - - - - - - - - - -
Cert not due for renewal, but simulating renewal for dry run
Plugins selected: Authenticator apache, Installer apache
Starting new HTTPS connection (1): acme-staging-v02.api.letsencrypt.org
Account registered.
Simulating renewal of an existing certificate for aquapedia.info
Performing the following challenges:
http-01 challenge for aquapedia.info
Waiting for verification...
Cleaning up challenges

- - - - - - - - - - - - - - - - - - - - - - - - - - - - - - - - - - - - - - - -
new certificate deployed with reload of apache server; fullchain is
/etc/letsencrypt/live/aquapedia.info/fullchain.pem
- - - - - - - - - - - - - - - - - - - - - - - - - - - - - - - - - - - - - - - -

- - - - - - - - - - - - - - - - - - - - - - - - - - - - - - - - - - - - - - - -
Congratulations, all simulated renewals succeeded:
/etc/letsencrypt/live/aquapedia.info/fullchain.pem (success)
- - - - - - - - - - - - - - - - - - - - - - - - - - - - - - - - - - - - - - - -
Notice that if you created a bundled certificate with multiple domains, only the base domain name will be shown in the output, but the renewal will be valid for all domains included in this certificate.
A practical way to ensure your certificates will not get outdated is to create a cron job that will periodically execute the automatic renewal command for you. Since the renewal first checks for the expiration date and only executes the renewal if the certificate is less than 30 days away from expiration, it is safe to create a cron job that runs every week or even every day.
The official Certbot documentation recommends running cron twice per day. This will ensure that, in case Let’s Encrypt initiates a certificate revocation, there will be no more than half a day before Certbot renews your certificate.
Edit the crontab to create a new job that will run the renewal twice per day. To edit the crontab for the root user, run:
crontab -eYour text editor will open the default crontab which is an empty text file at this point. This tutorial will use the vi text editor.
Enter insert mode by pressing i and add in the following line:
0 0,12 * * * python -c 'import random; import time; time.sleep(random.random() * 3600)' && certbot renewWhen you’re finished, press ESC to leave insert mode, then :wq and ENTER to save and exit the file. This will create a new cron job that will execute at noon and midnight every day. Adding an element of randomness to your cron jobs will ensure that hourly jobs do not all happen at the same minute, causing a server spike;python -c 'import random; import time; time.sleep(random.random() * 3600)' will select a random minute within the hour for your renewal tasks.
For more information on how to create and schedule cron jobs, you can check our How to Use Cron to Automate Tasks in a VPS guide. More detailed information about renewal can be found in the Certbot documentation.
That’s all! Enjoy GreenCloudVPS services!

